
Learn how to draw a snowflake the easy way using simple six-fold symmetry. A beginner step-by-step guide to even, six-sided snowflakes, no experience needed.
A snowflake looks delicate and complicated, but every real one is built on one simple secret: six matching sides. In this guide you'll learn how to draw a snowflake the easy way using six-fold symmetry, starting with a tiny star of guide lines and then repeating the same little marks on every arm. That repeated pattern is what turns a few scribbles into a perfect, even snowflake. No experience needed and no fancy supplies. If you can copy one small shape six times, you can draw a snowflake.
We'll keep the guide lines light at first so the snowflake stays balanced, then darken the design at the end. Grab a pencil and let's begin.
What you'll need
- A pencil (any pencil works)
- An eraser
- Plain paper
- Optional: a ruler for straight guide lines, a black or blue pen for outlining, plus light blue and silver for color
How to draw a snowflake step by step
This is the foundation-first method kid-friendly art teachers use: build the six-arm skeleton first, then add matching details. In her snowflake tutorial on Art Projects for Kids, art educator Kathy Barbro starts with a vertical line, then an X over it, making six evenly spaced arms before any decoration. We'll build the same six-fold frame.
Step 1: Draw the first line and a center dot
Make a small dot in the middle of your paper. Through it, draw one light vertical line, the same length above and below the dot. This is your first pair of arms. Keep it light, since it's a guide.
Step 2: Add an X to make six arms
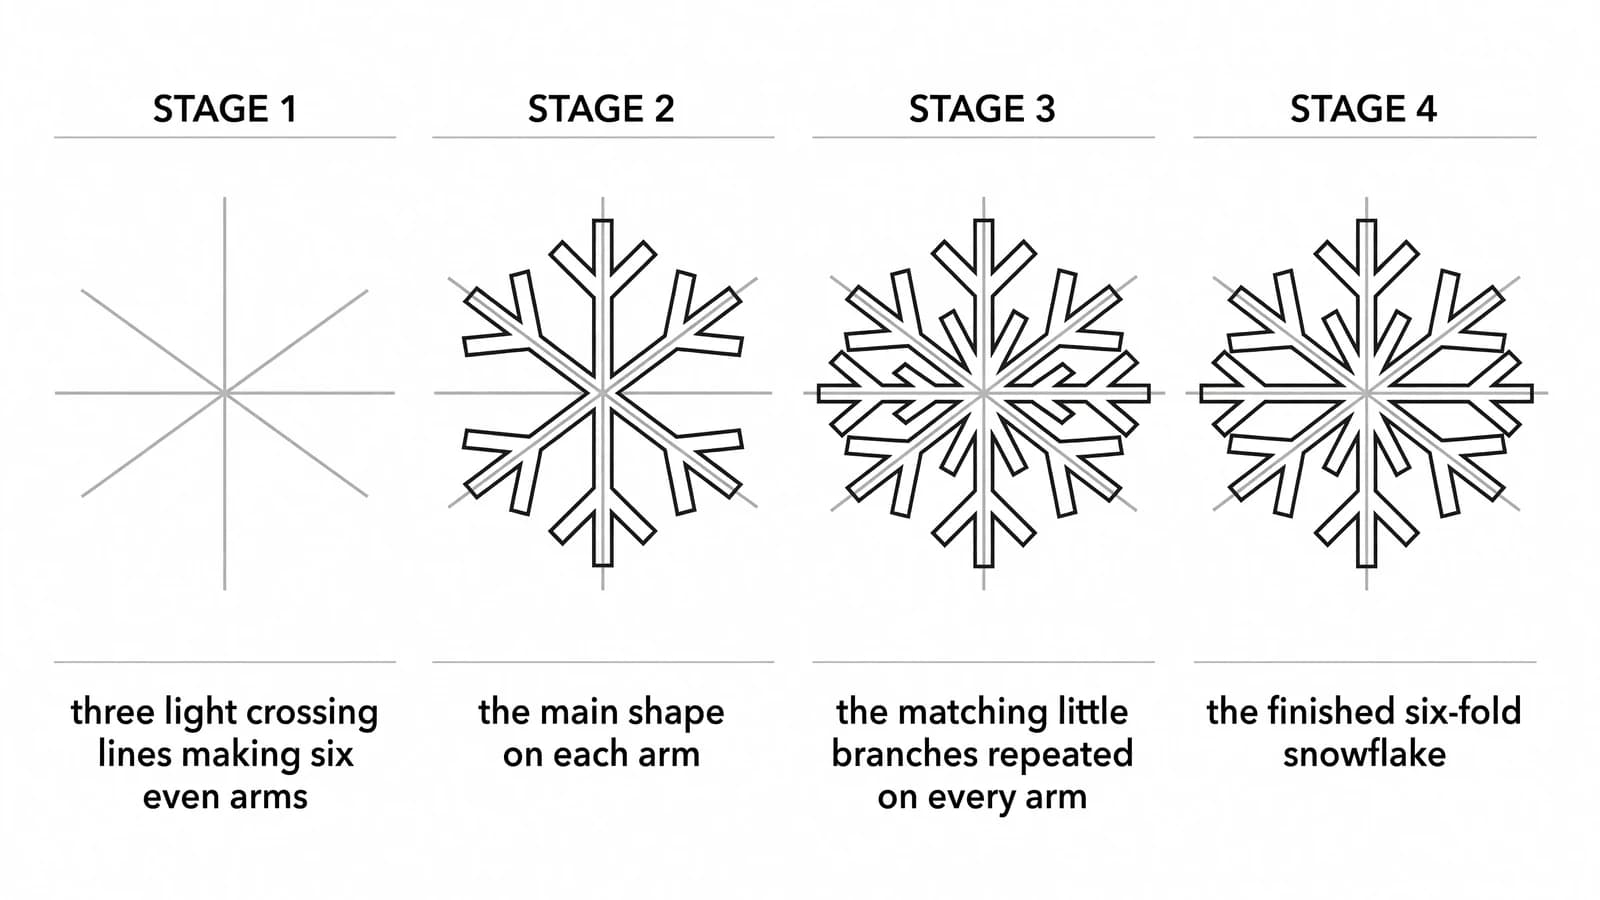
Across the same center dot, draw two more lines that cross like an X, so all together you have three lines meeting in the middle. That gives you six arms spaced evenly around the center, like the spokes of a wheel. Try to keep the gaps between the spokes even. This six-arm star is the whole foundation. Silk + Sonder's doodle guide says the same thing: the most important step is the basic snowflake shape, made from six intersecting lines, before any embellishment.
Step 3: Design one arm
Now decorate just one arm. Near the tip, add a little "V" or arrowhead pointing outward. Partway down, add two short branches angling off each side, like a tiny tree or a fork. Keep it simple, three or four marks at most. Whatever you design here, you'll copy onto the other five arms.
Step 4: Repeat the exact same pattern on every arm
Copy your one arm's design onto each of the other five arms, matching the marks as closely as you can: the same V at every tip, the same branches at the same spot. This matching is the secret to a snowflake that looks right. Easy snowflake lessons stress that every arm should get the same marks for the shape to stay symmetrical, so go slowly and repeat carefully.
Step 5: Add a center detail
Where all six arms meet, add a small shape to anchor the middle, like a little hexagon, a small circle, or a six-pointed star made of short lines. This tidies up the busy center where the spokes cross.
Step 6: Add matching extras
If you want more sparkle, add small dots at the tips of the arms or tiny diamond shapes along them, but remember the rule: whatever you add, add it to all six arms the same way. Even decoration keeps the snowflake balanced.
Step 7: Darken your design and color it in
Once you're happy, trace over the snowflake with a firmer stroke or a pen, then gently erase any leftover guide lines you don't want to keep. Snowflakes look great as plain white line art on blue paper, or you can color them light blue and silver. Scatter a few small dots around for falling snow.
What artists recommend (and common mistakes)
A few simple rules make a snowflake look real and even. Here is what art teachers say:
- Start with light guide lines. Kathy Barbro on Art Projects for Kids starts with a vertical line and an X and stresses that "the length and spacing needs to be the same." Light construction lines let you space the six arms evenly before committing to any detail.
- Build the six-arm structure before any details. Kathy Barbro on Art Projects for Kids draws the vertical line, the X, and six evenly spaced arms before adding diamonds and V-shapes. The skeleton comes first; decoration comes second.
- Keep every arm the same. Silk + Sonder calls the basic six-line shape the most important step. Design one arm, then repeat the exact same marks on all six so the snowflake stays symmetrical.
- The common mistake: forgetting the six sides. Many beginners draw a 4-point or 8-point shape by accident. Real snowflakes have six sides, so count your arms before you start decorating: three crossing lines make six, and that six-fold symmetry is what makes it look like a true snowflake.
Fun variations to try
- Lacy snowflake: add lots of tiny branches and dots to each arm for a delicate, frosty look.
- Bold snowflake: keep just a few thick shapes per arm for a simple, graphic design that's quick to repeat.
- Star snowflake: end each arm in a clear point so the whole thing reads like a six-pointed star.
- Whole snowstorm: fill a page with snowflakes of different sizes and designs, no two exactly alike, just like real snow.
- Window scene: draw a few snowflakes inside a window frame with a cozy curtain on each side.
Frequently asked questions
How many sides does a snowflake have? Real snowflakes have six sides, or six arms, because of the way water freezes into ice crystals. Drawing three lines that cross at the center gives you the six even arms you need for a believable snowflake.
How do you draw a snowflake with six points? Make a center dot, draw a vertical line through it, then add two more lines crossing like an X. That makes six evenly spaced arms. Design one arm with a few small marks, then copy the exact same marks onto the other five.
Why does my snowflake look uneven? Usually the arms aren't spaced evenly, or each arm has different marks. Space the three crossing lines so the six gaps are equal, then repeat the identical design on every arm. Matching arms are what make a snowflake look symmetrical.
Keep drawing and coloring
That's it, you can draw an even, six-sided snowflake. Fill a winter sky with more Christmas drawing ideas like trees and ornaments, then learn how to draw a star for the night above and how to draw Christmas things for a whole festive scene. When you want a break, print our free cozy coloring pages and color away. Stay warm and keep drawing.