
Learn how to draw a star the easy way, including a clean 5-point star in one stroke and a bright starburst. A beginner step-by-step, no experience needed.
A perfect five-point star feels like magic, but it's really just five straight lines drawn in the right order. In this guide you'll learn how to draw a star the easy way, including how to make a clean five-point star in one smooth stroke without lifting your pencil. No experience needed, and no special supplies. If you can draw a straight-ish line, you can draw a star.
We'll start with the famous one-stroke trick, then show you the guide-circle method for a really neat star, and finish with a bright starburst. Keep your lines light at first so they're easy to fix. Grab a pencil and let's begin.
What you'll need
- A pencil (any pencil works)
- An eraser
- Plain paper
- Optional: a ruler for super-straight lines, a black pen for outlining, plus crayons or markers
How to draw a star step by step
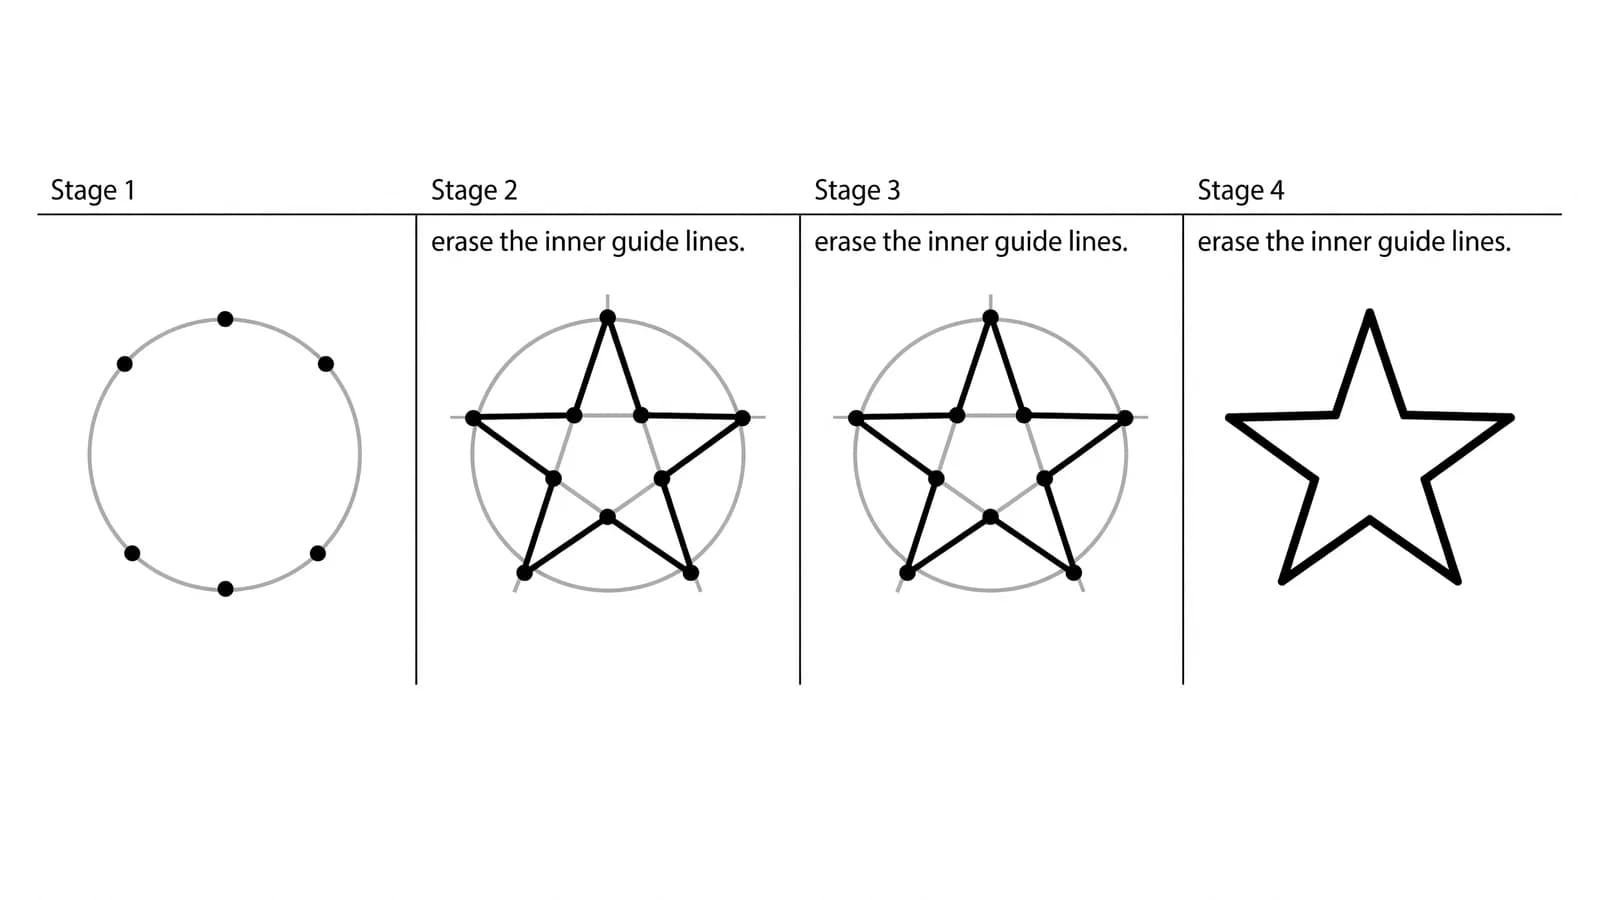
This is the foundation-first way teachers block in a star: place light guides, then connect them in order, then clean up. The Skillshare drawing guide recommends starting your five-point star by lightly drawing a circle and placing five dots before drawing the final lines, so you can erase the construction later. We'll cover both that neat method and the quick one-stroke trick.
Step 1: Draw a light guide circle
Draw a soft circle, pressing very lightly. A perfect circle isn't needed. This is just a fence to keep all five star points the same distance from the center, which is the secret to a star that looks even.
Step 2: Place five dots around the circle
Put one dot at the top of the circle. Then space four more dots evenly around the edge, like the numbers on a clock at roughly 12, a little past 2, near 5, near 7, and a little before 10. Try to keep the gaps even. These five dots are your star points.
Step 3: Draw the first two lines
Start at the top dot. Draw a straight line down to the lower-right dot (the one near 5 o'clock). Then, without much fuss, draw from there up and across to the upper-left dot (near 10 o'clock). You've made the first wide "V" sideways. Keep these lines light.
Step 4: Cross to the other side
From the upper-left dot, draw a straight line across to the upper-right dot (near 2 o'clock). Two lines will now cross in the middle, and that's exactly right. The crossing lines are what make a star instead of a pentagon.
Step 5: Close the star
From the upper-right dot, draw down to the lower-left dot (near 7 o'clock). Then draw your final line from the lower-left dot back up to the top dot where you started. All five points are now connected, and a clean five-point star appears inside your circle.
Step 6: Erase the guides and inner lines
Erase the guide circle and the crisscross lines inside the star, leaving just the outer star shape. The Skillshare tutorial gives this same advice: after connecting the points, erase the inner guidelines and then go over the outer star edges with a darker pencil or pen to sharpen the shape.
Step 7: Darken the outline and color it in
Trace the final star outline with a firmer stroke or a black pen. Then color it in. Classic yellow looks like a storybook star, but try gold, pink, or rainbow points too. Add a few small dots around it for a sparkly night-sky feel.
The one-stroke star (no lifting your pencil)
Once you know the dot order, you can draw a star without lifting your pencil at all. Start at the top point and go: down to the lower right, up and across to the upper left, straight across to the upper right, down to the lower left, then back up to the top. Five lines, one smooth motion. Say it out loud a few times and your hand will memorize the path.
What artists recommend (and common mistakes)
The biggest tip from drawing teachers is to keep your first lines feather-light so the star is easy to fix. Here is what that looks like in practice:
- Use light guidelines first. Skillshare has beginners lightly draw a circle or pentagon and place five dots before any final lines go down. The guide keeps every point the same length so the star doesn't lean.
- Draw lightly, then darken what you keep. Art educator and author Bert Dodson, in Keys to Drawing, tells beginners to draw lightly at first and then selectively darken the lines they want to keep, so mistakes are easy to adjust.
- Avoid the most common mistake: pressing too hard too soon. Skillshare warns beginners to use a light amount of pressure "so that you can easily go over the lines you like and erase the ones you don't." Heavy dark lines from the start make corrections messy and the star harder to fix.
- Build the final shape from light lines. Illustrator Andrew Loomis, in his classic Fun With a Pencil, tells beginners to start with a simple "form," then "build your final lines in by selecting, eliminating the lines you do not use." That is exactly the dots-then-connect method: lay down the guide, then keep only the five lines you need.
And from Victorian drawing teacher John Ruskin in his classic The Elements of Drawing: "the best answerer of questions is perseverance; and the best drawing-masters are the woods and hills." A page of quick little stars will train your hand faster than one careful big one.
Fun variations to try
- A starburst: Draw a small circle, then shoot lots of thin pointed triangles out from it in every direction, alternating long and short rays for a sparkle.
- A six-point star: Draw one triangle, then a second upside-down triangle over it, and erase the inside lines for a Star of David shape.
- A shooting star: Draw a five-point star with a curving, tapering tail trailing behind it.
- A whole night sky: Fill a page with stars of different sizes, plus a crescent moon in the corner.
Frequently asked questions
How do you draw a perfect 5-point star? Lightly draw a circle, place five evenly spaced dots around it, then connect the dots in a crisscross order: top to lower-right, up to upper-left, across to upper-right, down to lower-left, and back to the top. Erase the circle and you have an even star.
How do you draw a star in one stroke? Start at the top point and draw five connected lines without lifting your pencil: down to the lower right, up to the upper left, across to the upper right, down to the lower left, then back up to the top. The lines cross in the middle to form the star.
Why does my star look lopsided? Usually the five points aren't spaced evenly. Drawing a light guide circle first and placing the dots an equal distance apart fixes this almost every time.
Keep drawing and coloring
Now that you can draw a star, fill the sky. Browse our aesthetic drawing ideas for more doodles like moons and clouds, learn how to draw a butterfly to flutter through your scene, or try how to draw a rose next. When you want a break, print our free nature coloring pages and color away. You've got this.