
Learn how to draw Christmas things the easy way, from a cozy tree to a wrapped gift and a round ornament. A beginner step-by-step guide, no experience needed.
Christmas is the most fun time of year to fill a page with drawings, and the good news is that the most festive things are also the simplest shapes. In this guide you'll learn how to draw Christmas things one calm step at a time: a leafy green tree, a wrapped gift, and a shiny round ornament that together make a cozy little holiday scene. These are easy Christmas drawings anyone can make. No experience needed and no fancy supplies. If you can draw a triangle, a square, and a circle, you already have everything you need.
We'll build each object from light guide shapes first, then add the fun details and color at the end. Keep your lines feather-light at the start so mistakes are easy to fix. Grab a pencil and let's begin.
What you'll need
- A pencil (any pencil works)
- An eraser
- Plain paper
- Optional: a ruler for the gift box edges, a black pen for outlining, plus crayons, markers, or colored pencils in classic red, green, and gold
How to draw Christmas things step by step
This is the foundation-first way illustrators build a holiday scene: rough in the big shapes first, then refine. In its step-by-step Christmas tree and presents tutorial, Xencelabs blocks in the basic shape of the tree, then draws a few present boxes below as simple shapes, and only refines the ornaments and decorations afterward. We'll do the same with our three little objects.
Step 1: Block in three light shapes
Decide where each object will sit. Lightly draw a tall, skinny triangle for the Christmas tree on one side, a square or short box shape for the gift in the middle, and a circle for the ornament on the other side. Press lightly. These are just placeholders so nothing overlaps in a messy way.
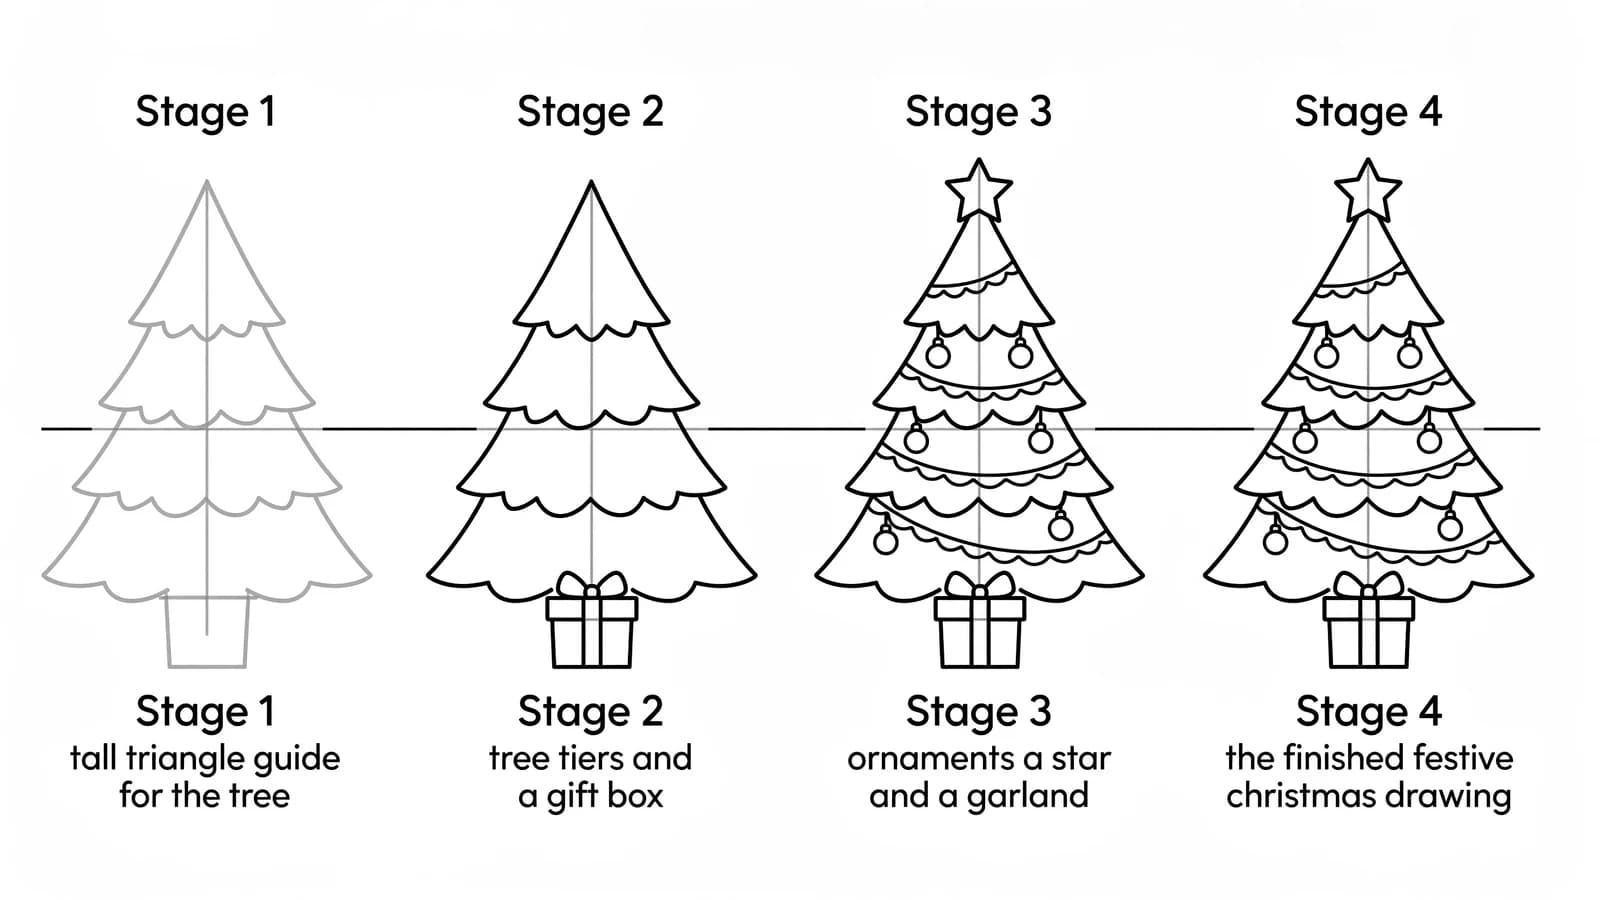
Step 2: Shape the Christmas tree
Turn the triangle into a tree by drawing the side edges as gentle stair-step zigzags instead of straight lines, like three or four stacked tiers of branches getting wider as they go down. Add a small rectangle at the bottom for the trunk. A wide tree feels friendly, so don't be afraid to make the bottom tier nice and broad.
Step 3: Turn the box into a wrapped gift
Make your gift box look three-dimensional. Draw the front as a square, then add a short slanted top and one slanted side so it looks like a real box you could pick up. Keep the lines light. We'll add the ribbon next.
Step 4: Add the ribbon and bow
Draw a vertical ribbon line down the center of the gift's front and a matching one across the top, like the box is tied with a cross of ribbon. On top, add a bow: two little loops side by side with a small knot in the middle and two short ribbon tails hanging down. This is the detail that makes a plain box read as a present.
Step 5: Finish the ornament
Inside your circle, add a small rectangle at the top for the metal cap, and a tiny loop above that for the hanger. You can leave the ornament plain and round, or draw a swooping stripe or a few dots across it for a decorated look. A short curved line near one edge makes a nice shine mark.
Step 6: Decorate the tree
Add a star or a small five-point shape at the very top of the tree. Then sprinkle little circles around the branches for ornaments and a wavy zigzag line draped across the tiers for a garland. Keep the decorations a little uneven and scattered, which looks more natural than a perfect grid.
Step 7: Darken the lines you love and color it in
Trace the outlines you want to keep with a firmer stroke or a black pen, then erase any leftover guide shapes. Color the tree green, the gift in a bright red or blue with gold ribbon, and the ornament in any shiny color you like. Add a few dots in the background for falling snow, and your little Christmas scene is done.
What artists recommend (and common mistakes)
A few simple habits make a holiday drawing look planned instead of crowded. Here is what art teachers suggest:
- Rough in the big shapes before any detail. The Xencelabs Christmas tree tutorial blocks in the basic tree silhouette and simple present boxes first, then adds ornaments and decorative lines afterward. Blocking the shapes early stops your objects from bumping into each other.
- Pick a small, limited color scheme. Elementary art teacher Trista Faye, in her Christmas art ideas, has students choose just three colors that complement each other for a holiday drawing. A limited palette keeps the page harmonious and is far easier to manage than reaching for every crayon.
- Keep your first lines light. Draw the guide shapes softly so you can adjust the tree's width or the gift's angle before you commit. Heavy dark lines from the start make corrections messy.
- The common mistake: starting with the tiny details. It is tempting to draw the bow or the ornaments first, but that leaves the big shapes lopsided. Block in the tree, gift, and ornament shapes first, then add decorations last, so the whole scene stays balanced.
Fun variations to try
- A jolly Santa: draw a circle for the head, a triangle hat with a fluffy pom-pom, a big round belly, and a curly white beard.
- A cheerful snowman: stack three circles, add a carrot nose, coal buttons, stick arms, and a striped scarf.
- A candy cane: draw a tall "J" shape with two lines, then fill the gap with slanted red stripes.
- A wreath: draw two circles, one inside the other, then fill the ring with little leaf shapes and a red bow at the bottom.
- A whole holiday card: line up a row of trees and gifts along the bottom, add snow dots, and write a message above.
Frequently asked questions
What are easy Christmas things to draw for beginners? A Christmas tree, a wrapped gift, a round ornament, a candy cane, and a snowman are the easiest. Each one starts from a single simple shape, a triangle, a box, or a circle, so they are perfect first holiday drawings.
How do you draw a simple Christmas tree? Draw a tall triangle, then redraw its sides as gentle zigzag tiers so it looks like stacked branches. Add a small rectangle trunk at the bottom and a star on top. Decorate with little circles for ornaments and a wavy garland line.
What colors should I use for Christmas drawings? Classic red, green, and gold read as Christmas instantly. Pick just three colors that look good together rather than using every color, which keeps the drawing tidy and festive.
Keep drawing and coloring
That's it, you can draw a whole festive scene. Keep the holiday spirit going with more Christmas drawing ideas for snowmen, candy canes, and cards, then learn how to draw a snowflake to fill in the sky and how to draw a star for the top of your tree. When you want a break, print our free cozy coloring pages and color away. Happy holidays and happy drawing.