
Learn how to draw a skull the easy way, from a simple oval and center line to eye sockets, teeth, and jaw. A beginner-friendly, step-by-step guide, no experience needed.
A skull seems tricky, but it hides behind two friendly guides: a rounded shape for the head and a center line to keep both sides matching. Once those are down, the eye sockets and teeth line up almost by themselves. In this guide you'll learn how to draw a skull step by step from the front view, the easy way, building from a simple oval to the hollow eyes, nose hole, and grinning teeth. No experience needed, so let's draw a skull that actually looks like one.
Keep your guide lines light. Symmetry is the whole game here, so the center line is your best friend.
What you'll need
- A pencil and an eraser
- Plain paper
- Optional: a black pen for outlining, plus a gray pencil or markers for shading
How to draw a skull step by step
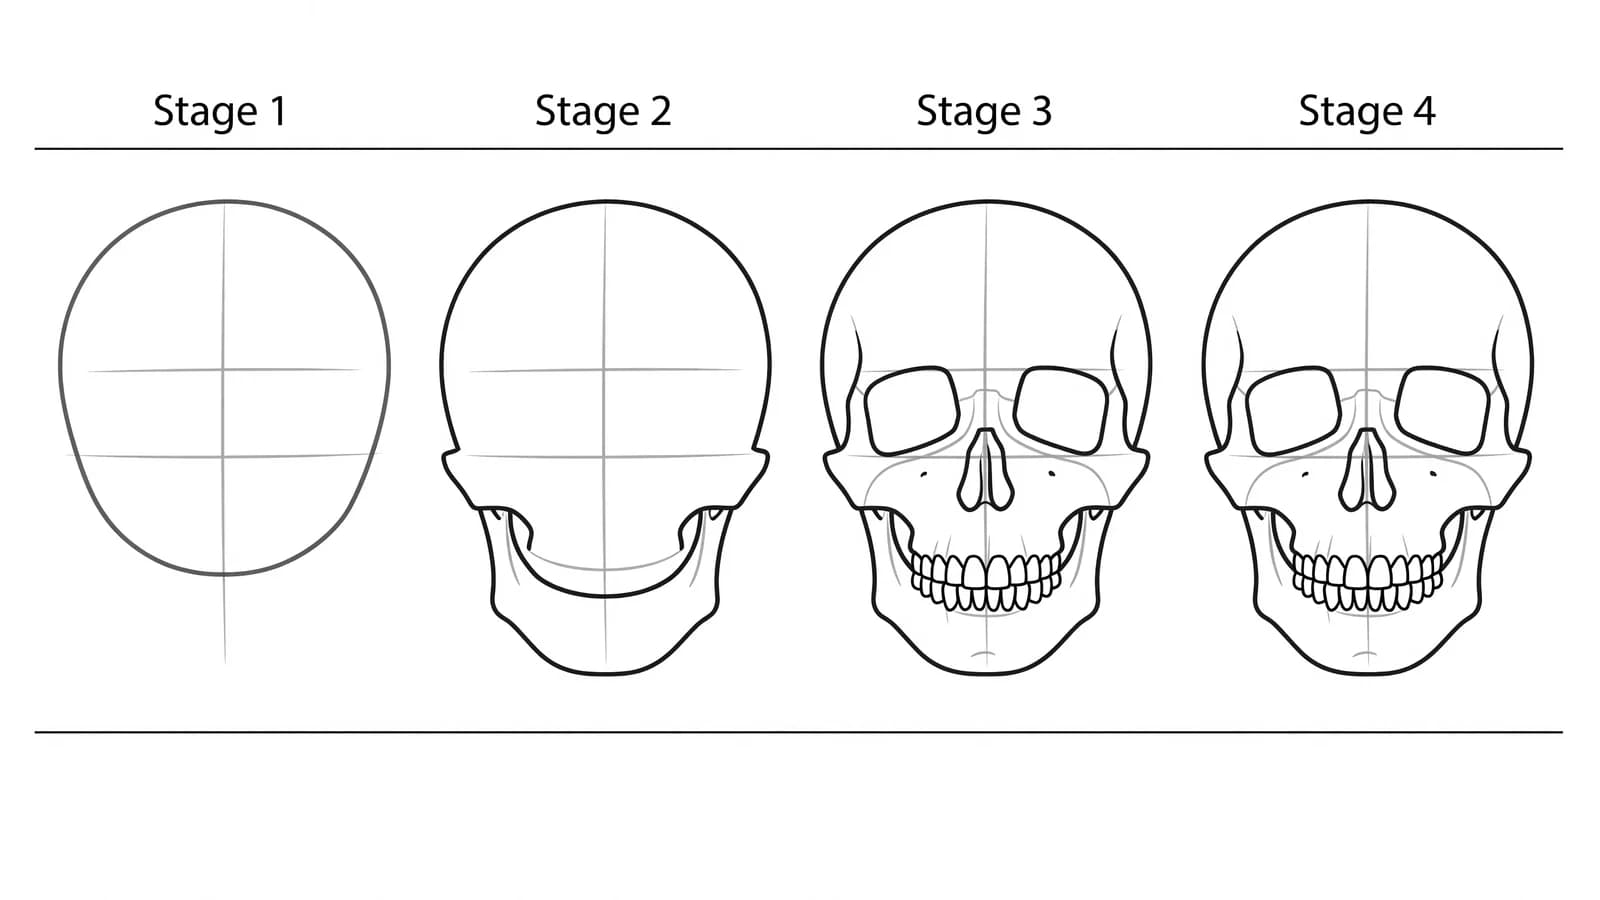
Adobe's skull tutorial lays out a clear, foundation-first method: start with "a wide oval" for the cranium, then add a center line and horizontal placement lines so the features stay aligned, placing the eye sockets and nasal cavity by those landmarks instead of guessing (Adobe Creative Cloud). We'll follow that same path for a clean front-view skull.
Step 1: Draw the cranium and center line
Lightly draw a wide oval or circle for the top of the skull (the cranium). Then draw a vertical line straight down the middle. This center line keeps the left and right sides even, which is the secret to a skull that doesn't look lopsided.
Step 2: Add the jaw
Below the oval, draw the cheeks and jaw. From the sides of the cranium, bring two lines down and inward, then round them into a U-shape for the chin. The finished outline looks a little like a lightbulb or an upside-down egg: wide at the top, narrower at the jaw.
Step 3: Mark your guide lines
Across the face, draw a few light horizontal lines: one for where the eye sockets sit, one lower for the bottom of the nose, and one for the line of the teeth. Using these landmarks, instead of eyeballing it, keeps everything aligned. Adobe recommends placing the eye sockets, nasal cavity, cheekbones, and jaw by these guides rather than guessing (Adobe Creative Cloud).
Step 4: Draw the eye sockets
On the eye-line, draw two large sockets, one on each side of the center line. Fine Art Tutorials describes them as two large symmetrical shapes a bit like aviator sunglasses, set either side of that vertical center line (Fine Art Tutorials). They are rounded, a bit like upside-down hearts or rounded squares, and they angle slightly inward at the bottom. Space them about one eye-width apart. Leave them hollow and dark.
Step 5: Add the nose and cheekbones
In the middle, just above the nose-line, draw an upside-down heart or a narrow triangle for the nasal cavity. Then sketch the cheekbones as gentle curves that swoop out from under the eye sockets and back toward the jaw. These give the skull its strong, bony shape.
Step 6: Draw the teeth
Along the teeth-line, draw the row of upper teeth, then the lower teeth on the jaw. A handy tip from Adobe: teeth "are not all uniform," and a reference photo really helps here. Vary the sizes a little, with wider front teeth and smaller ones toward the back, and add light vertical lines between them (Adobe Creative Cloud).
Step 7: Outline, shade, and finish
Trace your final lines with a firmer stroke or a black pen, then erase the guide lines. Shade inside the eye sockets and nose hole to make them look deep and hollow. Add soft gray shadows under the cheekbones and along the jaw to give the skull a rounded, three-dimensional feel.
What artists recommend (and common mistakes)
- Never skip the center line. The biggest beginner mistake is drawing features by eye, which leaves the skull off-kilter and uneven. The vertical center line keeps both sides matching (Adobe Creative Cloud).
- Place by landmarks, not by guessing. Use your horizontal guide lines to set the eyes, nose, and teeth so they sit where bone actually goes (Adobe Creative Cloud).
- Use a reference, especially for teeth. Looking at a real skull or photo makes the teeth and jaw far more believable, since they are not all the same size.
- Make the sockets deep. Shading inside the eyes and nose is what sells the hollow, skeletal look.
Fun variations to try
- A simple skull: Keep it to the rounded outline, two oval eyes, a triangle nose, and a simple row of teeth for a quick, clean icon.
- A skull drawing front view with a smile: Round everything off and add a wide, friendly grin for a cute, cartoon skull.
- A sugar skull: Decorate it with flowers, swirls, and dots around the eyes for a colorful Day of the Dead style.
- A side-view skull: Once the front view feels easy, try the profile to show off the jaw and the back of the cranium.
Frequently asked questions
How do you draw a skull easy? Draw a wide oval for the top, add a center line, then bring the cheeks and jaw down into a U-shaped chin. Add eye sockets, a triangle nose, and a row of teeth along light guide lines. Building on those guides is what makes an easy skull drawing work.
How do you draw a skull front view? Use a vertical center line and a few horizontal lines to keep both sides even. Place two large eye sockets, an upside-down heart for the nose, and the teeth along the bottom. A skull drawing front view is all about symmetry.
Why does my skull look lopsided? You probably drew the features by eye instead of using a center line. Add a vertical line down the middle and match each feature on both sides of it, and the off-kilter look goes away.
Keep drawing and coloring
A skull pairs perfectly with the rest of the bone crew. Draw a skeleton to go with it, try how to draw a dragon for more fantasy, and browse a page of scary things to draw for spooky inspiration. Then print our free fantasy coloring pages to color skulls, dragons, and more. You've got this.