Learn how to draw a dragon the easy way, from simple body shapes to wings, spikes, and a fiery head. A beginner-friendly, step-by-step guide, no experience needed.
A dragon looks like the hardest thing on the page, but it is really just a few simple shapes wearing wings and spikes. Once you block in the body, head, and tail with light circles and curves, the scary part is over. In this guide you'll learn how to draw a dragon step by step, the easy way, building up from basic shapes to a cute dragon with a strong neck, bat-like wings, and a friendly grin. No experience needed, so grab a pencil and let's wake up your dragon.
Keep your lines light at the start. You'll darken the good ones at the end.
What you'll need
- A pencil and an eraser
- Plain paper
- Optional: a black pen for outlining, plus crayons or markers for color
How to draw a dragon step by step
Most beginner dragon lessons agree on one thing: block the whole creature in simple shapes before you draw a single spike. Cartooning Club's step-by-step lesson starts by blocking in the basic shape and composition with a light circle for the head used only as a guide, and the Clip Studio Paint dragon tutorial by artist Lindsey Alvord reminds you that "basic shapes should save you," using circles and lines to build the body first (Cartooning Club; Clip Studio Paint). We'll follow that same foundation-first path.
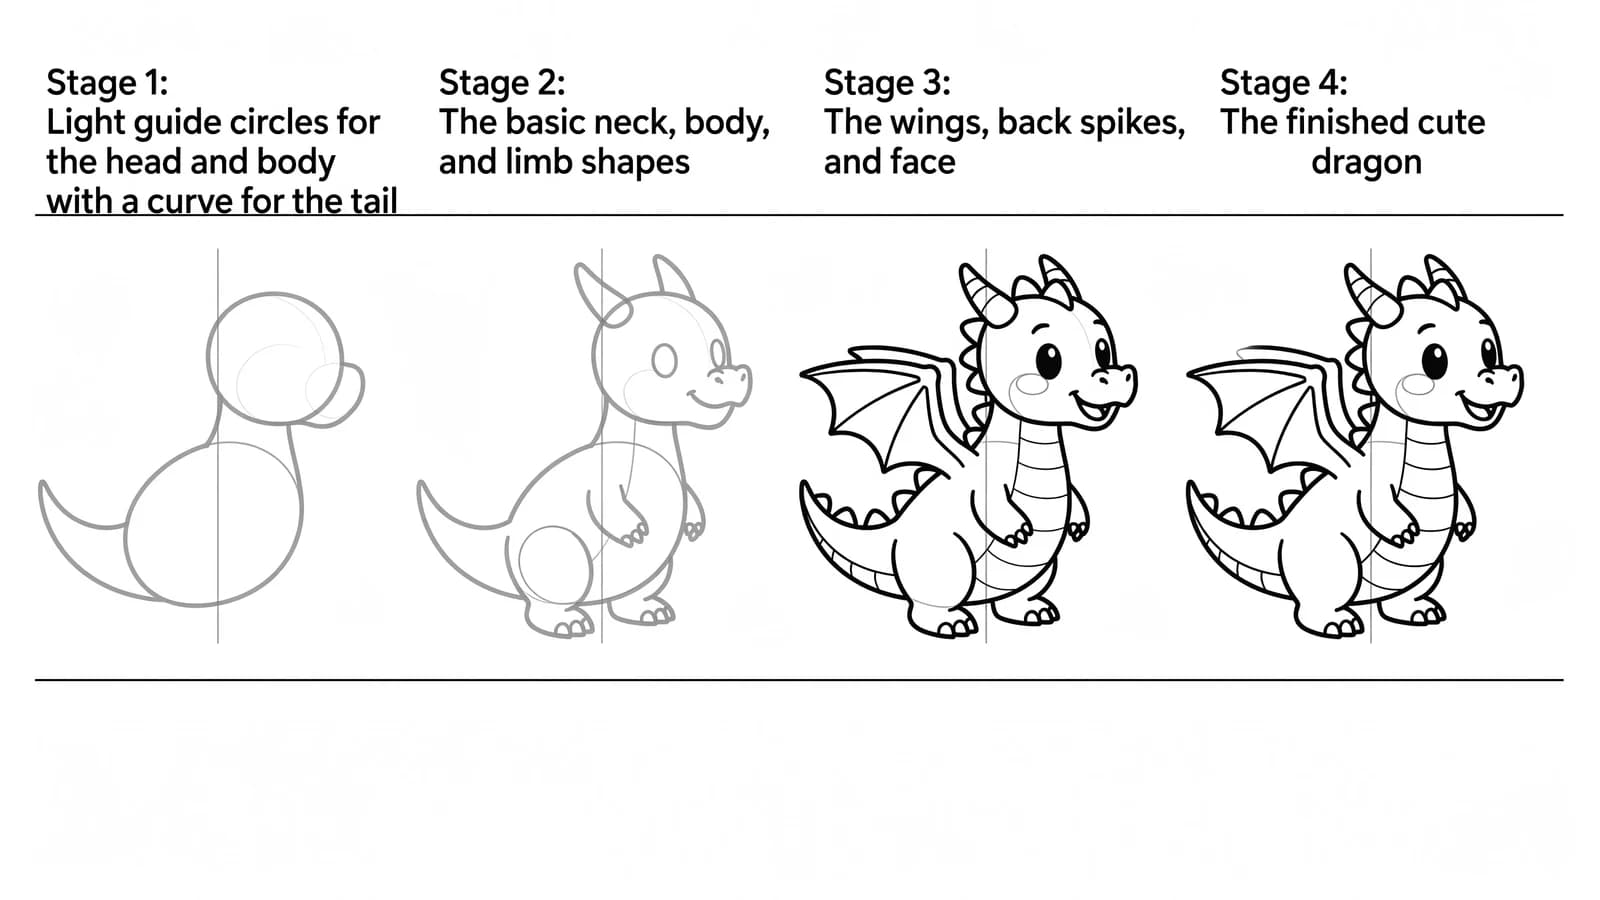
Step 1: Block in the body and head
Lightly draw a large oval for the body, like an egg lying on its side. Then add a circle for the head up and to one side, leaving a gap between them for the neck. These two shapes set how big and how stretched-out your dragon will be. Keep them faint.
Step 2: Connect the neck and tail
Draw two curved lines to join the head circle to the body, making a thick, bendy neck. From the back of the body, sweep one long line outward and let it taper to a point. That's the tail. A dragon's body is basically one flowing S-curve from nose to tail tip.
Step 3: Add the legs
Block in the legs as simple tubes with rounded shapes for the upper part, like little balloons for the muscles. Draw two front legs and two back legs. Tip: real lizards and even house cats make great references for where dragon legs bend. The Clip Studio dragon guide notes the artist "sometimes will reference cats to help make the dragon legs more realistic" (Clip Studio Tips). Add little oval feet with three claws each.
Step 4: Draw the wings
From the high point of the back, draw two long, curved arm bones for the wings, like skinny umbrellas. From each arm bone, add three or four finger lines that fan out. Then connect those fingers with scalloped curves to make the bat-like wing skin. Wings are what turn a lizard into a dragon, so make them big.
Step 5: Shape the head and face
Inside the head circle, draw a snout that comes forward, like a dog's muzzle. Add a curved mouth, a round nostril, and a big friendly eye. Two curved horns sweep back from the top of the head. A couple of small spikes on the cheek give it character.
Step 6: Add spikes and belly lines
Run a row of triangle spikes down the back of the neck, along the spine, and out to the tail tip. On the belly, neck, and tail, draw short curved lines across the body to suggest soft, plated scales. These little ridges make the dragon look armored.
Step 7: Outline and color
Trace the lines you want to keep with a firmer stroke or a black pen, then erase all the light guide shapes. Color your dragon any way you like: classic green, fiery red, or a magical purple. Shade the wings a paler tint and add a tiny flame at the mouth if you want a fire-breather.
What artists recommend (and common mistakes)
- Shapes first, spikes last. The number one beginner mistake is jumping straight to details like scales and teeth before the body shape is right. Both the Cartooning Club and Clip Studio lessons start with loose circles for a reason: a wonky body can't be fixed with fancy spikes (Cartooning Club).
- Use real animals as references. Snakes, bats, and lizards help you place legs, wings, and tails that actually bend the right way (Clip Studio Tips).
- Keep one flowing line. A dragon reads best when the neck, back, and tail form one smooth S-curve instead of stiff, separate parts.
- Don't shrink the wings. Tiny wings look like fins. Make them as wide as the body or wider.
Fun variations to try
- A cute baby dragon: A big round head, huge eyes, stubby legs, and tiny wings make an adorable easy dragon drawing.
- A dragon head drawing: Zoom in on just the head and neck for a bold portrait. Focus on the horns, eye, and a curl of smoke.
- A Chinese dragon: Skip the wings, stretch the body long and snake-like, and add a flowing mane and whiskers.
- A sleeping dragon: Curl the body into a spiral, tuck the wings, and add little "zzz" puffs for a peaceful scene.
Frequently asked questions
How do you draw a dragon easy? Start with an oval body and a circle head, connect them with a curved neck, then add a tail, four legs, and big bat wings. Finish with horns, spikes, and an eye. Building from simple shapes is what makes an easy dragon drawing work.
How do you draw a dragon head? Draw a circle for the skull, then pull a snout forward like a dog's muzzle. Add a curved mouth, a nostril, a big eye, and two horns sweeping back. Spikes along the jaw finish a dragon head drawing.
What shapes do I start a dragon with? Circles and ovals. An oval for the body, a circle for the head, tube shapes for the legs, and long curves for the neck, tail, and wing arms. Detail comes only after these guides look right.
Keep drawing and coloring
Your dragon is ready for a whole fantasy world. Try how to draw a unicorn and how to draw a skull next, browse a page of cool things to draw for more ideas, then print our free fantasy coloring pages to bring dragons, castles, and magic to life in color. You've got this.