Learn how to sketch step by step, from loose construction lines to light and shadow. A beginner-friendly sketching guide that builds real drawing habits.
Learning how to sketch is the doorway to drawing almost anything. A sketch is not a careful finished picture, it is a loose, light search for the right shapes before you commit. In this guide you'll learn how to sketch step by step the way artists actually work: warm up, block in simple shapes, build up from light to dark, then refine. This is a foundation method, not a single object, so the steps below are habits you can reuse on every drawing. No experience needed, so grab a pencil and let's start sketching.
Hold your pencil loosely and keep your early lines feather-light. You'll darken the keepers at the end.
What you'll need
- A pencil (an HB or 2B is perfect) and an eraser
- A sketchbook or any plain paper
- Optional: a second softer pencil for darker shading and a kneaded eraser
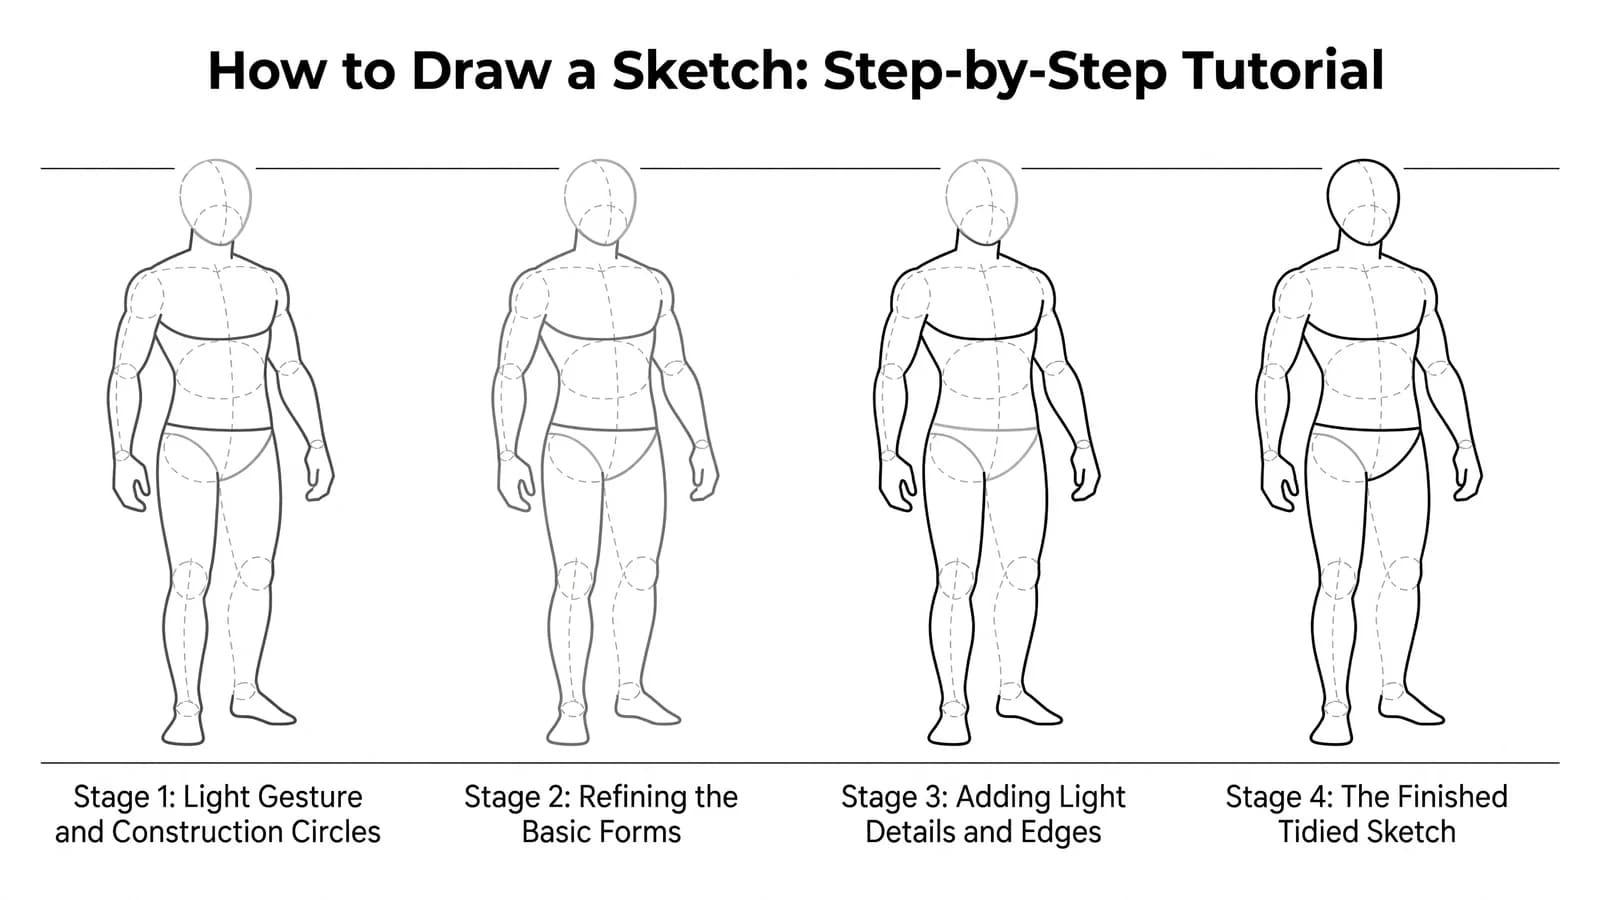
How to sketch step by step
The single most important sketching habit is to draw what you actually see, not the symbol in your head. Art educator Matt Fussell of The Virtual Instructor puts it simply: "Drawing is about seeing," and adds that "learning to draw is actually about learning to see" the real shapes in front of you instead of the version you assume (The Virtual Instructor). We'll lean on that the whole way, working light-to-dark so nothing gets locked in too soon.
Step 1: Warm up your hand
Fill part of a page with loose circles, ovals, straight lines, and gentle curves. Don't aim for perfect, aim for relaxed. This wakes up your hand and reminds you to draw from your arm. Mona Brookes' well-known beginner method starts the same way, gaining control over simple lines and shapes first, then combining them into real objects (Drawing with Children method).
Step 2: Block in big shapes
Look at your subject and squint. Ignore the details and find the largest simple shapes: a circle for a head, a box for a car, a triangle for a tree. Draw these very lightly. These blocks set your proportions and where everything sits on the page.
Step 3: Check proportions and placement
Before adding anything, compare your shapes. Is the head too big? Is one side wider than the other? Hold your pencil up to measure rough sizes against the real subject. Fixing proportion now, while your lines are faint, is far easier than fixing it after you've committed.
Step 4: Draw what you see, not a symbol
Now refine your blocks into the real edges, still lightly. The trick is to keep looking at your subject and copy the actual shapes, values, and angles instead of the cartoon version your brain wants to insert. Fussell teaches breaking a subject down into the simplified shapes you actually see, and it is the habit that separates a stiff sketch from a believable one (The Virtual Instructor).
Step 5: Build up from light to dark
Start shading with light, even pressure, then gradually deepen the darkest areas. Working light-to-dark lets you sneak up on the right value without flattening the drawing with heavy lines too early. Squint again to spot where the deepest shadows really fall.
Step 6: Refine and add detail
Pick out the lines and details that matter most: an eye, a window, a few leaves. You don't need to draw everything. A sketch reads better when a few sharp details sit against looser, suggested areas.
Step 7: Try a timed sketch
To grow fast, sketch the same thing in shrinking time limits, an idea from art teacher Tim Bogatz, who has students draw a subject in fifteen minutes, then five, then two, then one (The Art of Education University). The slow ones build careful seeing, the fast ones build confident, loose lines. Both make you a stronger sketcher.
What artists recommend (and common mistakes)
- Draw what you see, not a symbol. The biggest beginner trap is drawing the idea of an eye or a tree instead of the real shapes in front of you. Keep looking up at your subject (The Virtual Instructor).
- Start with simple shapes. Block in circles, boxes, and triangles before any detail, then combine them (Drawing with Children method).
- Stay light early. Pressing hard from the start locks in mistakes. Build value gradually from light to dark.
- Practice with a timer. Timed sketches train both careful observation and quick, loose lines (The Art of Education University).
Fun variations to try
- Gesture sketches: Spend thirty seconds capturing the pose or flow of a subject with fast, sweeping lines. Great for people and animals.
- Sketchbook fill: Pick one ordinary object, like a mug, and sketch it five times from different angles on one page.
- Value study: Forget outlines and sketch only the light and dark shapes you see. It trains your eyes to read shadow.
- Two-minute everyday objects: Sketch whatever is near you (keys, a shoe, a plant) in two minutes each. Quick reps build real skill fast.
Frequently asked questions
How do I start a sketch as a beginner? Warm up with loose lines, then block in the biggest simple shapes of your subject very lightly. Check your proportions while the lines are still faint, then slowly refine and shade from light to dark. Building from simple shapes is what makes sketching feel possible.
What is the difference between sketching and drawing? A sketch is loose, quick, and exploratory, usually light lines you can change easily. A finished drawing is more careful and complete. Sketching is the planning stage, which is why almost every polished drawing starts as a rough sketch.
Why do my sketches look stiff or wrong? Usually because you're drawing the symbol in your head instead of the real shapes in front of you. Keep glancing back at your subject and copy the actual angles and sizes you see, not what you assume they should be.
Keep drawing and coloring
Sketching is the warm-up for everything else. Once your shapes feel solid, tighten things up with how to draw line art, then put it all together on how to draw a person or a how to draw a landscape. Grab a page of drawing ideas for beginners to practice on, and print our free coloring pages to study how finished shapes are built. You've got this.