Learn how to draw a person the easy way using the classic head-count proportions. A beginner-friendly, step-by-step full body drawing guide from frame to finished figure.
Drawing a whole person can feel overwhelming, but it gets easy when you build the body from a simple frame and a few proportion rules. You don't start with details. You start with big shapes. In this guide you'll learn how to draw a person step by step, using the classic head-count method to keep the body in proportion, then adding the head, limbs, and clothing for a finished figure. We'll cover the full body from head to toe. No experience needed.
We'll draw a standing, front-facing figure, since that's the clearest place to start. Keep your early lines light and loose. Let's begin.
What you'll need
- A pencil and an eraser
- Plain paper
- Optional: a black pen for outlining, plus colored pencils or markers
How to draw a person step by step
Step 1: Set the height with head-counts
Here's the rule that keeps a figure from looking too stubby or too stretched: an adult body is about seven and a half to eight heads tall. Lightly draw a vertical line, then mark it off into equal head-length sections from top to bottom. This "head-count" is the oldest proportion trick in figure drawing, and it does most of the work for you.
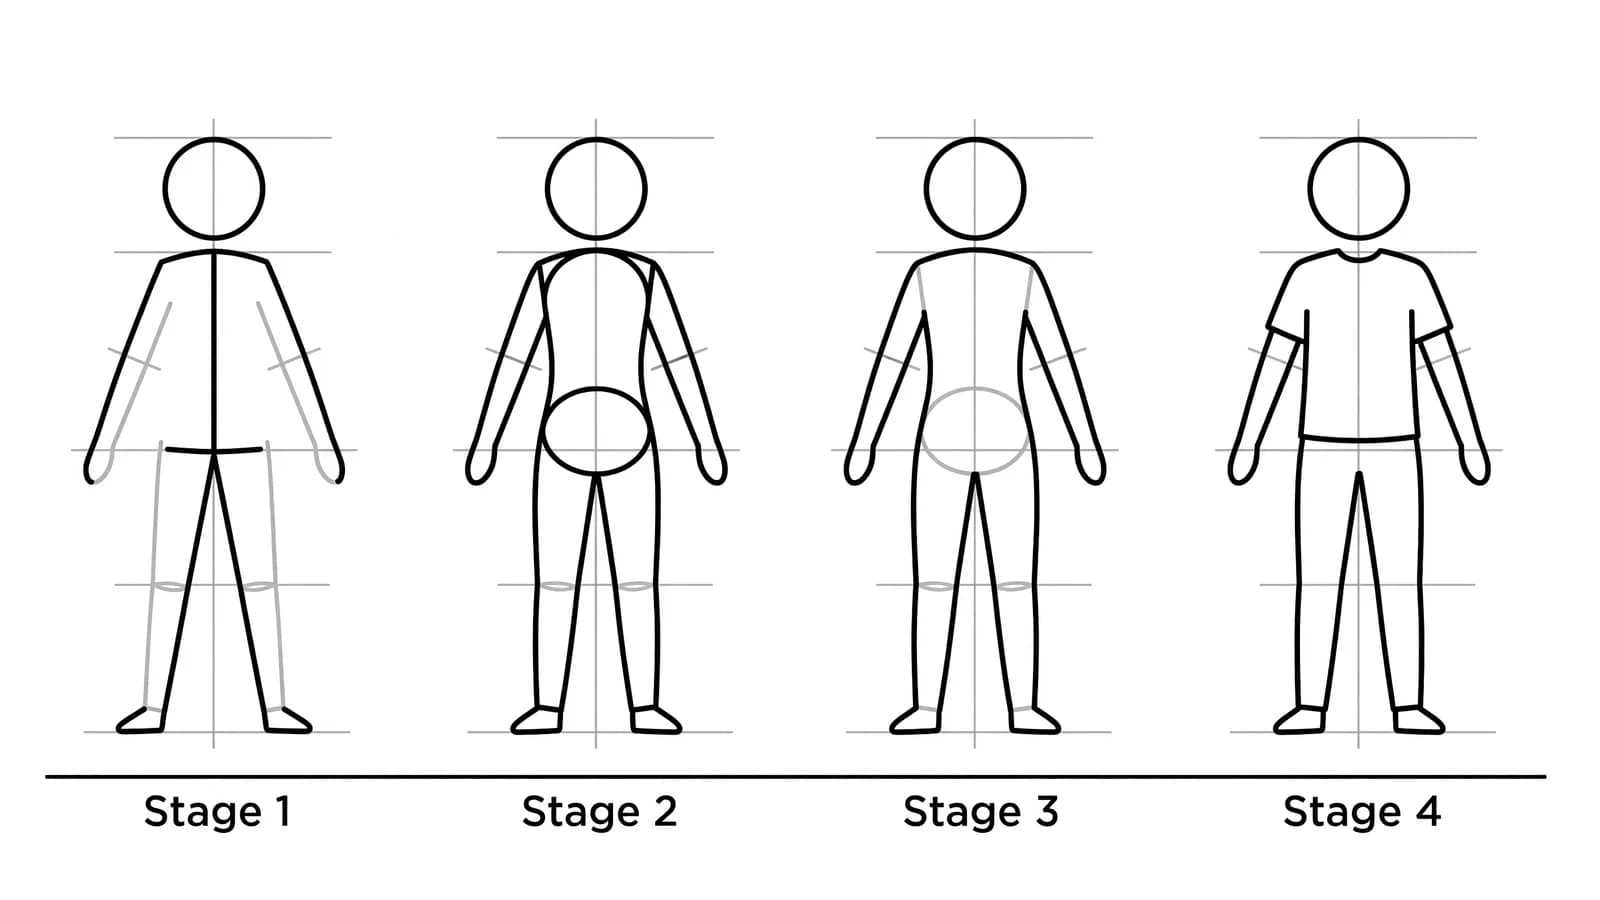
Step 2: Block in the big shapes
Sketch a simple oval for the head in the top section, a longer shape for the rib cage, and a shape for the hips around the middle. Urban sketching instructor Sketching Scottie blocks in the silhouette and big shapes of the head and body before any details, stressing how important it is to capture those main shapes first. Don't worry about anything small yet.
Step 3: Draw the action line and stick frame
Down the center, draw a gentle line for the spine (this sets the pose), then add simple lines for the arms and legs branching off the rib cage and hips. The waist usually lands around head three, the hips near head four, and the knees around head six. The hands fall near the middle of the body. This stick frame is your skeleton.
Step 4: Add volume to the limbs
Thicken the stick lines into rounded forms: cylinders for the arms and legs, and softer shapes for the joints at the shoulders, elbows, hips, and knees. Think of the body as a set of simple 3D tubes and boxes. This is where the figure starts to feel solid instead of flat.
Step 5: Place the facial features
Now add the face using simple thirds. Sketching Scottie splits the face into three equal parts: hairline to eyebrows, eyebrows to the bottom of the nose, and nose to chin. The eyes sit just below the brow line, and the mouth sits between the nose and the chin. Keep it small and simple at this scale.
Step 6: Refine hands, feet, and the outline
Sketch the hands as mitten shapes first, then add fingers, and shape the feet as wedges. Draw a clean outline around your whole figure, following the volumes you built. Don't get lost in tiny details yet. Get the overall shape right.
Step 7: Add hair, clothing, and finishing touches
Draw the hair as a big shape over the skull, then add clothing that follows the body's forms, with folds where the fabric bends. Trace your final lines, erase the head-count guides and the stick frame, and add any color you like.
What artists recommend (and common mistakes)
- Use the head-count proportions. The biggest beginner mistake is guessing the proportions. Measuring the body in head-lengths (about seven and a half to eight for an adult) instantly makes a figure look right.
- Big shapes before details. Block in the main masses first. Sketching Scottie captures the big silhouette before anything small, and getting lost in tiny details too early is what trips most beginners up.
- Step back and check. Illustrator Sam Yang advises holding your sketchbook at arm's length, stepping back, or even looking at it in a mirror to catch proportion and anatomy errors. Fresh eyes spot what close-up eyes miss.
- Keep early lines light. You'll erase the frame and guides, so don't press hard.
Fun variations to try
- Realistic figure: Pay close attention to the head-count proportions and the way muscles and joints give the limbs their form. Add gentle shading to round out the body.
- Cartoon person: Shorten the figure to four or five heads tall, enlarge the head, and simplify the hands and feet. Shorter proportions instantly read as cute.
- Anime character: Stretch the figure slightly, add large expressive eyes, and draw flowing, chunky hair. Our how to draw anime guide covers the face style.
- Action pose: Curve the spine line more dramatically and angle the shoulders against the hips to suggest movement.
Frequently asked questions
How many heads tall is a person in drawing? An adult figure is usually drawn about seven and a half to eight heads tall. Measuring the body in head-lengths is the classic way to keep the whole figure in proportion from head to toe.
How do you draw a person for beginners? Start with a vertical line marked into equal head-lengths, block in big shapes for the head, rib cage, and hips, add a stick frame for the limbs, then build up volume and details. Big shapes and proportions come before any small details.
How do you draw a full body? Set the total height in head-counts first, then place the rib cage, hips, and joints along that line. Add rounded limbs, then the face, hands, feet, hair, and clothing last. Working from the frame outward keeps the whole body balanced.
Keep drawing and coloring
A person is the sum of smaller skills, so practice the parts too. Try how to draw a face for the proportions up close and how to draw hair to top off your figure. When you want to relax, browse our free coloring pages, color a few girl coloring pages, or grab a prompt from our drawing ideas for beginners.