Learn how to draw line art the easy way, with clean confident strokes and smart line weight. A beginner-friendly, step-by-step guide to better lines.
Good line art is what makes a drawing look finished and crisp. The secret is not a fancy pen, it is the way you move your hand. In this guide you'll learn how to draw line art with clean, confident lines, how to use line weight to add depth, and how to fix the scratchy "hairy" lines that trip up most beginners. This is a foundation skill, so the steps below are a method you can warm up with every time you draw. No experience needed, so grab a pencil and let's get your lines under control.
Keep your shoulders loose and your grip relaxed. Tense hands make shaky lines.
What you'll need
- A pencil and an eraser
- Plain paper, plus a few cheap practice sheets you won't be precious about
- Optional: a black fineliner or ball pen for inking your final line drawing
How to draw line art step by step
The biggest jump in clean line art comes from one habit: drawing from your arm, not your fingers. Concept artist Marc Brunet teaches beginners to use the elbow and whole arm for long, clean strokes, drawing a little faster and simply undoing a line when it misses, instead of carving it out with tiny scratchy marks (Marc Brunet). We'll build from that, warming up first and saving the dark, final lines for last.
Step 1: Warm up with long strokes
Before you draw anything real, fill a page with long straight lines and big smooth curves. Lock your wrist and swing from your elbow and shoulder. Try to land each line on a target dot at the far end. Two minutes of this loosens your arm and trains the confident motion you want.
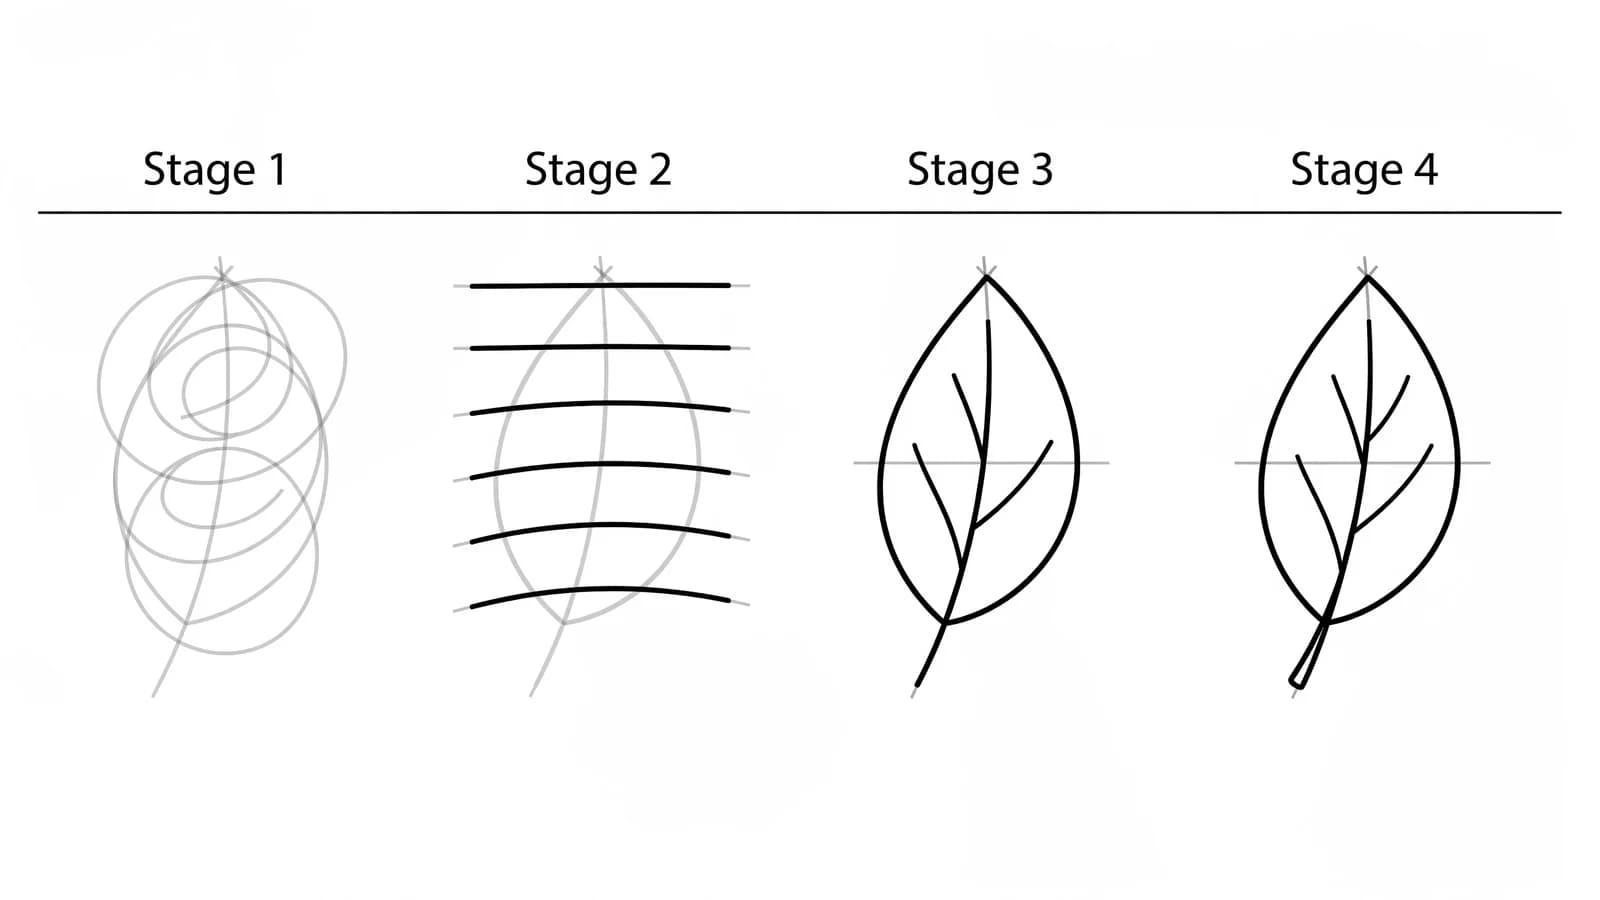
Step 2: Sketch loose guide shapes
Now block in whatever you're drawing with light, loose pencil lines. These guides are messy on purpose. Keep them faint so they almost disappear. Getting the shape and proportions right here means your clean lines later will have something correct to trace.
Step 3: Draw confident strokes, not hairy ones
Commit to each line in one quick motion. Aim where you want the line to end, then go. If you miss, lift up and redraw the whole stroke rather than patching it with little marks. Those many short, scratchy strokes are the classic "hairy lines" mistake, and Brunet points to them as the number one thing holding beginners back (Marc Brunet).
Step 4: Extend lines past their corners
For sharp, clean joins, let your lines run slightly past where they meet, then erase the little overlap afterward. Illustrator NinaEevee recommends this exact trick: extending lines a touch beyond the intersection gives you crisp, sharp corners instead of soft, rounded mush (NinaEevee).
Step 5: Add line weight for depth
Not every line should be the same thickness. Press harder, or go over a line twice, to make it thicker on the outside edges of your subject and in shadowed areas. Keep the inside detail lines thin. Tate's line guide explains that varying how much you press creates a sense of depth and movement, pushing some lines forward and letting others recede (Tate).
Step 6: Use fewer lines
Strong line art says more with less. Look for the few lines that really describe the shape and skip the rest. Tate's guide encourages timed drawings to see "how few lines you really need to build up a picture" (Tate). Crowded, repeated lines make art look busy and unsure.
Step 7: Ink and clean up
Trace your best pencil lines with a fineliner or a firmer dark stroke, keeping the line weight you planned. Let the ink dry fully, then erase every pencil guide underneath. What's left is clean, confident line art ready to color or stand on its own.
What artists recommend (and common mistakes)
- Draw from your arm. Tiny finger movements make wobbly lines. Swing from the elbow and shoulder for long, smooth strokes (Marc Brunet).
- No hairy lines. Don't "find" a line with many short scratches. One confident stroke, redrawn if needed, always looks cleaner.
- Vary your line weight. Same-thickness lines look flat. Thicker outer and shadow lines plus thin inner lines add instant depth (Tate).
- Overshoot your corners. Run lines slightly past their joins and erase the extra for sharp, clean corners (NinaEevee).
Fun variations to try
- Continuous line drawing: Draw a whole object without lifting your pen. It is a playful way to loosen up and trust your hand.
- Bold and thin contrast: Pick one subject and ink it twice, once all thin, once with heavy weight on the outside. Compare how much more solid the weighted version looks.
- Minimalist line art: Reduce a face or a flower to the fewest lines that still read clearly. Great for cards and simple wall art.
- Hatching for shade: Once your outlines feel clean, fill shadow areas with sets of parallel lines instead of solid black.
Frequently asked questions
How do I draw cleaner, smoother lines? Move from your elbow and shoulder, not your fingers, and draw each line in one confident motion. If a line misses, redraw the whole thing instead of patching it. A few minutes of long warm-up strokes before you start makes a big difference.
What is line weight and why does it matter? Line weight is how thick or thin a line is. Thicker lines on outer edges and in shadows make those areas feel closer and heavier, while thin inner lines stay quiet. Varying line weight is what gives flat line art a sense of depth.
Do I need a special pen for line art? No. You can practice line art with a regular pencil or even a ball pen. A fineliner gives crisp, even ink, but clean lines come from how you move your hand, not from the tool.
Keep drawing and coloring
Clean lines make everything else easier. Try how to sketch next to loosen up your construction, then put your lines to work on how to draw a face. Browse drawing ideas for beginners when you want something to practice on, then print our free coloring pages and study how the line art is built. You've got this.