
Learn how to draw hair the easy way by thinking in big shapes, not single strands. A beginner-friendly, step-by-step hair guide covering realistic and anime styles.
Hair looks like a tangle of a thousand tiny lines, which is exactly why so many beginners get stuck. The secret is that you don't draw the strands at all. You draw the big shape first. In this guide you'll learn how to draw hair step by step, starting with the overall mass and flow, then adding value and just a few key strands on top. We'll cover realistic hair and anime hair, so you can draw almost any hairstyle. No experience needed.
Keep your lines light to begin with. Hair is forgiving once you trust the shapes. Let's start.
What you'll need
- A pencil and an eraser
- Plain paper
- Optional: a harder pencil (like a 2H) for light guides and a softer one for darks, plus a black pen
How to draw hair step by step
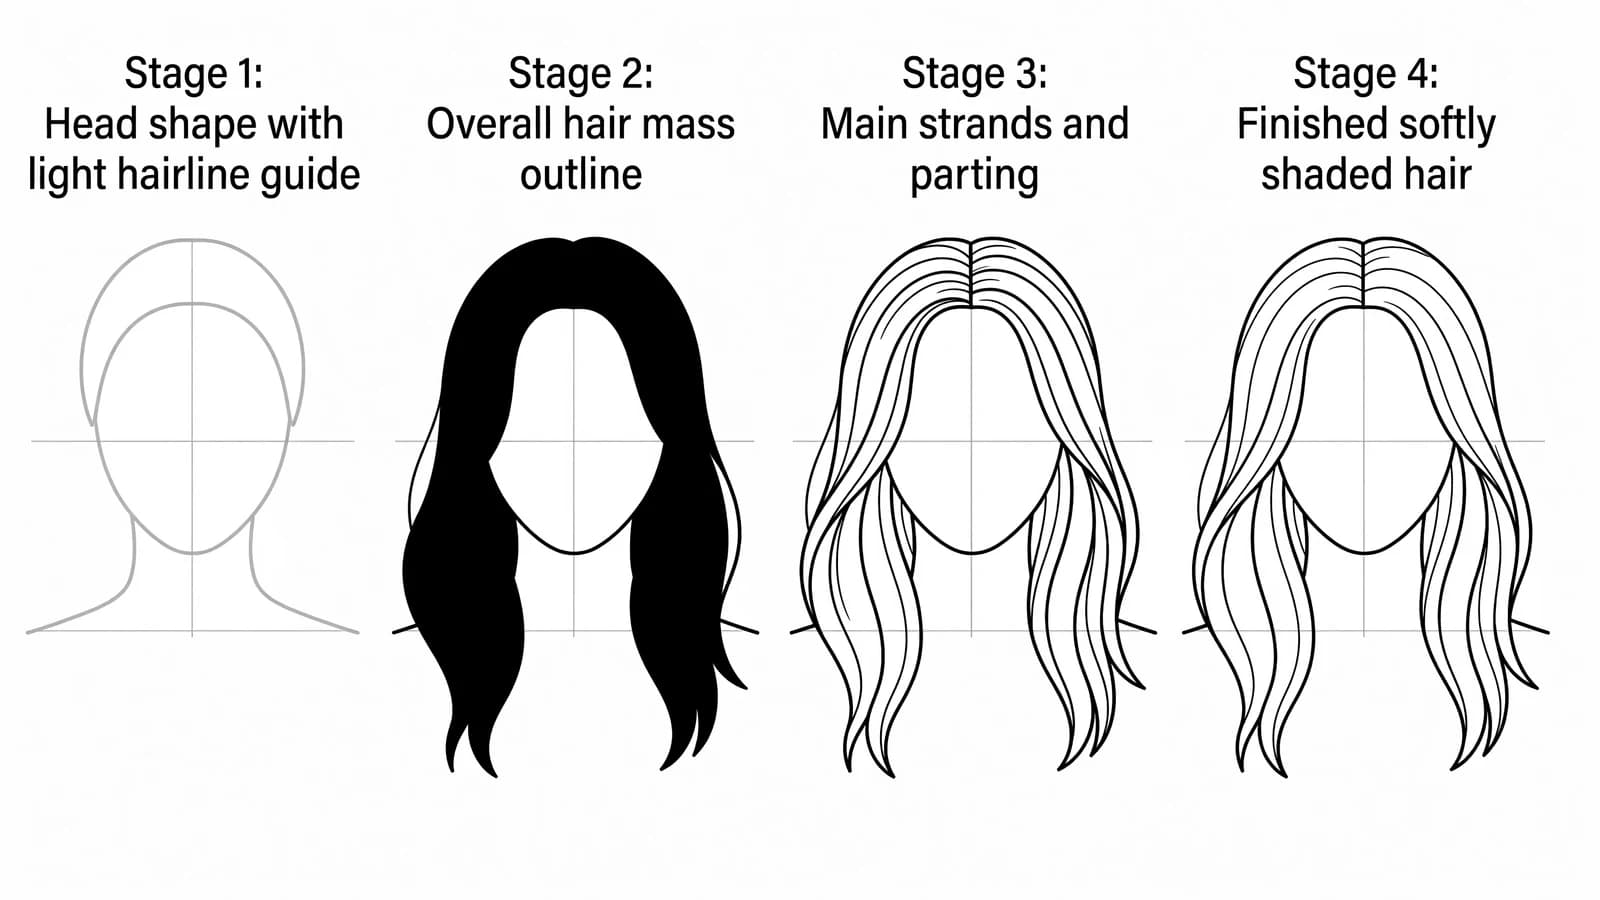
Step 1: Draw the hairline first
Before anything else, lightly sketch the hairline across the forehead and around the face. This tells you where the hair starts growing. Establishing the hairline first, then deciding the direction of the flow, is the order recommended in many beginner hair tutorials, and it keeps the hair from looking like a helmet sitting on the head.
Step 2: Block in the big shape
Now draw the overall mass of the hair as one big, simple shape that sits away from the skull (hair has volume, so leave a gap). Matt Fussell of The Virtual Instructor advises defining the outer contour lightly first, with a hard pencil, before any detail. Don't think about strands yet. Just get the silhouette right.
Step 3: Divide the mass into a few large clumps
Break the big shape into a handful of major sections, or clumps, that flow from the part or the crown. RISD instructor Clara Lieu advises seeing hair as a single mass and noticing how it divides into groups and smaller forms. As she puts it, "View hair as a sculptural form that has weight and substance. Don't focus on individual hairs at all."
Step 4: Add mid-tone value
Start shading with a mid-tone across the hair, working with the flow. It's easier to begin in the middle of the value range and move toward the lights and darks than to jump straight to the darkest dark, a tip from Love Life Drawing. Lay your pencil strokes in the direction the hair grows.
Step 5: Build the darks and shape the shadows
Now push the shadow areas darker, especially deep in the clumps, near the part, and underneath where one section overlaps another. These dark gaps between clumps are what make hair read as separate, flowing locks instead of a flat blob.
Step 6: Use directional strokes that follow the form
Shade with strokes that flow over the rounded form of each clump, like cross-contour lines wrapping the shape. Matt Fussell recommends exactly this, letting the strokes follow the way the hair grows. Use a broader, softer point for the big masses.
Step 7: Add a few key strands and the highlights
Only now, switch to a sharp pencil and add a small number of individual strands, mostly where light catches the surface or where strands break free at the edges. Lift out or leave the brightest highlights. A few well-placed strands suggest the whole head of hair. Trace your final lines, erase stray guides, and finish.
What artists recommend (and common mistakes)
- Don't draw every strand. This is the most common mistake by far. Matt Fussell tells students, "Don't try to draw every strand of hair. Instead, concentrate only on shapes and the value within them." Too many lines make hair look stiff and noisy.
- See the mass, not the hairs. Clara Lieu warns against focusing on individual hairs at all. Treat hair as a solid, sculptural form with weight.
- Leave a gap from the skull. Hair has volume. If it hugs the head too tightly, it looks painted on. Give it some lift.
- Work light to dark. Start with a mid-tone and build up. Going too dark too fast is hard to undo.
Fun variations to try
- Realistic hair: Focus on smooth value transitions and the way light wraps around the rounded clumps. Keep strands few and intentional.
- Anime hair: Draw the hair as bold, pointed chunks and spikes flowing from a center part or cowlick. Use flat color or a single sharp highlight band instead of soft shading. See our how to draw anime guide for matching faces.
- Long, wavy hair: Let the big clumps curve in an S shape and overlap. Wavy hair is just clumps with more flow.
- Curly hair: Build it from rounded, spiral clumps rather than lines, and keep the edges bumpy and soft.
Frequently asked questions
How do you draw hair for beginners? Start with the hairline, block in the big overall shape, then divide it into a few large clumps. Shade with a mid-tone using strokes that follow the flow, deepen the shadows between clumps, and add only a few key strands at the end.
Why does my hair drawing look fake? You're probably drawing too many individual strands. As artist Matt Fussell says, concentrate on shapes and value, not single hairs. Build the mass first and add just a handful of strands on top.
How do you draw anime hair? Treat the hair as bold, pointed chunks that flow from the part or crown. Keep the points sharp, vary the shapes, and use flat color with one sharp highlight band rather than soft realistic shading.
Keep drawing and coloring
Hair frames the whole face, so it pairs perfectly with our other portrait guides. Try how to draw a face to practice proportions, then put it all together with how to draw a person. For more inspiration, browse our free coloring pages or our gallery of aesthetic drawing ideas.