Learn how to draw a face the easy way using simple proportion guidelines. A beginner-friendly, step-by-step face drawing guide from head shape to realistic finish.
A face can feel like the hardest thing to draw, but it follows a friendly set of rules. Once you know where the eyes, nose, and mouth belong, the whole thing clicks into place. In this guide you'll learn how to draw a face step by step, starting with a simple head shape and a few light proportion guidelines, then adding features and shading for a realistic finish. No experience needed, and no fancy supplies.
We'll draw a front-facing face, since that's the easiest place to start. Keep every line light at first so you can fix the guides later. Let's begin.
What you'll need
- A pencil (a regular HB is great) and an eraser
- Plain paper
- Optional: a softer pencil for shading, and a black pen for outlining
How to draw a face step by step
Step 1: Draw the head shape
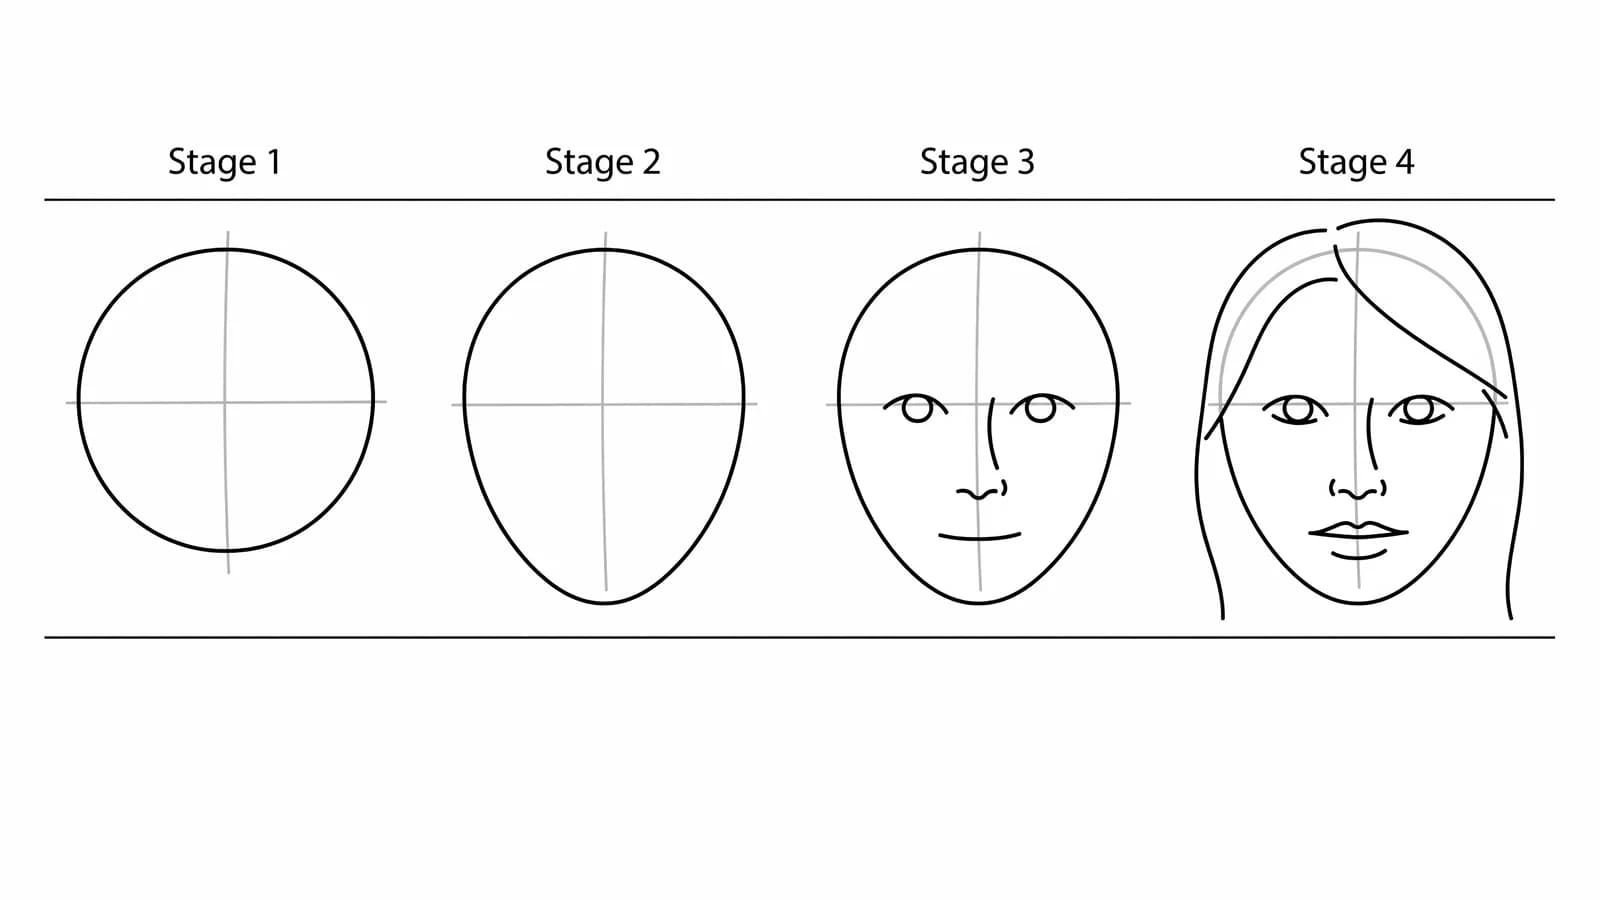
Start with a light circle for the top of the skull. Then add a curved line down each side that narrows into a rounded chin at the bottom, so the whole shape looks a little like an egg. Art educator Erika Lancaster teaches beginners to begin a head with a circle plus a jaw shape, which is exactly what we're doing here. Keep it loose.
Step 2: Add the center line and the eye line
Draw one line straight down the middle of the face (the center line) and one line across the middle (the eye line). Here's the key proportion rule that surprises most beginners: the eyes sit halfway down the head, not near the top. That horizontal line marks where they go. These guides keep both sides even and stop the features from drifting.
Step 3: Place the eyes
On the eye line, draw two eyes, one on each side of the center line. Use a simple proportion check from artist Lee Hammond: the space between the eyes is about one eye width, and both eyes should sit directly across from each other. Leaving that one-eye gap in the middle is what makes a face look natural instead of cramped.
Step 4: Add the nose
The nose sits below the eyes, ending about halfway between the eye line and the chin. Lee Hammond points out that a vertical line dropped from the inner corner of each eye lines up with the sides of the nose, so use that to set the width. Draw it lightly: the bottom of the nose, the two nostrils, and a soft hint of the bridge are plenty.
Step 5: Add the mouth
The mouth goes a little below the nose, roughly one third of the way from the nose to the chin. The inner corners of the eyes can help you judge the width of the mouth. Draw the line where the lips meet first, since that line carries the most shape, then add a soft upper and lower lip.
Step 6: Add the eyebrows, ears, and hairline
Eyebrows sit just above the eyes and follow their curve. The ears line up between the eye line and the bottom of the nose, one on each side. Then sketch in the hairline across the top of the forehead and the basic shape of the hair around the face.
Step 7: Shade and finish
Now bring the face to life with light and shadow. This is the step beginners skip most. Hammond stresses that only the brightest highlights should be left white, and that many artists leave skin tones far too light. Shade gradually from the dark areas (under the brow, beside the nose, under the lip) into the lighter ones to show the round, 3D form. Trace your final lines, erase the guides, and you're done.
What artists recommend (and common mistakes)
- Use the guide lines every single time. Skipping the center line and the eye line is the number one beginner mistake, and it leads to crooked, mismatched features.
- Trust the proportions, not your eye. Beginners almost always draw the eyes too high. Remember they sit halfway down the head. Measure with your pencil if you need to.
- Don't leave the face flat and white. As Lee Hammond warns, "many artists will leave skin tones too light." Add gentle shading so the face looks round instead of like a flat mask.
- Keep early lines light. Pressing hard makes guides impossible to erase. Build up slowly.
Lee Hammond's whole method rests on one idea: get the basic shapes right before you blend, because they are very hard to change later. A face is just a few simple shapes placed with care.
Fun variations to try
- Realistic face: Spend extra time on smooth, gradual shading and the small forms around the eyes, nose, and lips. Soft transitions are what read as real.
- Cartoon face: Shrink the nose and mouth, simplify the shading, and exaggerate one feature, like big round eyes or a wide grin.
- Anime face: Use a more pointed chin, tiny nose and mouth, and large, expressive eyes set on the eye line. See our how to draw anime guide for the full style.
- Different expressions: Tilt the eyebrows and reshape the mouth to show happy, surprised, or thoughtful.
Frequently asked questions
Where do the eyes go on a face? The eyes sit halfway down the head, on a horizontal line through the middle. Beginners usually place them too high. Leave about one eye width of space between them, as artist Lee Hammond recommends.
How do you draw a face easy for beginners? Start with an egg-shaped head, add a center line and an eye line through the middle, then place the eyes on that line, the nose halfway down to the chin, and the mouth below that. The guide lines do most of the work.
Why does my face drawing look flat? It usually needs shading. Leaving the skin plain white keeps it looking like a flat mask. Shade gradually from the shadow areas into the light, and keep only the brightest highlights white.
Keep drawing and coloring
A face is the foundation for drawing people. Next, try how to draw hair to frame your face, then learn how to draw a person to put the whole figure together. When you want a break, browse our free coloring pages or grab a few prompts from our drawing ideas for beginners.