Learn how to draw a nose step by step, front view and side view, from a simple triangle to the nostrils and shading. A beginner guide with no experience needed.
The nose can feel tricky because it has no hard outline in real life, just soft planes and shadows. But once you learn the simple shapes underneath it, drawing one gets a lot easier. In this guide you'll learn how to draw a nose step by step, starting with a basic triangle, then adding the ball of the tip, the two nostrils, and gentle shading. We'll cover both the front view and the side view, and you don't need any experience to follow along.
Keep your pencil light while you build the shapes. The nose is mostly about value and form, so we'll save the dark tones for the end. Let's begin.
What you'll need
- A pencil and an eraser
- Plain paper
- Optional: a blending stump or tissue for soft shading
- Optional: a softer pencil (2B or 4B) for the darkest shadows
How to draw a nose step by step
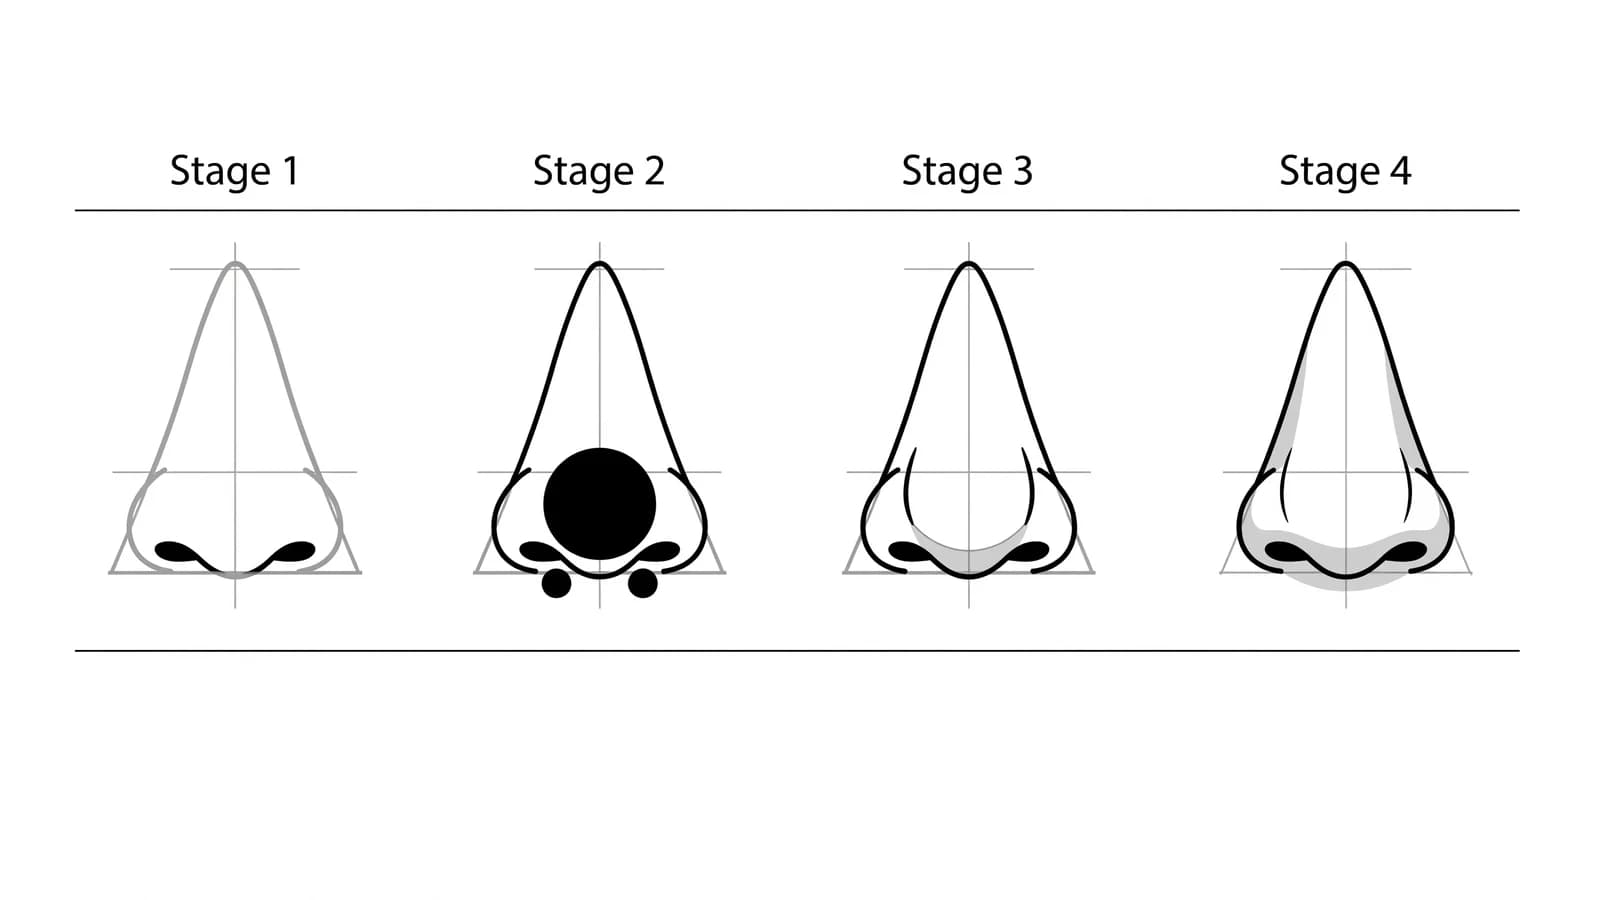
Step 1: Block in a light triangle
Start with the broadest shape. Lightly draw a tall, narrow triangle pointing up, with the wide part at the bottom where the nostrils will go. Thinking of the nose as a simple triangle, and as a 3D object rather than a flat outline, is exactly how the National Portrait Gallery's demo begins building the structure (National Portrait Gallery). For a side view, draw the triangle leaning out from the face, with the slope of the bridge as one edge.
Step 2: Add the ball of the tip and the wings
At the bottom of the triangle, draw a circle for the ball of the nose (the tip). Then add a smaller circle on each side for the wings, the rounded flaps that form the outer edges of the nostrils. These three soft balls give the nose its rounded form. Keep them light, because you'll shade over them later.
Step 3: Shape the bridge
Connect the top of the triangle up toward the brow with two light lines for the sides of the bridge. On a front view these lines are very soft and may almost disappear. On a side view, draw the full profile curve of the bridge, from between the eyes down to the tip, in one flowing line.
Step 4: Draw the nostrils
Under the ball of the tip, draw the two nostril openings. Tuck a small curved shape into the underside of each wing. Make the nostrils soft commas or rounded triangles, not perfect black holes. The space between them is the base of the nose. On a side view you'll usually see only one nostril, partly hidden behind the wing.
Step 5: Map the planes
Picture the nose as a boxy form with a top plane (the bridge), two side planes, and a bottom plane (the underside where the nostrils sit). The Virtual Instructor suggests reducing the nose to basic shapes and planes, then using value to build form instead of relying on outlines (The Virtual Instructor). Lightly mark where each plane turns so you know where the light and shadow will fall.
Step 6: Shade for form
Decide where your light is coming from. Shade the side planes that face away from the light, darken the underside of the tip, and add soft shadow inside and around the nostrils. Keep the top of the bridge and the ball of the tip lighter, since those catch the most light. Blend gently so the tones melt together. Avoid a hard line down each side of the nose. Use shading to suggest the edge instead.
Step 7: Clean up and finish
Gently erase the leftover triangle and circle guides, and lift out a soft highlight on the tip and the bridge with your eraser. Check that the nose sits well with the rest of the face. Add the darkest accents inside the nostrils last so they read as the deepest shadows.
What artists recommend (and common mistakes)
- Draw the nose as part of the head, not on its own. Art professor Clara Lieu reminds artists that "The nose is just one small component of a head," and to make sure it fits the forehead, brow, cheeks, and chin around it (Clara Lieu).
- Skip the hard outline. The most common beginner mistake is drawing a firm line down both sides of the nose. The National Portrait Gallery demo notes you are better off using shading than a line on either side (National Portrait Gallery).
- Don't make nostrils too dark. Solid black holes look harsh. Keep them soft and rounded, with the deepest dark saved for the very corners.
- Think in 3D. Always remember the nose is a boxy, rounded form sticking out from the face, not a flat shape lying on top of it.
Front view vs side view
- Front view: The nose is symmetrical. You'll mostly see the ball of the tip, the two wings, and both nostrils, with very soft lines for the bridge. Almost all the form comes from shading.
- Side view (profile): Now the bridge becomes a clear outline from brow to tip, and you see the full slope of the nose plus one nostril. This view is great for practicing the planes because the form is so visible.
- Cartoon style: For an easy cartoon nose, simplify everything to a single curved line, a small "L" shape, or a little button. The same triangle and ball still guide where it goes.
Frequently asked questions
How do you draw a nose easy? Start with a light triangle, add a circle for the tip and one for each nostril wing, then place the two nostrils underneath. Shade softly to round out the form and skip the hard outlines. Building from those few simple shapes is the easiest path.
How do you draw a nose from the front? Draw a narrow triangle pointing up, add the ball of the tip and the two wings at the base, then tuck in the nostrils. Keep the side lines very faint and let shading, not outlines, show the shape. Most of a front-view nose is value, not line.
Why does my nose look flat? A flat nose usually comes from outlining instead of shading. Map the nose as a box with a top, two sides, and a bottom plane, then shade the planes that face away from the light. The shadow under the tip and around the nostrils is what makes it pop forward.
Keep drawing and coloring
A nose rarely travels alone, so build the rest of the face next. Try how to draw an eye and how to draw a mouth to complete the features. When you're ready for a colorful break, browse aesthetic drawing ideas or print our free coloring pages and practice your shading with crayons and pencils.