Learn how to draw a mouth and lips step by step, from the center line to the top and bottom lip and shading. A beginner-friendly guide with no experience needed.
A mouth can show a smile, a frown, or a whole mood, so it is a great feature to master. The secret is that lips are soft, rounded forms, not just an outline, and they follow a few reliable shapes. In this guide you'll learn how to draw a mouth step by step, starting with the line where the lips meet, then building the top and bottom lip, and finishing with shading that makes them look full. We'll also cover an easy smile and realistic lips. No experience needed.
Keep your lines light at the start so you can shape things as you go. Let's begin.
What you'll need
- A pencil and an eraser
- Plain paper
- Optional: a blending stump or tissue for soft shading
- Optional: a softer pencil (2B or 4B) for the darkest line
How to draw a mouth step by step
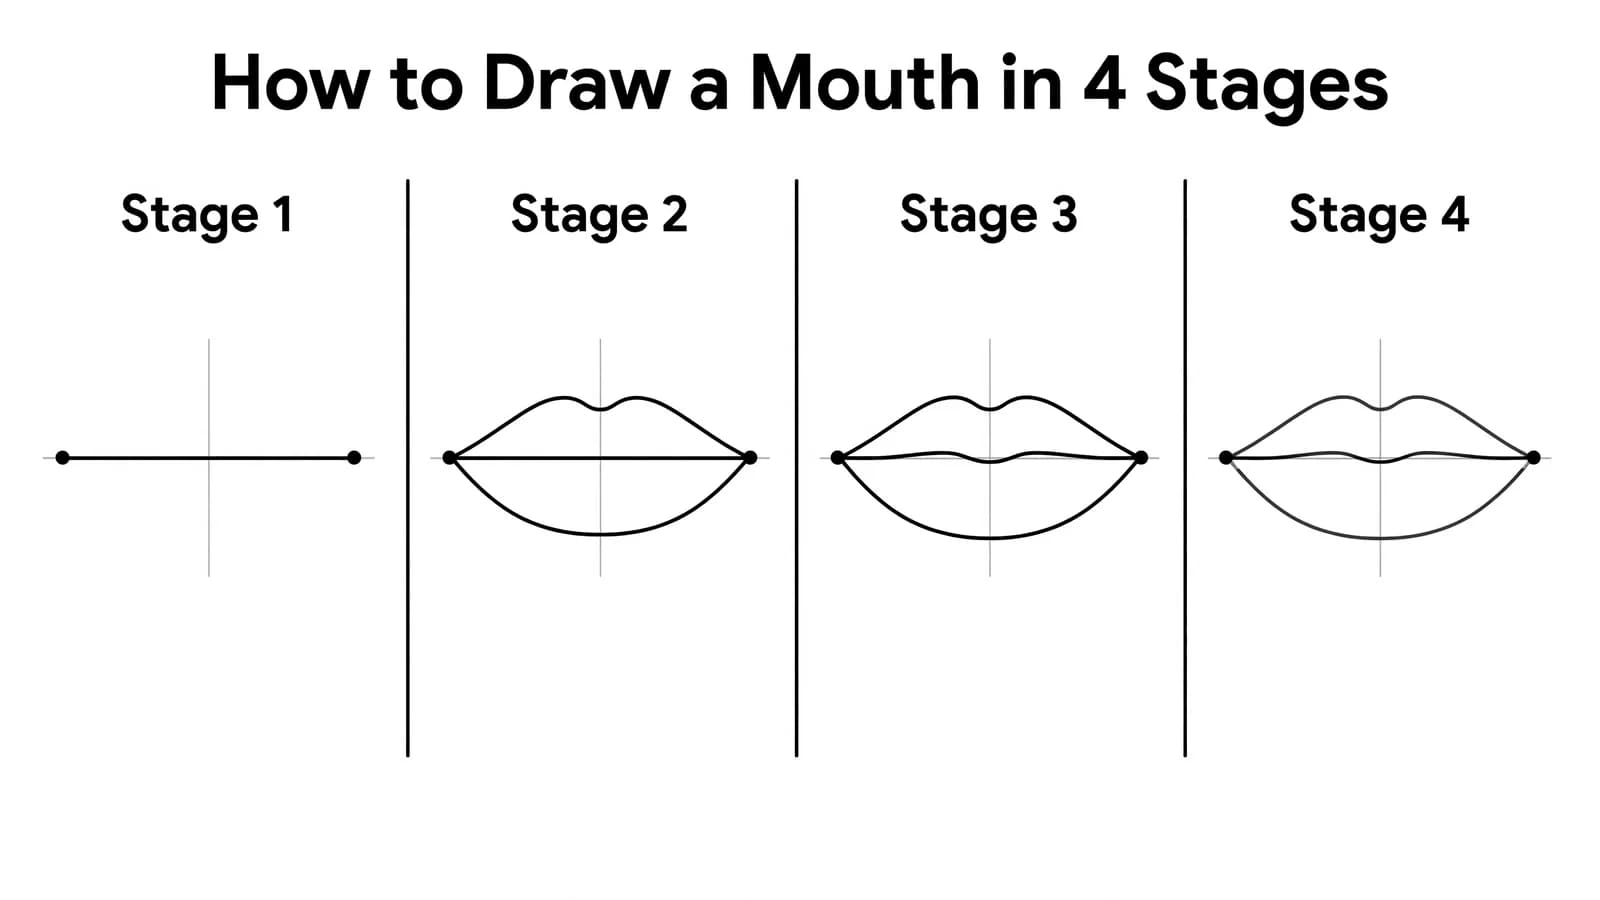
Step 1: Draw the center line first
Instead of starting with the full outline, draw the line where the top lip and bottom lip meet. The Virtual Instructor advises drawing this line first and warns that drawing the entire outline first usually leads to proportion problems (The Virtual Instructor). Make it a soft, slightly wavy line, often a gentle "M" curve in the middle, with a small dip down at the center.
Step 2: Block in simple guide shapes
Lightly sketch a guideline through the middle and mark the two corners of the mouth so you know how wide it will be. Beginner tutorials suggest using a simple box or a few basic shapes to block in the lips before refining the outline (The Pencil Room). Keep these guides faint, because they are just a map for the lips.
Step 3: Shape the top lip
Above the center line, draw the top lip. It usually has two soft bumps that come down toward the middle, forming a gentle "M" with a small dip in the center called the cupid's bow. The top lip is often a little thinner and points slightly downward at the edges.
Step 4: Shape the bottom lip
Below the center line, draw the bottom lip as one or two fuller, rounded curves. The bottom lip is usually plumper than the top and catches more light. Leave a little space between the bottom of the lip and the chin, where a soft shadow will sit.
Step 5: Map the lips as planes
Think about the mouth in terms of planes and form, not just a flat outline. The Virtual Instructor points out that the upper lip is usually darker while the lower lip is lighter, because the upper lip tilts away from the light and the lower lip catches it (The Virtual Instructor). Lightly note which areas will be in shadow and which will be lit.
Step 6: Shade for fullness
Start with light pressure and build up slowly. Darken the line where the lips meet, since that is the deepest shadow. Shade the upper lip a bit darker than the lower, add a soft shadow under the bottom lip, and leave a small highlight on the fullest part of the lower lip. Draw the lip texture as short lines that follow the curve of each lip, fanning out from the center.
Step 7: Clean up and finish
Gently erase your guide shapes and tidy the corners of the mouth, where a tiny dark accent helps the lips look set into the face. Soften any hard outer edges with your eraser so the lips blend into the skin instead of looking cut out. Add color last if you like, building it up lightly.
What artists recommend (and common mistakes)
- Start with the meeting line, not the outline. The most common beginner mistake is trying to draw the whole outline of the lips first, which usually causes proportion errors (The Virtual Instructor). Lay down the center line and corners first.
- Use light lines to sketch. Block the lips in softly with light guidelines before you commit, so you can adjust the shape (The Pencil Room).
- Treat lips as form, not line. Lips are rounded pillows. Shade them so the upper lip reads slightly darker and the lower lip catches the light.
- Soften the outer edges. A hard, fully drawn outline makes lips look pasted on. Let the edges fade into the skin with gentle shading.
Realistic lips vs a simple smile
- Realistic lips: Spend your time on the values. Keep the meeting line as the darkest part, vary the shading between upper and lower lip, and add a soft highlight and fine texture lines. Avoid a heavy outline all the way around.
- A simple smile: For a quick, friendly mouth, draw a curved meeting line that turns up at both ends. Add a soft lower lip below it and a hint of the top lip above. Cartoon smiles can be just one or two curved lines.
- Open smile with teeth: Draw the upper lip, then a curved shadow line for the gum, and only lightly separate the teeth. Keep teeth a soft gray, never bright white or boxed in with hard lines.
Frequently asked questions
How do you draw lips for beginners? Start with the line where the lips meet, mark the two corners, then build a thinner top lip with a cupid's bow above and a fuller bottom lip below. Shade the upper lip darker than the lower and add a small highlight. Working from that center line first keeps the proportions right.
How do you draw a smile? Draw a curved meeting line that lifts at both ends, then add a soft lower lip beneath it and a light hint of the upper lip. For an open smile, add a curved shadow above the teeth and keep the teeth a soft gray with no hard outlines between them.
Why do my lips look flat? Flat lips usually come from a single hard outline and even shading. Treat the lips as rounded forms, make the upper lip a touch darker than the lower, deepen the line where they meet, and leave a highlight on the bottom lip so it looks full.
Keep drawing and coloring
A mouth is one piece of the puzzle, so finish the face next. Try how to draw an eye and how to draw a nose to round out the features. When you want a colorful break, explore drawing ideas for beginners or print our free coloring pages to practice your shading and color.