Learn how to draw an eye step by step, from the almond shape and eyelids to the round eyeball, iris, and shine. A beginner guide for realistic and anime eyes.
The eye is the part of a face that people notice first, so it is worth learning to draw it well. The good news is that an eye follows a clear set of shapes you can build up one step at a time. In this guide you'll learn how to draw an eye step by step, starting with a light almond outline, then shaping the eyelids, the round eyeball, the iris, and the tiny shine that brings it to life. No experience needed, and the same steps work for a realistic eye or a big anime eye.
We'll draw one front-facing eye so you can see every part clearly. Keep your pencil light at first so you can fix your guides later. Let's begin.
What you'll need
- A pencil and an eraser
- Plain paper
- Optional: a blending stump or tissue for smooth shading
- Optional: a black pen for outlining
How to draw an eye step by step
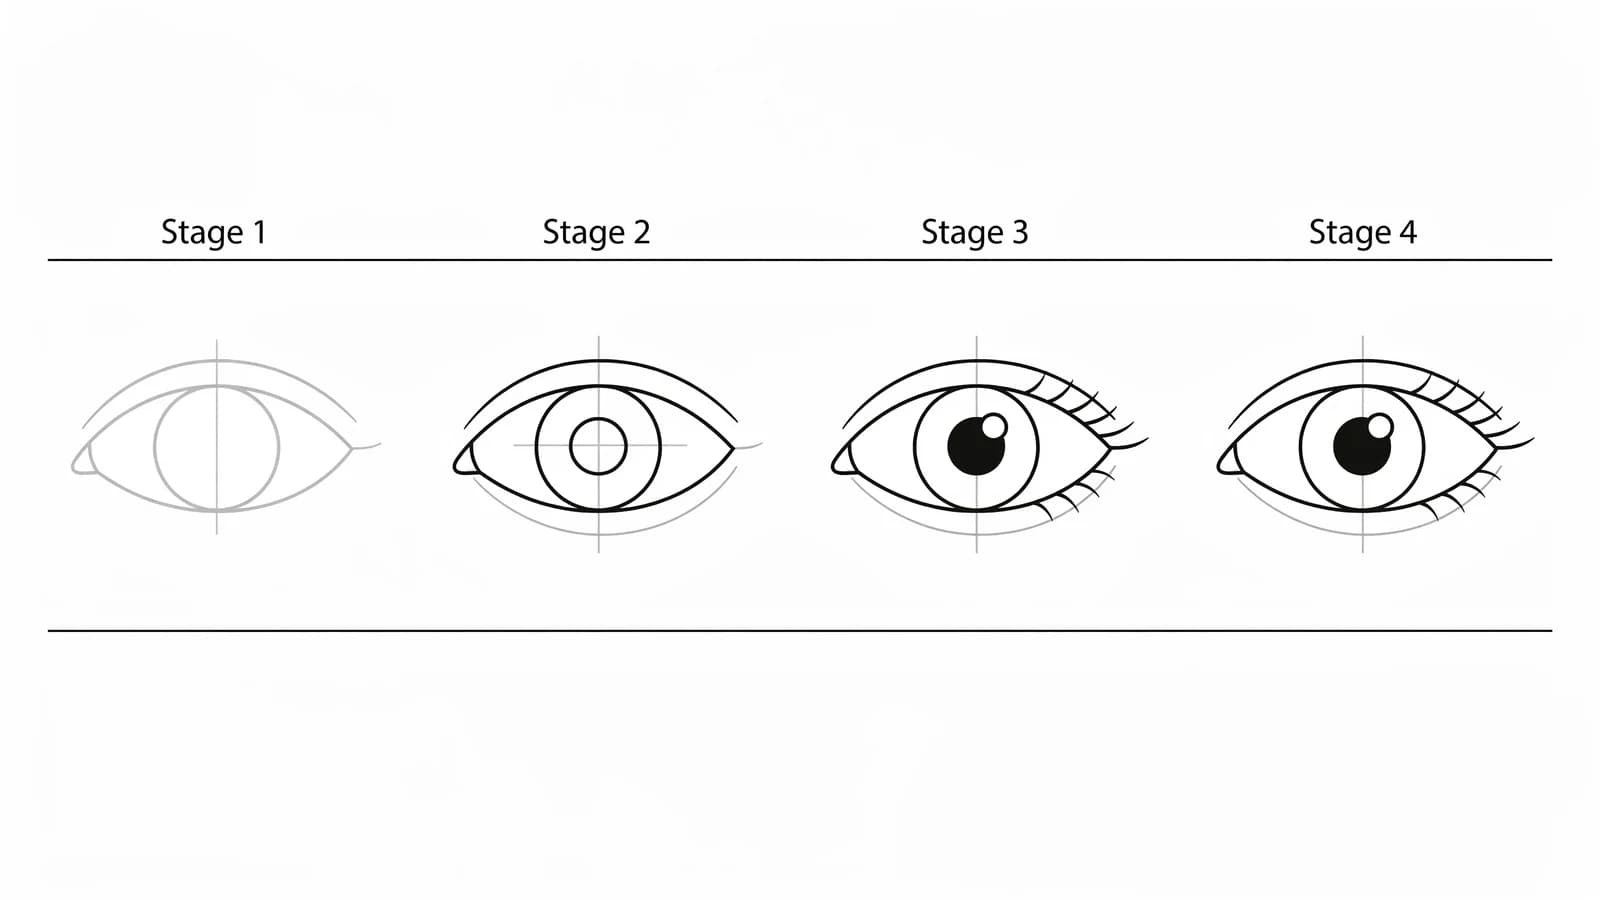
Step 1: Block in the big almond shape
Start with the largest, broadest shape and save the details for later. Lightly draw an almond, or a curved leaf shape, that is wider in the middle and tapers to a point on each side. The inner point (near the nose) usually sits a little lower than the outer point. Drawing instructors often suggest blocking in the biggest shapes first, then subdividing them, before you touch any small details (Vitruvian Studio).
Step 2: Draw the upper and lower eyelids
Now turn that single almond into two lids. Draw the top lash line a touch thicker and more curved, then add a thinner line just above it for the crease of the upper eyelid. Add a soft line under the lower lash line to show the thickness of the bottom lid. A helpful way to think about it is that the eyelids wrap around a ball. Treat the eyeball as a sphere and draw the eyelids curving over it, not as flat straight lines (Stan Prokopenko).
Step 3: Add the round eyeball and iris
Inside the eye opening, draw a large circle for the iris (the colored part). Part of the iris is usually hidden under the upper lid, so let the top of the circle slip behind the lash line. Picture the whole eyeball as a round sphere sitting in the socket, even though you only see a slice of it. This keeps the eye from looking flat and pasted on.
Step 4: Draw the pupil and the shine
In the center of the iris, draw a smaller circle for the pupil and fill it in dark. Then draw one small circle for the highlight, the little spot of light, usually where the upper lid casts a shadow. Leave that highlight spot white. It is what makes the eye look wet and alive.
Step 5: Build up the shading slowly
Start with light pencil pressure and slowly darken, blending as you go for smooth tones. The BioWars tutorial suggests adding more pressure only after the basic shapes are in place, then blending to avoid sharp transitions (BioWars). Shade the iris darker around its edge and lighter near the highlight. Add a soft shadow under the upper lid where it falls on the eyeball, and keep the white of the eye a soft gray, never pure white.
Step 6: Add eyelashes and the eyebrow
Draw the lashes growing from the lash line in curved clumps, longer on the outer corner and thinning toward the inner corner. Less is more here, so resist drawing every single lash. Finally, sketch the eyebrow as a soft band of short strokes above the eye, following the curve of the brow bone.
Step 7: Outline, erase, and finish
Trace the lines you want to keep with a firmer stroke or a black pen, then gently erase any leftover guide lines. Lighten or remove smudges around the white of the eye so the highlight pops. If you like, add a touch of color to the iris with colored pencils, building it up from light to dark just like the shading.
What artists recommend (and common mistakes)
- Work from big shapes to small. The most common beginner mistake is jumping straight to eyelashes and tiny details before the big eye shape and the values are right. Vitruvian Studio warns that beginners often skip the broad forms and work specific-to-general instead of general-to-specific (Vitruvian Studio).
- Shade the eyeball like a ball. A round form needs round shading. Keeping that sphere in mind stops the eye from looking like a flat sticker.
- Protect the highlight. Color and shade around the little white spot, never over it. That single dot of light does most of the work.
- Keep both eyes even. If you draw a pair, use a shared eye line and leave about one eye-width of space between them so they match.
Realistic vs anime eyes
The same shapes work for both styles, just dialed up or down.
- Realistic eye: Keep the almond shape natural, blend your shading smoothly, and draw lashes in soft clumps. Spend most of your time on the gradual values in the iris and the shadow under the upper lid.
- Anime eye: Make the eye taller and bigger, use a bold dark upper lash line, shrink the visible white, and add one or two large bright highlights. The lower lid is often just a small line. Anime eyes carry the whole expression, so exaggerate the shine.
- Eyelid focus: To practice the eyelid alone, draw just the curve where the upper lid meets the lash line and notice how its thickness changes from inner to outer corner.
Frequently asked questions
How do you draw an eye for beginners? Start with a light almond shape, add the upper and lower eyelids, then draw a big circle for the iris and a smaller one for the pupil. Leave a white highlight, shade from light to dark, and finish with a few lashes. Building from simple shapes is the whole trick.
How do you draw an eyeball so it looks round? Picture the eyeball as a full sphere sitting in the socket, even though the lids only show a slice of it. Shade it like a ball, darker at the edges and lighter near the light source, and tuck the top of the iris behind the upper lid.
Why do my eyes look flat? Flat eyes usually come from hard outlines and even, all-over shading. Add a shadow where the upper lid falls on the eyeball, curve your shading to follow the round form, and keep that bright highlight to suggest a wet, glassy surface.
Keep drawing and coloring
An eye is the perfect warm-up for a whole face. Next, try how to draw a nose and how to draw a mouth to round out the features, or jump into how to draw anime for those big expressive eyes. When you want a break from sketching, grab some drawing ideas for beginners or print our free girl coloring pages to practice your colors.