Learn how to draw an elephant the easy way, from a big circle and a curving trunk to floppy ears and chunky legs. A beginner step-by-step guide, no experience needed.
An elephant looks complicated, but it is really just a few friendly curves stacked together. In this guide you will learn how to draw an elephant step by step, starting with a big round body and a head, then adding a long curling trunk, two floppy ears, and four sturdy legs. This works for an easy elephant drawing or a cute elephant with a raised trunk, and you need no experience at all.
We will draw a side-view elephant, because the profile shows off the trunk, the big ear, and that rounded back. Keep your lines light at the start so the shapes can shift around, then darken the keepers at the end. Let's begin.
What you'll need
- A pencil and an eraser
- Plain paper
- Optional: a black pen for outlining, plus crayons, markers, or colored pencils
How to draw an elephant step by step
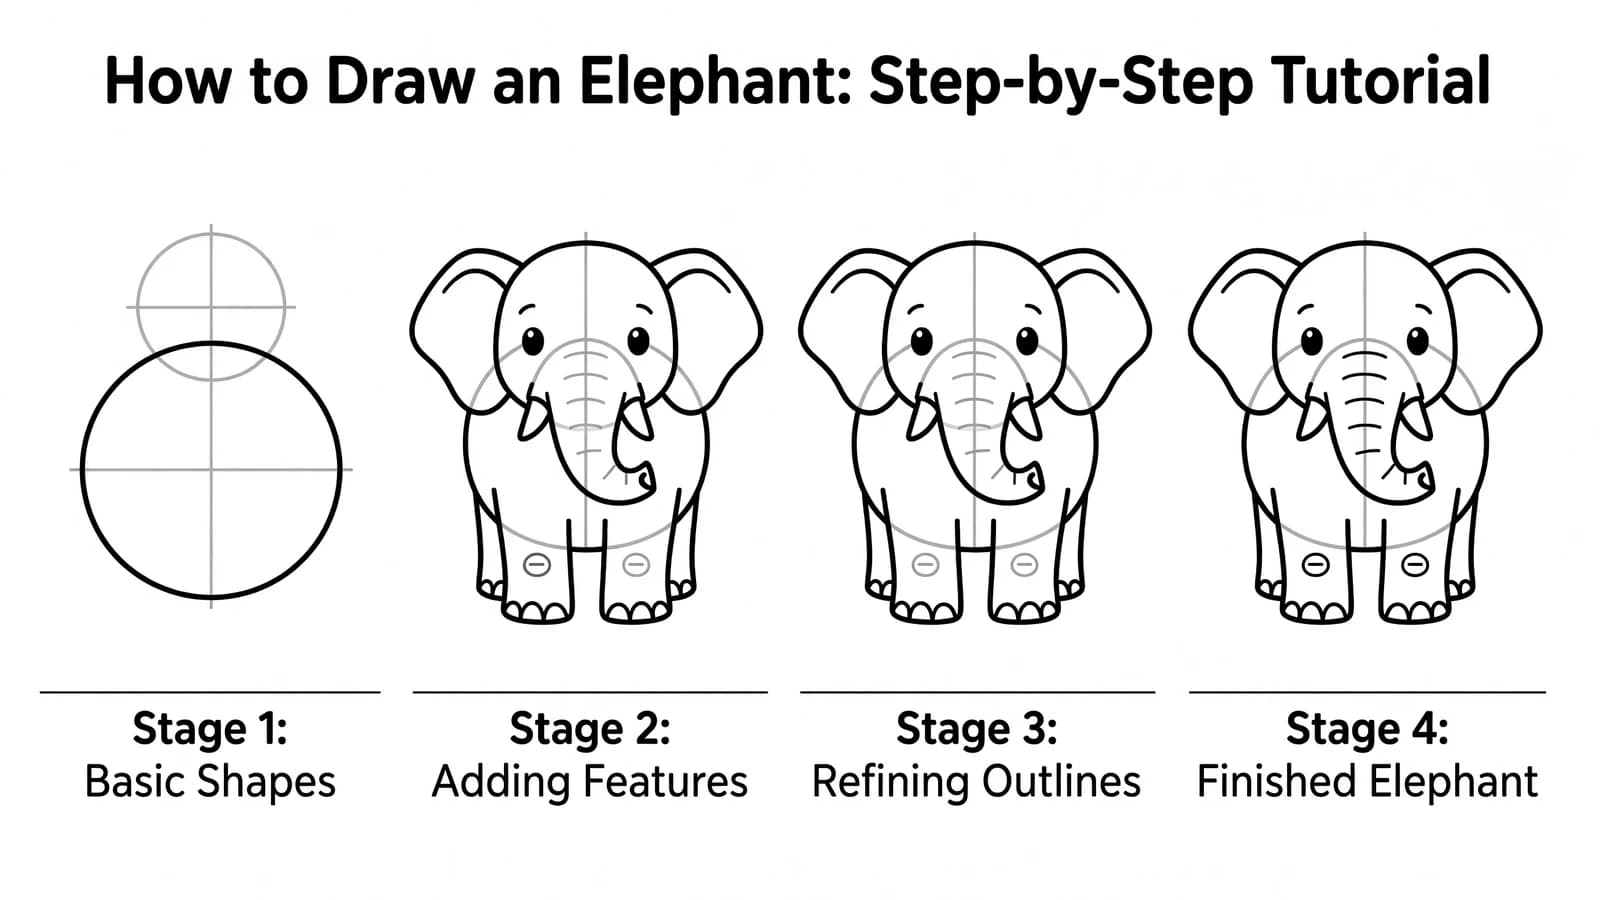
Step 1: Block in the body and head
Start with a large oval in the middle of your paper for the body, then add a smaller circle near the front and a little higher for the head. The Virtual Instructor begins an elephant drawing with a few light measurement lines so the whole animal fits the page, and that simple planning is worth copying (The Virtual Instructor). Keep these first shapes light so you can adjust them.
Step 2: Sketch the trunk angles with straight lines
Before you draw the curvy trunk, map it out with a few straight lines from the head down to where the tip will land. Drawing instructor Cecilie Okada teaches students to "draw three straight lines" to plot the head and trunk angles first, then curve them into the final shape (Cecilie Okada). This keeps the trunk from wandering off in a strange direction.
Step 3: Curve the trunk and add the face
Now round those straight guides into a thick, hanging trunk that tapers a little toward the tip. Add a small curve at the end for the trunk tip. Put a tiny eye on the head and a gentle slope from the forehead down into the trunk. For a cute elephant, curl the trunk upward like it is waving hello.
Step 4: Draw the big floppy ear
Add one large ear behind the head, shaped like a soft, wide leaf or a rounded triangle. African elephant ears are big and floppy, so let it cover much of the head and droop down a bit. A faint inner line near the top gives the ear a folded, three-dimensional look.
Step 5: Add the four legs
Draw four thick legs that look like sturdy tree trunks, wide at the top and a touch narrower at the round, flat feet. Show the two near legs fully and let the two far legs peek out just behind them. Watch the negative space between the legs as you place them, not just the legs themselves, so the spacing looks natural.
Step 6: Finish the back, tail, and tusks
Connect the head to the body with a smooth curve along the top for the back. Add a thin tail with a little tuft at the end hanging off the back. If you want tusks, draw two short, curved white points coming out near the base of the trunk.
Step 7: Outline and erase your guides
Trace the lines you want to keep with a firmer stroke or a black pen, smoothing each curve as you go. Then erase the leftover ovals, circles, and straight trunk guides, plus any stray marks. Add a couple of soft wrinkle lines across the trunk and on the knees for a realistic touch.
Step 8: Add details and color
Color your elephant a soft gray, building it up in light layers rather than pressing hard once. Leave the tusks and toenails light, and add a slightly darker shade under the belly and behind the ear so the body looks round. A few light wrinkles on the trunk and ear finish the gentle-giant look.
What artists recommend (and common mistakes)
- Start with simple measurements and light shapes. The most common mistake is diving straight into the trunk and ears. Block in the body and head with light shapes first so the whole elephant fits the page, the way The Virtual Instructor plans the drawing with a few measurements (The Virtual Instructor).
- Map the trunk with straight lines before curving it. Straight guide lines pin down the trunk's angle, then you curve them into the final form, a beginner-friendly trick from Cecilie Okada (Cecilie Okada).
- Watch the negative space, not just the legs. A frequent beginner slip is drawing each leg in isolation and getting the spacing wrong. As Cecilie Okada puts it, "Don't look at the legs only," and instead use the gaps between the legs to place them (Cecilie Okada).
- Keep the parts in proportion. Skip To My Lou suggests checks like making the legs about as long as the trunk, which stops the elephant from looking stretched or stumpy (Skip To My Lou).
Fun variations to try
- A cute baby elephant: Make the head and eyes bigger, the legs shorter and chubbier, and curl the little trunk upward.
- A trumpeting elephant: Lift the trunk high in the air and open the mouth for a loud, happy pose.
- A front-view elephant: Draw the face head-on with both ears spread wide and the trunk hanging straight down the middle.
- A circus elephant: Add a colorful blanket on the back and a small hat for a playful, storybook feel.
Frequently asked questions
How do you draw an elephant for beginners? Start with a big oval for the body and a circle for the head, then add the trunk, one big ear, four thick legs, and a tail. Building from simple shapes first keeps the proportions right, which is why beginner lessons start there.
How do you draw an elephant's trunk? Map the angle with two or three straight guide lines from the head down to the tip, then round them into a thick trunk that tapers slightly toward the end. Add a small curve at the tip and a few soft wrinkle lines.
How do you draw a cute elephant? Make the head and eyes big, the legs short and chubby, and curl the trunk upward like a wave. Cute comes from large eyes and rounded shapes, so keep every line soft and avoid sharp angles.
Keep drawing and coloring
Once your elephant is happily trumpeting, give it some company. Try how to draw a lion for another savanna friend, or how to draw a horse for a different gentle giant. For more ideas, browse our animal drawing ideas list, then print our free animal coloring pages to bring a whole watering hole to life with color.