Learn how to draw a horse the easy way, blocking in circles and ovals before details. A beginner-friendly, step-by-step guide with no experience needed.
A horse looks hard until you see how it's built: a big oval body, a round chest, a small head, and four legs that all start from simple blocks. In this guide you'll learn how to draw a horse step by step, using construction shapes first so the proportions come out right. No experience needed, and it works whether you want an easy cartoon horse or a more realistic standing pose.
We'll draw a horse standing in side view, the clearest way to learn the proportions. Sketch lightly so you can adjust, then darken your final lines. Let's begin.
What you'll need
- A pencil and an eraser
- Plain paper
- Optional: a black pen for outlining, plus brown, tan, or black crayons or colored pencils
How to draw a horse step by step
Step 1: Block in the body shapes
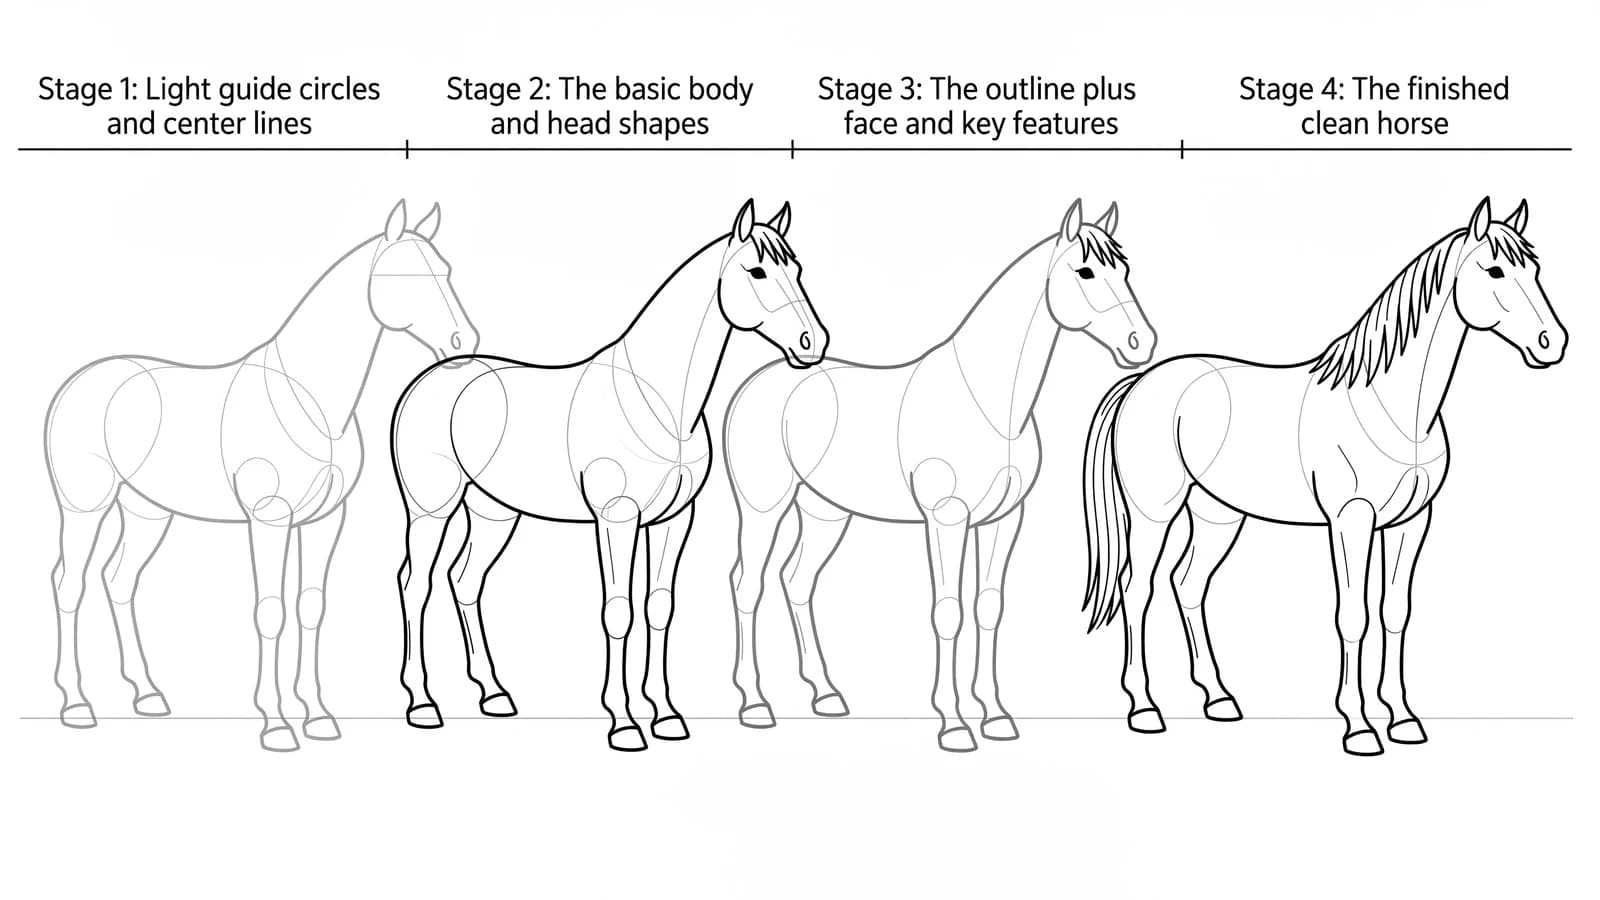
Start with two large ovals: one for the chest at the front and one for the hindquarters at the back, with a little gap between them. Artist Dani Puente, in the Art Rocket horse guide, recommends blocking the horse in with simple construction shapes like circles and ovals before any details, so you nail the proportions and pose first. Keep these shapes light.
Step 2: Connect the back and belly
Draw a curved line across the top to join the two ovals into one back, then a softer curve underneath for the belly. Art teacher Paul Priestley, in his step-by-step horse tutorial, suggests thinking about the 3D form rather than just the outline, using guiding curves over the body to feel its volume before you refine the silhouette. Now your horse has a solid trunk.
Step 3: Add the neck and head
From the front oval, draw a thick curved neck rising up and forward. At the top, add a small rectangle or wedge for the head, angled down at the front for the muzzle. The head is smaller than beginners expect, so keep it modest. Place the eye partway down the side of the head, not near the front.
Step 4: Draw the legs as blocks
Under the body, add four legs. Sketch each as a stack of simple shapes: a wider upper section, a thinner lower section, and a small hoof block at the bottom. The front legs drop down fairly straight, while the back legs bend with a clear angle at the hock. Line the hooves up so the horse stands level.
Step 5: Add the mane and tail
Draw the mane as a flowing shape along the top of the neck, and the tail as a long sweep falling from the back of the hindquarters. Let both follow gentle curves so they look soft. The mane and tail are where your horse gets its movement and personality.
Step 6: Refine the outline
Now go around the whole horse and smooth your construction blocks into one clean contour, shaping the chest, belly, and leg muscles. Build from references if you can: Dani Puente's Art Rocket guide stresses that accurate reference photos are the first key step, so you can observe the real shapes instead of guessing.
Step 7: Outline, erase, and color
Trace the lines you want to keep with a firmer stroke or a black pen, then erase the leftover ovals and guide marks. Color your horse brown, tan, black, gray, or palomino gold, leave a lighter belly, and give the mane and tail their own shade.
What artists recommend (and common mistakes)
- Block in shapes before details. This is the core method every horse teacher repeats. In his step-by-step horse tutorial, art teacher Paul Priestley blocks in the basic shapes of the horse first and leaves the detail for later stages.
- Study your subject. Equine artist Karen Baker Thumm writes, "In order to draw or paint horses well, you must know your subject well." Even a quick look at a reference photo helps your shapes ring true.
- Watch the eye placement. A common beginner mistake, noted by concept artist Alexandria Neonakis in her horse drawing notes, is placing the eyes too far forward like a dog's. A horse's eye sits well back on the side of the long head.
- Check the proportions. The same notes warn against legs that are too long, a head that's too big, and a body that's too short. Block everything in first and compare the parts before you commit.
Fun variations to try
- An easy cartoon horse: Round off all the shapes, shrink the legs, and give it big eyes for a friendly pony.
- A horse head drawing: Skip the body and focus on the head, neck, mane, and one big eye for a portrait.
- A galloping horse: Stretch the legs out front and back and lift the body to show it running.
- A unicorn: Add a spiral horn on the forehead and a flowing rainbow mane and tail.
Frequently asked questions
How do you draw a horse easy? Block in two large ovals for the chest and hindquarters, connect them into a back and belly, then add a neck, a small head, four block-built legs, and a mane and tail. Starting with simple shapes keeps the proportions right.
How do you draw a horse head? Draw a wedge or long rectangle for the head, angled down at the muzzle, then add a thick curved neck below it. Place the eye partway down the side of the head and add the mane along the top of the neck.
Why do my horse drawings look wrong? Usually the proportions are off, often legs too long, a head too big, or eyes set too far forward like a dog's. Block the whole horse in with light shapes first and compare the parts before adding detail.
Keep drawing and coloring
Once your horse is standing tall, add some barnyard friends. Try how to draw a duck for the pond or how to draw a dog for a loyal companion, browse more animal drawing ideas, then print our free animal coloring pages to color a whole stable of your own.