Learn how to draw a bird the easy way, from a simple oval body and round head to wings, tail, and a tiny beak. A beginner-friendly, step-by-step drawing guide.
Birds are one of the friendliest things to start with, because almost every bird is just an egg shape with a round head, a little beak, and a sweep of tail. In this guide you'll learn how to draw a bird step by step, beginning with two simple shapes and finishing with a perky little tail. This is an easy, simple bird drawing that any beginner can follow, and you can make it as cute as you like along the way.
We'll draw a small songbird sitting in profile, since a side view is the clearest pose to learn. Keep your lines light at first, then darken your favorites at the end. Let's begin.
What you'll need
- A pencil and an eraser
- Plain paper
- Optional: a black pen for outlining, plus crayons, markers, or colored pencils
How to draw a bird step by step
Step 1: Warm up with a few loose scribbles
Before you draw anything real, scribble some quick spirals and wiggly lines in a corner of the page. This loosens your hand so it follows your eye. The team at Artists Network suggests warming up with fast spirals and doodles, leaving out the details and just going for the gesture. Thirty seconds of this and your lines will flow much more easily.
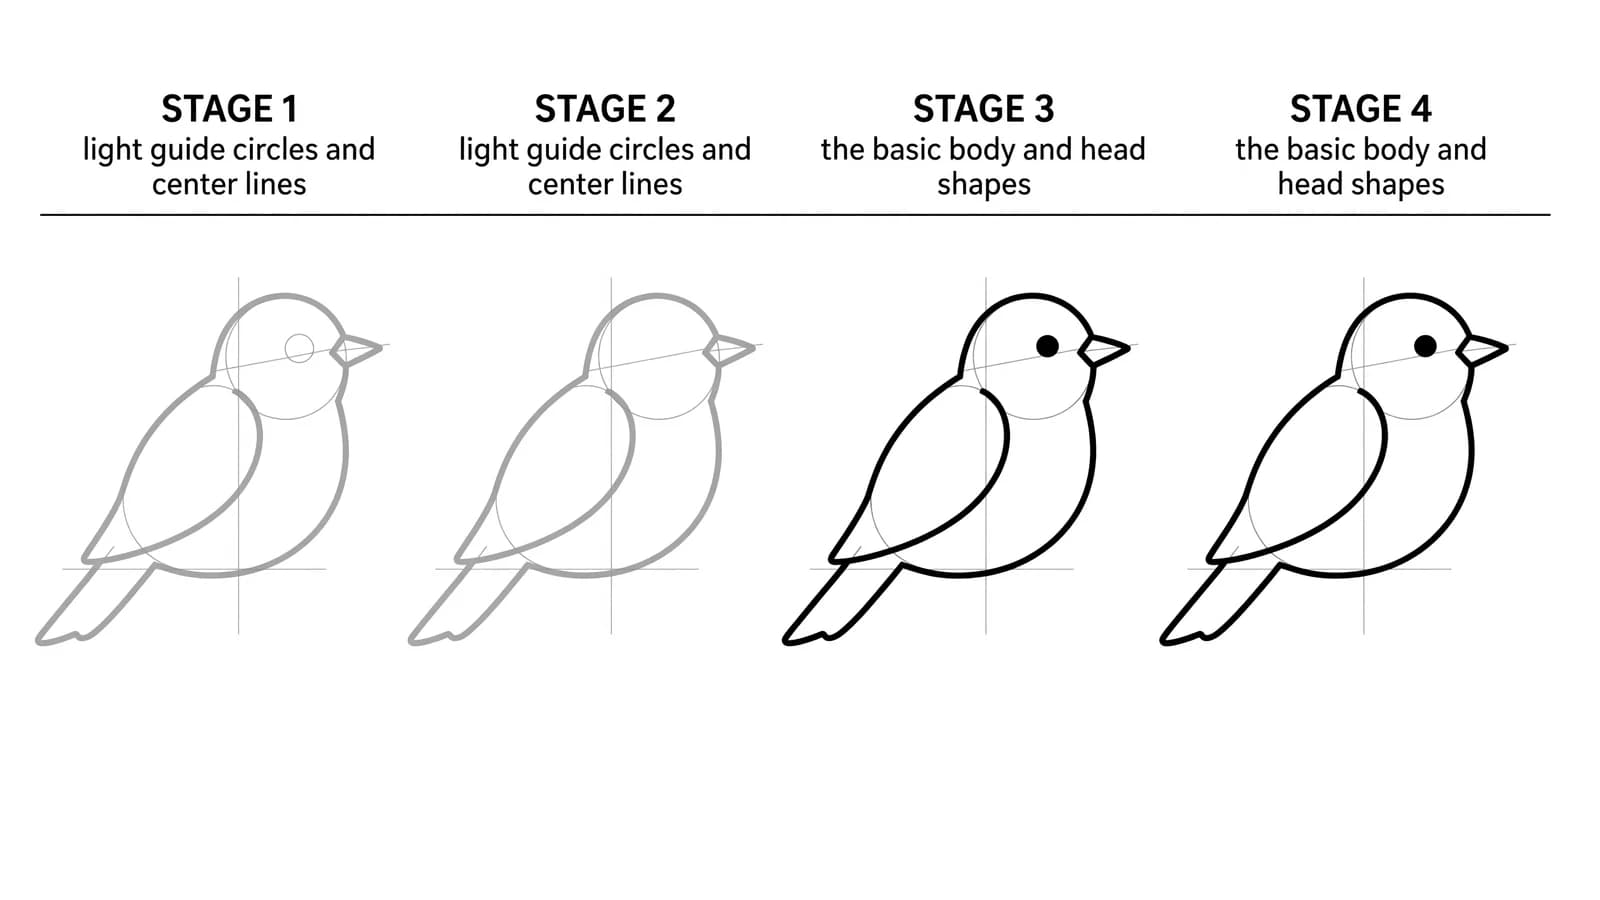
Step 2: Block in the body and head
Draw a light oval for the body, tilted a little, like an egg lying on its side. Then add a smaller circle near the top front for the head, letting it overlap the body. Field-guide illustrator David Sibley teaches beginners to begin with large shapes: an oval for the body, a circle for the head, and a light line to show the angle of the bill and eye. These two shapes are the whole foundation of your bird, so keep them soft and easy to erase.
Step 3: Add the tail and a guide line for the beak
Sweep a tail out from the back of the body, a simple wedge or a few stacked lines. Then add a short, light line poking out from the front of the head to mark where the beak will point. This guide line sets the bird's posture and the angle of its face before you commit to any details.
Step 4: Draw the beak and eye
Turn your guide line into a small triangle beak. Add a round eye on the head, set a little forward and high for a sweet, alert look. This is the fun part, but do not rush it. As naturalist-educator John Muir Laws warns in his bird drawing tutorial, "Many artists speed past these important initial steps but time spent at the start will pay off in the end." Getting the body and head shapes right first is what makes the face land in the right place.
Step 5: Add the wing
Draw a curved wing shape along the side of the body, like a long teardrop folded against the back. Most of the wing tucks in when a bird is resting, so you only see a smooth curve with a few longer feather lines at the back tip. One simple wing shape is plenty for a cute bird.
Step 6: Draw the legs and a perch
Add two thin legs coming down from the bottom of the body, with little three-toed feet. If your bird is sitting, draw a small branch or a flat line under the feet so it has something to grip. Keep the legs simple, just a couple of bent lines each.
Step 7: Outline and erase your guides
Trace the lines you want to keep with a firmer stroke or a black pen. Then erase the leftover guide marks where the body and head overlapped and the beak guide line. Add a few short strokes on the chest and tail to suggest soft feathers.
Step 8: Color your bird
Color your bird any way you like. A red robin's breast, a bright blue jay, a sunny yellow canary, or a fantasy rainbow bird all start from the same shapes. Leave a tiny white dot in the eye to make it sparkle.
What artists recommend (and common mistakes)
- Block in the big shapes first. David Sibley's whole method rests on light ovals and circles for the body and head before any detail. Skip them and your bird tends to come out lopsided.
- Don't jump to the beak and eye. The most common beginner mistake is drawing the cute parts first. John Muir Laws stresses that getting the basic shape right at the start is the most important step.
- Warm up loose, then tighten. A few seconds of gesture scribbling, as Artists Network recommends, makes your real lines smoother and more confident.
- Keep the wing as one shape. Beginners often draw every feather. A single folded teardrop with a few tip lines reads as a wing instantly.
Fun variations to try
- A round, cute bird: Make the body a fat circle and the head almost as big, with huge eyes for a baby-bird look.
- A bird in flight: Stretch both wings out wide from the body and angle the tail back for a soaring pose.
- An owl: Use a tall oval body, two big front-facing eyes, and little ear tufts on top.
- A duck or chick: Lower the body, flatten the beak, and shorten the tail. A fluffy yellow chick is just a small round bird.
Frequently asked questions
How do you draw a bird for beginners? Start with an oval for the body and a circle for the head, then add a tail, a triangle beak, an eye, a wing, and two legs. Building from two simple shapes is the easiest way to keep the proportions right, which is exactly the method field-guide artists like David Sibley teach.
How do you draw a cute bird? Make the body and head round and close in size, give it one big eye set high and forward, and keep the beak small. Round shapes and a big eye are what make a bird drawing read as cute.
What is the easiest bird to draw? A small songbird in side view is the easiest, because you only draw one wing, one eye, and a simple tail. Robins, sparrows, and bluebirds all share this same friendly shape.
Keep drawing and coloring
Once your bird is perched and happy, give it some company. Try how to draw a giraffe or how to draw a rabbit next, browse our cute things to draw for more ideas, then print our free animal coloring pages to color a whole flock of your own.