Learn how to draw a basketball the easy way. A simple, foundation-first basketball drawing for beginners with curved seam lines and shading to look 3D.
A basketball is one of the friendliest balls to draw, because its seams follow a simple, repeatable pattern. In this guide you'll learn how to draw a basketball step by step, starting from a light circle and adding the curved seam lines that wrap around the ball. This is an easy basketball drawing that comes together fast, even if you've never drawn a sports ball before.
We'll go foundation-first: a light circle, light center guides, then the four classic seams, and finally a bit of shading so the ball looks round and 3D instead of flat. Keep your early lines soft so they're easy to erase. Grab a pencil and let's begin.
What you'll need
- A pencil (a soft pencil shades more smoothly, but any pencil works)
- An eraser (a kneaded eraser is handy for lifting out the highlight)
- Plain paper
- Optional: a round lid to trace a neat circle, a black pen for outlining, plus an orange crayon or marker to color
How to draw a basketball step by step
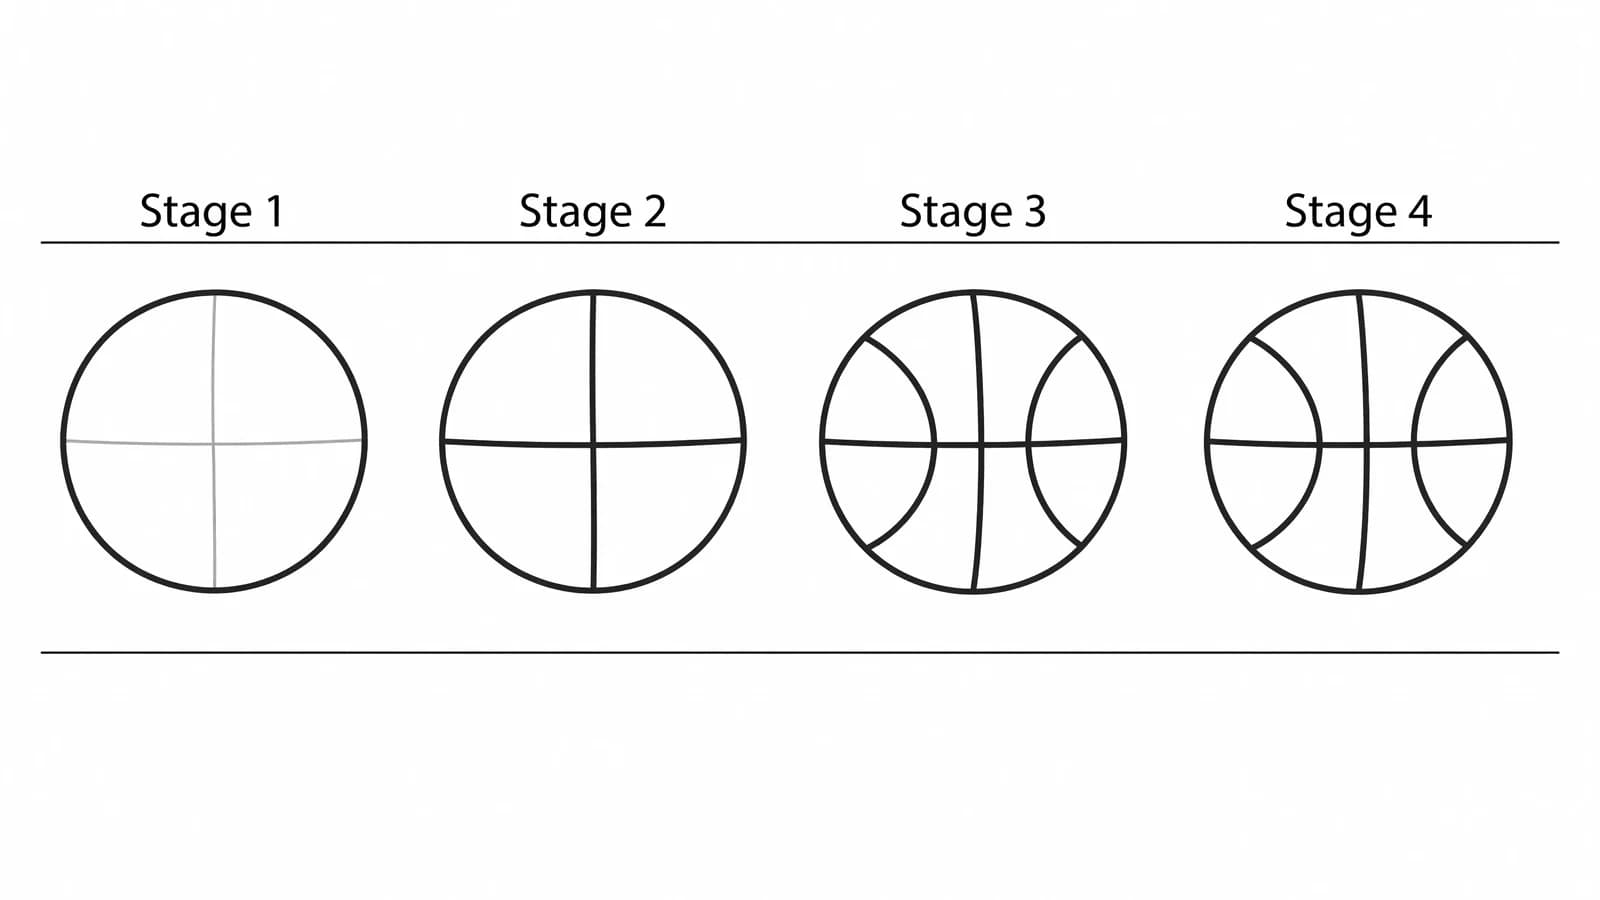
This is the way art teachers block in a basketball: start with the circle, place faint center guides, then hang the seams off those guides so they line up. DIY.org's lesson has beginners draw a large circle and then lightly mark the center with a faint vertical line and a faint horizontal line that cross in the middle before adding any seams. Those guides keep the panels even.
Step 1: Draw a light circle
Press lightly and draw a circle, or trace a round lid for a clean one. This is the whole ball. Art educator Kathy Barbro makes light marks at the top, bottom, left, and right first to plan how big the circle should be, which is a nice way to get a round shape.
Step 2: Add the center guide lines
Through the middle of the circle, lightly draw one vertical line and one horizontal line so they cross at the center, like a faint plus sign. DIY.org calls for exactly this: a faint vertical and horizontal line crossing in the middle. These guides tell you where the seams begin and end.
Step 3: Draw the two straight seams
Darken the vertical and horizontal center lines just a little so they become the first two seams. One runs top to bottom, the other side to side, dividing the ball into four sections. Right away it starts to look like a basketball.
Step 4: Add the first curved seam
Now add a curved seam. On one side of the ball, draw a long curved line that bows outward, like a backwards letter C, connecting the top of the vertical seam toward the bottom. Curve it so it follows the round shape of the ball, not a straight diagonal.
Step 5: Add the second curved seam
Mirror that curve on the other side. Draw a matching curved seam bowing the opposite way, so the two curves frame the center vertical line like parentheses. These S-shaped, wrapping curves are what give a basketball its signature look. Build them around your center guides so the panels stay even.
Step 6: Erase the guides and outline
Gently erase any leftover faint guide lines, then go over the circle and all four seams with a firmer pencil stroke or a black pen. Work slowly here. Kathy Barbro reminds beginners to work slowly for the best results, with no reason to rush. Clean lines make the ball look finished.
Step 7: Shade it to look 3D
Pick a light source, then shade the opposite side to make the ball round. DIY.org's method is clear: decide where the light is coming from, shade the side opposite the light, smooth the tones with a blending stump or tissue, and erase a small crescent highlight on the lit side to show a shiny spot. Color the ball orange over the shading, keeping the seams dark and the highlight bright.
What artists recommend (and common mistakes)
A basketball reads correctly when its seams wrap the form and a little shading gives it volume. Here's what teachers stress:
- Build the seams on center guidelines. DIY.org has students mark the center with faint crossing lines first, then place the seams off those guides. This keeps the panels centered instead of crooked or lopsided.
- Work lightly and slowly. Art educator Kathy Barbro plans the circle with light edge marks and tells beginners to work slowly for the best results. Light, unhurried lines are easy to refine before you commit to ink.
- The most common mistake is flat or random seams. Beginners often draw the seams as straight or guessed curves that don't follow the ball's roundness, so it looks like a flat circle with lines. DIY.org fixes this by building the seams as curved, wrapping lines around the center guides, then erasing the guidelines, and by shading one side to give the ball real 3D volume.
Fun variations to try
- A bouncing basketball: Add short curved motion lines and a little dust puff where it hits the ground.
- A basketball and hoop: Draw a simple rim and net above the ball for a full scoop-shot scene.
- A flaming basketball: Wrap orange and yellow flame shapes around the ball for a fast-break look.
- A spinning ball: Add a few speed lines circling the ball to show it spinning on a fingertip.
- A glossy ball: Make the highlight bigger and sharper so the basketball looks brand new.
Frequently asked questions
How do you draw a basketball easily? Draw or trace a circle, add faint vertical and horizontal center guides, then darken them into two straight seams and add two curved seams that bow around the sides. Erase the guides, outline the seams, and shade one side. That's a complete, easy basketball drawing.
How many lines are on a basketball? A basketball has four main seams: one vertical, one horizontal, and two long curved lines that wrap around the sides. Drawing those four seams, with the curves following the ball's roundness, makes it instantly recognizable.
Why does my basketball look flat? Usually the curved seams are too straight, or there's no shading. Curve the side seams so they wrap the form, and add soft shading on the side away from the light with a small bright highlight to give the ball round, 3D volume.
Keep drawing and coloring
Now that you can draw a basketball, try its teammates. The same circle-and-shading method powers a how to draw a volleyball, and to really nail the round, 3D look on its own, our how to draw a ball guide walks through shading a sphere step by step. Want more quick wins? Browse our easy things to draw or print our free coloring pages and color a few in. You've got this.