Learn how to draw a ball and shade a sphere so it looks 3D. An easy ball drawing for beginners, foundation-first, with simple light and shadow steps.
A ball is one of the best first things to draw, because it teaches you the single trick that makes any drawing pop off the page: shading. In this guide you'll learn how to draw a ball and how to shade a sphere so it looks round and 3D instead of flat. It starts as a plain circle, and with a few gray tones it turns into a solid ball you could almost pick up. This is an easy ball drawing that works for a beach ball, a baseball, or a simple sphere for art class.
No special supplies are needed. If you can draw a circle and smudge a little pencil, you can draw a 3D ball. Keep your lines light at the start so they're easy to fix, and let's begin.
What you'll need
- A pencil (a soft pencil like a 2B shades more smoothly, but any pencil works)
- An eraser (a kneaded eraser is great for lifting out highlights)
- Plain paper
- Optional: a blending stump, a tissue, or a clean fingertip for smoothing, plus a round lid to trace a neat circle
How to draw a ball step by step
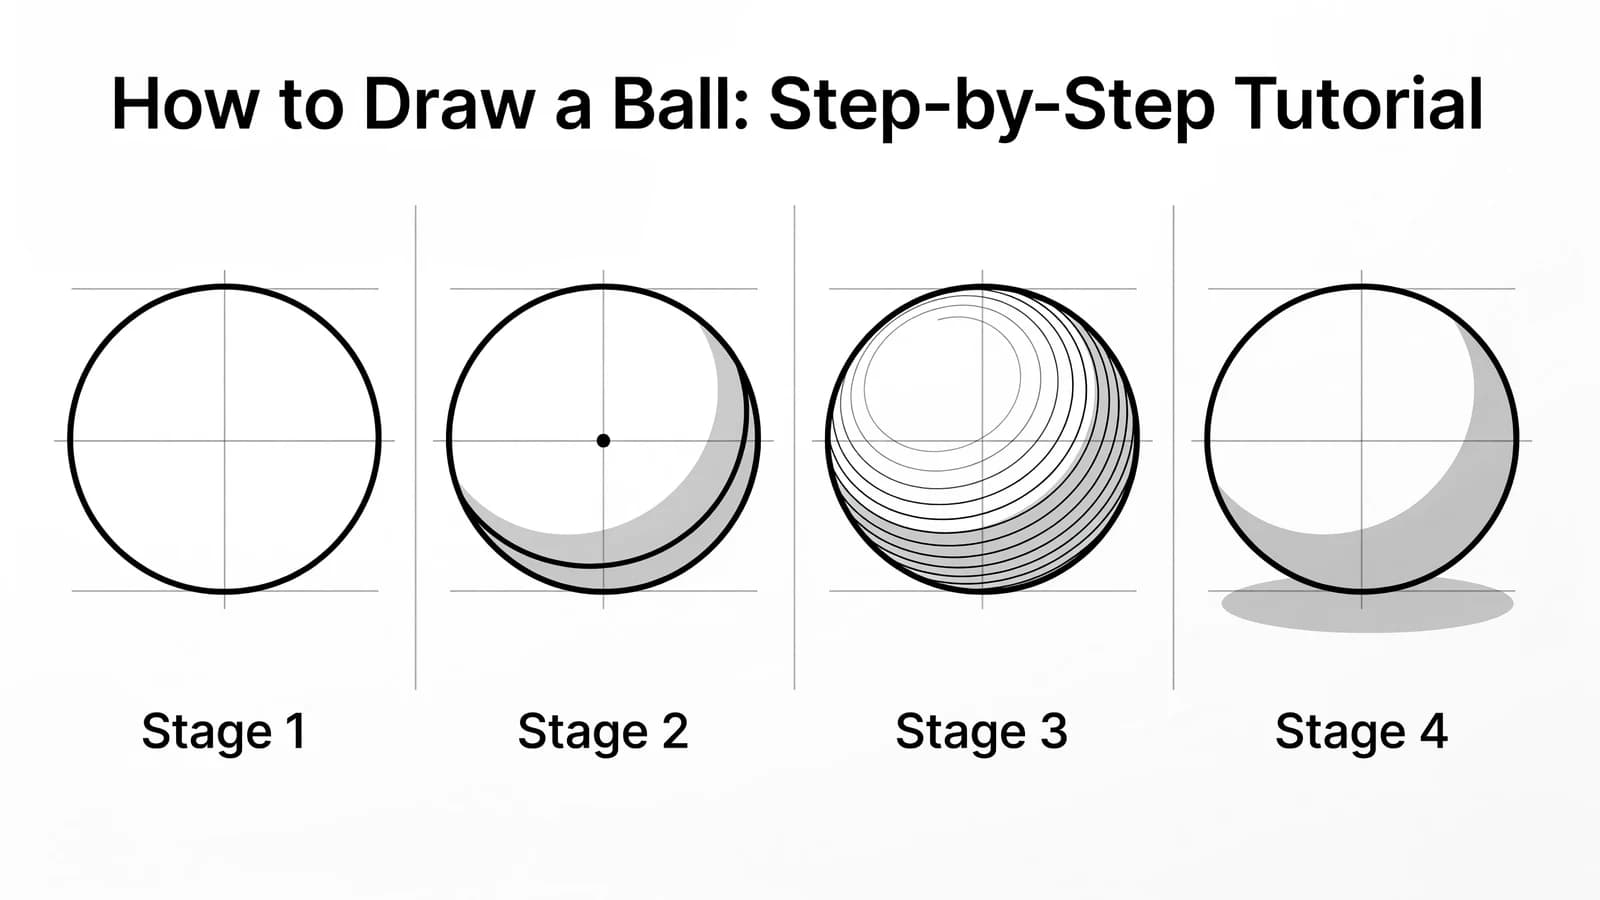
This is the foundation-first way artists turn a flat circle into a round sphere: draw the shape, decide where the light comes from, then build the shading from light to dark. The key idea is that the contour of a sphere is just a circle, and all the roundness comes from how you shade inside it. Take it slowly and you'll be surprised how real it looks.
Step 1: Draw a light circle
Press lightly and draw a circle. It doesn't have to be perfect. If a freehand circle feels tricky, trace a round lid or cup, or use a tip from the Ran Art Blog: draw two equal perpendicular lines that cross at the center and use their tips as a guide for the curve. This outline is the whole shape of your ball.
Step 2: Pick your light source
Decide where the light is coming from, like the top-left or the upper-right. Put a tiny dot or a small "sun" in the corner to remind yourself. This one decision controls everything: the side near the light stays bright, and the side away from it gets dark. The teacher Shelly at Welcome To Nana's even has students draw a small sun to remind them of the light source before they shade.
Step 3: Mark the highlight
The highlight is the brightest spot, where the light hits the ball most directly. Lightly circle a small area on the side facing your light source. Leave this spot white, the bare paper. Keeping a clean highlight is one of the biggest secrets to a shiny, round look.
Step 4: Add the core shadow
The core shadow is the darkest band on the ball, and it sits on the side away from the light, but not right at the edge. Shade a curved, crescent-shaped band there, pressing a little harder. Curve it to follow the round shape. This dark band is what convinces the eye the ball is solid.
Step 5: Build the gradual shading
Now connect the bright side to the dark side with a smooth fade. Starting from the highlight, gradually shade darker as you move away from it, so the tone slides from white to light gray to the dark core shadow. Build it up in light layers instead of one heavy press. The smoother the fade, the rounder the ball.
Step 6: Blend it smooth
Gently rub the shaded area with a blending stump, a tissue, or a clean fingertip to soften the pencil marks into one smooth gradient. Shelly suggests you use the side of the pencil lead to shade the edge away from the light, which lays down soft tone that blends easily. If you smudge into the highlight, dab it back out with your eraser.
Step 7: Add the cast shadow
A ball that's resting on a surface casts a shadow. Below the ball, on the side away from the light, draw a flat oval shadow that touches the bottom of the ball and fades as it stretches away. The cast shadow "glues" the ball to the ground so it doesn't look like it's floating.
Step 8: Sharpen and finish
Darken the core shadow a touch more, lift the highlight back to bright white with your eraser, and clean up the outer edge. Step back and you'll see a flat circle has become a round, 3D ball.
What artists recommend (and common mistakes)
The difference between a flat circle and a believable sphere is almost all about light and shadow. Here's what teachers stress:
- Map the light before you shade. Instructor Ran Levi at the Ran Art Blog has you imagine where the lightest part of the sphere is first, then gradually darken around it. Planning the light source keeps your shading consistent instead of patchy.
- Work from your darkest value outward. Artist and educator Marina Fridman of The Drawing Source has you establish the darkest value first, then draw an accurate gradation from the highlight to the half-tone, and from the half-tone to the core shadow. Setting that darkest tone gives you a value to measure everything else against, so the fade stays smooth.
- The most common mistake is flat, even shading. Beginners often just "color in" one dark side and stop. The Ran Art Blog points out that a real sphere has several pieces of value to look for: light and shadow areas, ambient occlusion, the core shadow, and the cast shadow. Skip the gradual fade and the highlight, and the ball stays flat.
Fun variations to try
- A baseball: Shade your sphere, then add two curved red stitch lines that hug the round form.
- A beach ball: Divide the circle into colorful curved panels, then shade lightly over the colors so it still looks round.
- A soccer ball: Add the classic black-and-white pentagon and hexagon panels, curving them to wrap the sphere.
- A bowling ball: Keep it dark and glossy with a big, sharp highlight and three little finger holes.
- A planet: Shade a sphere, then add rings, craters, or swirls for a space ball.
Frequently asked questions
How do you make a ball look 3D? Shade it. Pick one light direction, leave a small white highlight on the light side, add a dark curved core shadow on the far side, and blend a smooth fade between them. Add a cast shadow underneath. That light-to-dark gradient is what tricks the eye into seeing a round sphere.
How do you draw a simple sphere for beginners? Draw a circle, choose a light source, then shade from light to dark across it: bright highlight on one side, a dark crescent on the other, and a smooth blend in the middle. Even a quick version looks 3D once you add that gradient.
Why does my ball look flat? Usually the shading is too even, or there's no highlight. A flat circle becomes a ball only when one side is clearly bright and the other clearly dark, with a gradual change between them and a small white highlight left untouched.
Keep drawing and coloring
Now that you can shade a sphere, you can make almost anything look round. Put your new skill to work on a how to draw a basketball or a how to draw a volleyball, both of which use the same circle-and-shading method with panel lines on top. Hungry for more practice? Browse our easy things to draw for quick wins, or print our free coloring pages and color a few in. You've got this.