
Learn how to draw a whale the easy way, from a simple body curve to the tail and water spout. A cute, beginner-friendly, step-by-step guide for all ages.
Whales are one of the friendliest animals to draw because they are basically one big, smooth shape with a happy tail on the end. In this guide you'll learn how to draw a whale step by step, starting with a simple body curve and finishing with a fun water spout. It works for an easy whale drawing, a cute whale drawing, or a chunky blue whale drawing, and you don't need any experience to start.
Keep your pencil light at the beginning so you can shape the body and tail before you commit to the final lines. Let's dive in.
What you'll need
- A pencil and an eraser
- Plain paper
- Optional: a black pen for outlining, plus crayons or markers in blue and gray
How to draw a whale step by step
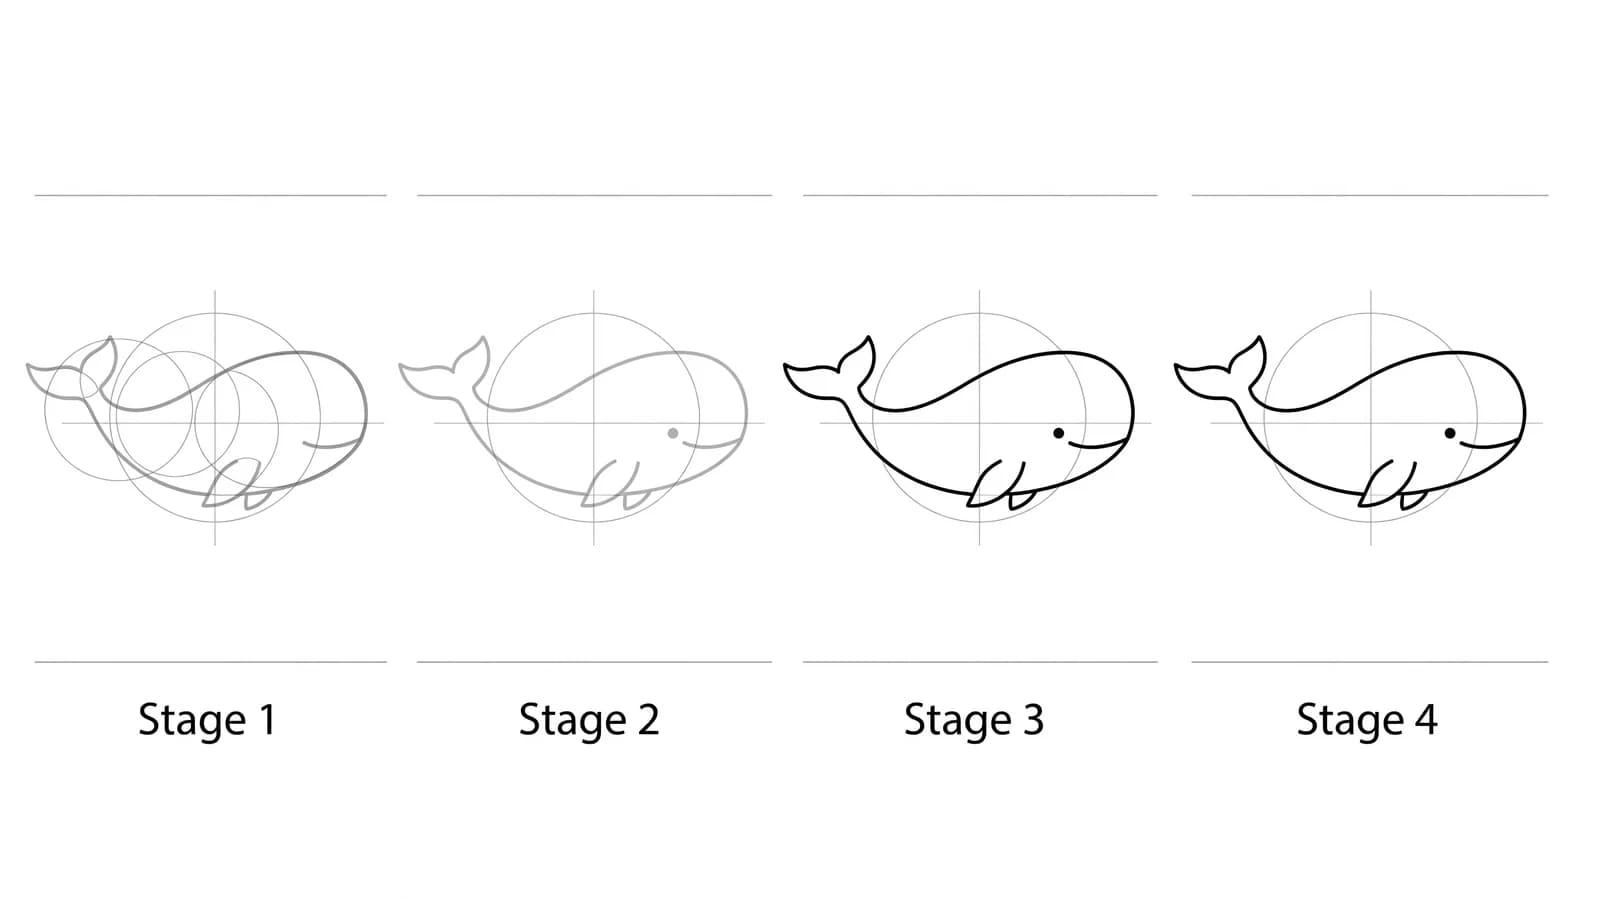
A whale comes together fastest when you build it from big simple shapes first and save the details for the end. In Drawing on the Right Side of the Brain, art educator Betty Edwards teaches drawing as a learnable skill built from simple component steps, so beginners start with overall shapes and proportions before details. The whale lesson at Art Projects for Kids follows that order too, starting with a top curve and a bottom curve before any details. We'll do exactly that.
Step 1: Draw the big body shape
Start with one large, rounded shape that looks like a fat jelly bean lying on its side. Make the left end wider for the head and let it taper a little toward the right where the tail will go. This single curve is the whole body, so take your time and keep the line smooth and light.
Step 2: Add the tail
At the narrow right end, draw the tail. A whale tail is two soft triangles, called flukes, that meet in a small dip in the middle. Point them up and out like a wide letter V. Keep the flukes about the same size on each side so the tail looks balanced.
Step 3: Shape the mouth and jaw
Near the wide left end, draw a long curved line for the mouth. Let it sweep gently upward at the corner so your whale looks like it is smiling. Add a slightly curved line underneath to separate the lower jaw from the body. This curve gives the head a friendly, rounded chin.
Step 4: Add the fin and eye
Draw one small flipper (the side fin) low on the body, just behind the mouth. It looks like a little rounded paddle. Then add a dot or a small circle for the eye, set above the front corner of the mouth. One eye is plenty since we are seeing the whale from the side.
Step 5: Draw the spout
On top of the head, draw the blowhole as a tiny oval. Then draw the water spout shooting up from it. The naturalist illustrator John Muir Laws teaches drawing whales by breaking them into simple forms and watching "the series of shapes you see as a whale spouts." Draw a few curved lines that fan out at the top, like a little fountain, then add small water drops around it.
Step 6: Add the belly and details
Draw a curved line along the lower part of the body to separate the pale belly from the back. On a blue whale you can also add a few long grooves running from the chin down the throat, which are called pleats. Keep these light so they sit gently on the body.
Step 7: Outline and color
Trace the lines you want to keep with a firmer stroke or a black pen, then gently erase any leftover guide marks. Color the back blue or blue-gray, leave the belly pale, and add a soft blue puddle of water spraying from the spout. Your whale is ready to swim.
What artists recommend (and common mistakes)
The biggest mistake beginners make is rushing. In a children's whale drawing tutorial, the instructor builds the whale from simple shapes and then rubs out any unnecessary lines so only the clean final outline remains. Pencil first, ink after, so every mistake is fixable.
A few more tips to keep your whale looking right:
- Start light, press later. Sketch the body and tail softly. Only darken your lines once the proportions look good.
- Keep the body one smooth shape. A whale's back should flow in a single gentle curve, with no bumpy or jagged edges.
- Balance the tail. Make both flukes a similar size so the tail does not tip to one side.
- Don't overcrowd the details. A few pleats, one eye, and one fin are enough. Too many lines make a whale look busy instead of smooth.
Fun variations to try
- A cute baby whale: Make the body extra round and short, with a big eye and a tiny spout for an adorable look.
- A blue whale: Stretch the body long and slim, add throat pleats, and color it deep blue-gray. The blue whale is the biggest animal on Earth.
- A humpback whale: Give it longer flippers and a bumpy chin for a more realistic feel.
- A whale scene: Add gentle ocean waves, a few bubbles, and a sunny sky so your whale has a home to swim in.
Frequently asked questions
How do you draw a whale easy? Draw one big rounded body shape, add a V-shaped tail at the narrow end, then give it a smiling mouth, one eye, a small fin, and a water spout on top. Start with light pencil lines so you can fix the shape before you outline and color.
How do you draw a blue whale? Make the body long and slim instead of round, then add long grooves (pleats) under the chin and a small fin and tail. Color it deep blue-gray with a pale belly. The shape is the same as an easy whale, just stretched longer.
What shape is a whale's body? A whale's body is one big, smooth, rounded shape, wider at the head and tapering toward the tail. Thinking of it as a single fat jelly-bean curve keeps your drawing simple and clean.
Keep drawing and coloring
Whales are a calming, beginner-friendly start to a whole zoo of animals. Try how to draw a mouse next for a tiny critter, or how to draw a bat for a fun winged animal. For more inspiration, browse our easy animal drawing ideas, then print free animal coloring pages to color your whole crew.