Learn how to draw a mouse the easy way, from a round head and body to big ears and a curly tail. A cute, beginner-friendly, step-by-step guide for all ages.
A mouse is a perfect first animal to draw because it is made of soft round shapes and just a few small details. In this guide you'll learn how to draw a mouse step by step, from a rounded head and body to those big ears, tiny feet, and a long curly tail. Whether you want an easy mouse drawing or an extra cute mouse drawing, the shapes stay simple and friendly the whole way through.
Keep your lines light at the start so you can place the ears and tail before you commit. Let's get started.
What you'll need
- A pencil and an eraser
- Plain paper
- Optional: a black pen for outlining, plus crayons or markers in gray, brown, or pink
How to draw a mouse step by step
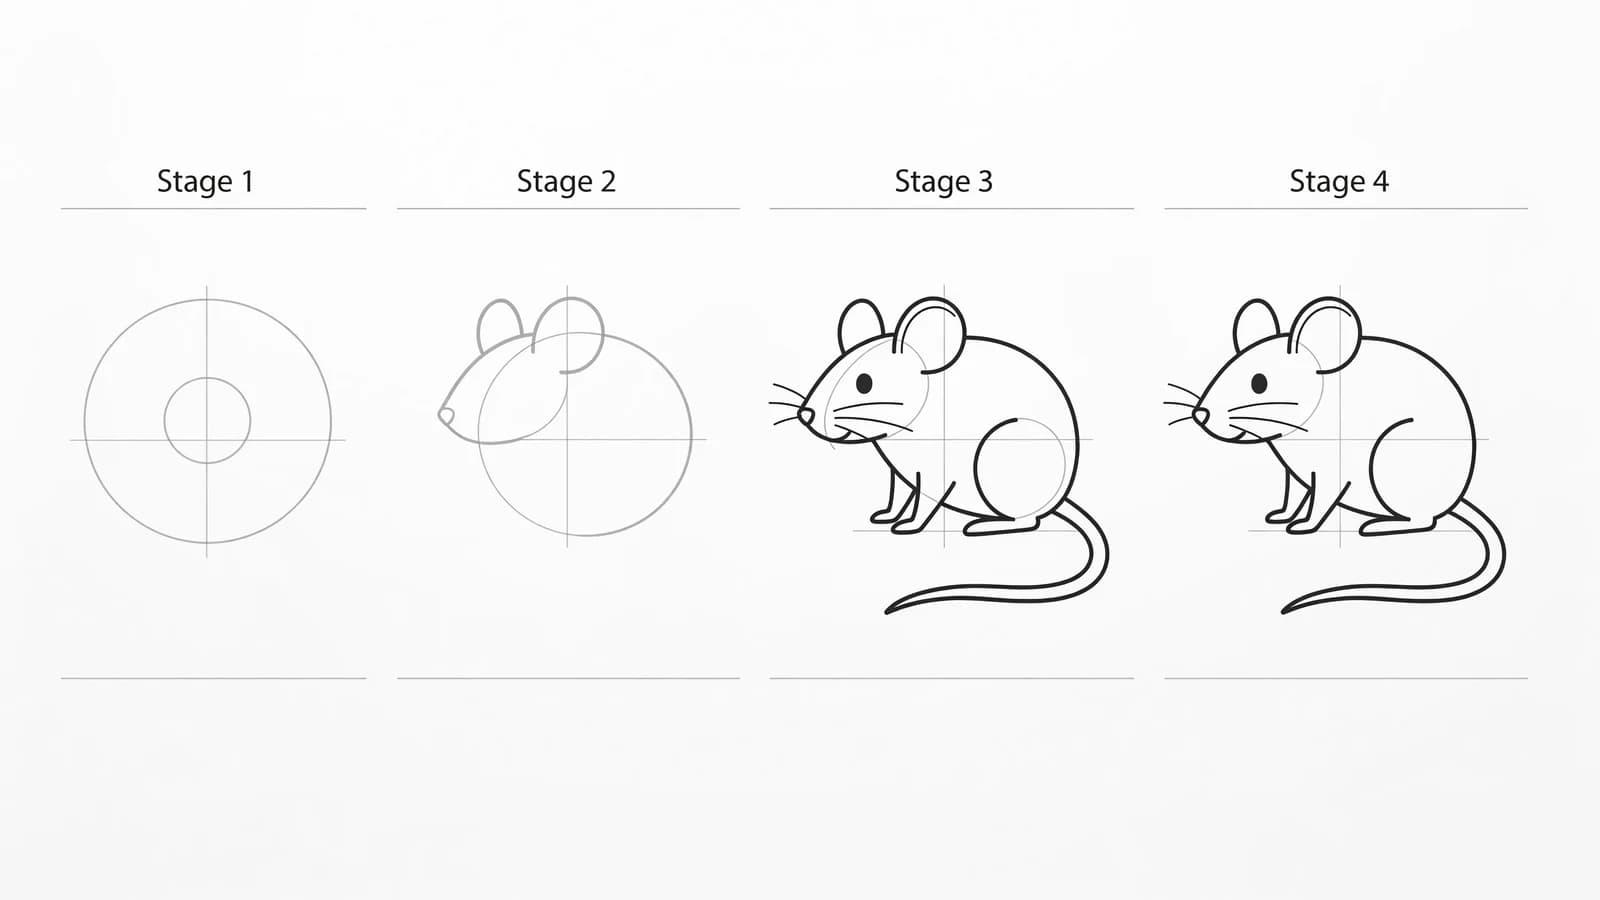
The trick to a good mouse is building it from simple construction shapes first, then adding ears, eyes, whiskers, feet, and tail afterward. The lesson at Art Projects for Kids follows this exact order, starting with "Draw the head shape" and "Add the body below." We'll do the same.
Step 1: Draw the head
Start with the head near the top of your page. For a natural mouse, sketch the head as a cone-like form with a rounded back, almost like an egg lying on its side with a slightly pointed nose. The narrated tutorial at YouTube suggests this same cone-with-a-rounded-back shape. Keep the pointed end facing the direction your mouse will look.
Step 2: Add the body
Below and behind the head, draw the body almost like a circle, a little bigger than the head. Let it overlap the head slightly so the two shapes join into one rounded critter. A mouse has a soft, chubby body, so keep the line smooth and full.
Step 3: Place the ears
A mouse's ears are its signature feature. Draw two big rounded circles on top of the head, like two coins standing up. Make them large and friendly, because oversized ears are what make a mouse look cute. Add a smaller curved line inside each ear for the inner ear.
Step 4: Mark the face guidelines
Lightly mark where the eye and nose will go. The same narrated tutorial recommends placing small guideline marks for the eye and leg positions first, then "erase the guidelines that we don't need anymore" once the details are in. A tiny dot for the eye and a small mark at the tip of the nose are all you need now.
Step 5: Draw the face
Add one round eye on the side of the head. At the pointed tip of the nose, draw a small oval and color it dark for the nose. Then draw three or four light whiskers sweeping out from each side of the nose. A small curved mouth under the nose finishes a happy face.
Step 6: Add the feet and tail
Draw two small front paws tucked under the chin and two slightly bigger back feet at the bottom of the body. Keep them simple and rounded. Then draw the tail: one long, thin line that curves out from the back of the body and curls at the end like a piece of ribbon.
Step 7: Outline and color
Trace the lines you want to keep with a firmer stroke or a black pen, then gently erase your guidelines. Color your mouse gray or brown, with pink inside the ears and a pink tail and nose. Add a tiny piece of cheese beside it if you want a fun finishing touch.
What artists recommend (and common mistakes)
The most common beginner mistake is making the mouse's features too rigid or working on the outline too early. The narrated tutorial at YouTube builds the form from loose shape guides first, then refines the outline, which keeps the final drawing from looking stiff. Start soft, refine later.
A few more tips for a friendly mouse:
- Go big on the ears. Small ears make a mouse look plain. Large, rounded ears read as "mouse" instantly and make it cuter.
- Keep one continuous body curve. Let the head and body flow together so your mouse looks soft, not boxy.
- Curl the tail. A long tail with a gentle curl at the end adds personality and balances the round body.
- Erase your guides. Once the details are placed, clean up the construction lines so your final drawing looks crisp.
Fun variations to try
- A super cute mouse: Make the head and eyes extra big, shrink the body, and add rosy cheeks for a chibi-style critter.
- A mouse with cheese: Draw a wedge of cheese with a few holes and have your mouse nibbling a corner.
- A field mouse: Add a few blades of grass and a seed or berry in its paws for a nature scene.
- A sleeping mouse: Curl the body into a ball, tuck the tail around it, and close the eye with a simple curved line.
Frequently asked questions
How do you draw a mouse easy? Start with a cone-shaped head and a round body, then add two big circle ears, one eye, a small nose, whiskers, little feet, and a long curly tail. Build the shapes lightly first, then outline and color. The big ears and curly tail do most of the work.
How do you draw a cute mouse? Make the head and eyes larger than normal, keep the body small and round, and add rosy cheeks and oversized ears. Bigger features and rounder shapes always read as cuter, so lean into soft curves.
What shapes make up a mouse? A mouse is built from a cone-like head, an almost-circular body, two round ears, and a long thin tail. Starting with these simple shapes keeps the drawing easy and balanced.
Keep drawing and coloring
Once you've got the mouse down, try how to draw a bat for another small animal with big ears, or how to draw a whale for a giant change of pace. For more ideas, browse our cute drawing ideas, then print free animal coloring pages to color a whole critter collection.