
Learn how to draw a vehicle the easy way with one simple box method that works for a car, a truck, and a bus. A friendly, step-by-step guide for beginners.
A vehicle can look hard to draw, but almost every car, truck, and bus starts the same way: a simple box on two round wheels. In this guide you'll learn how to draw a vehicle step by step using one easy box method, then stretch and reshape that box into three different vehicles. No experience needed, and the side view keeps everything friendly for beginners.
Keep your lines light to start so you can adjust the shape, then darken your favorites. Let's roll.
What you'll need
- A pencil and an eraser
- Plain paper
- Optional: a ruler for straight lines, a black pen, plus crayons or markers
How to draw a vehicle step by step
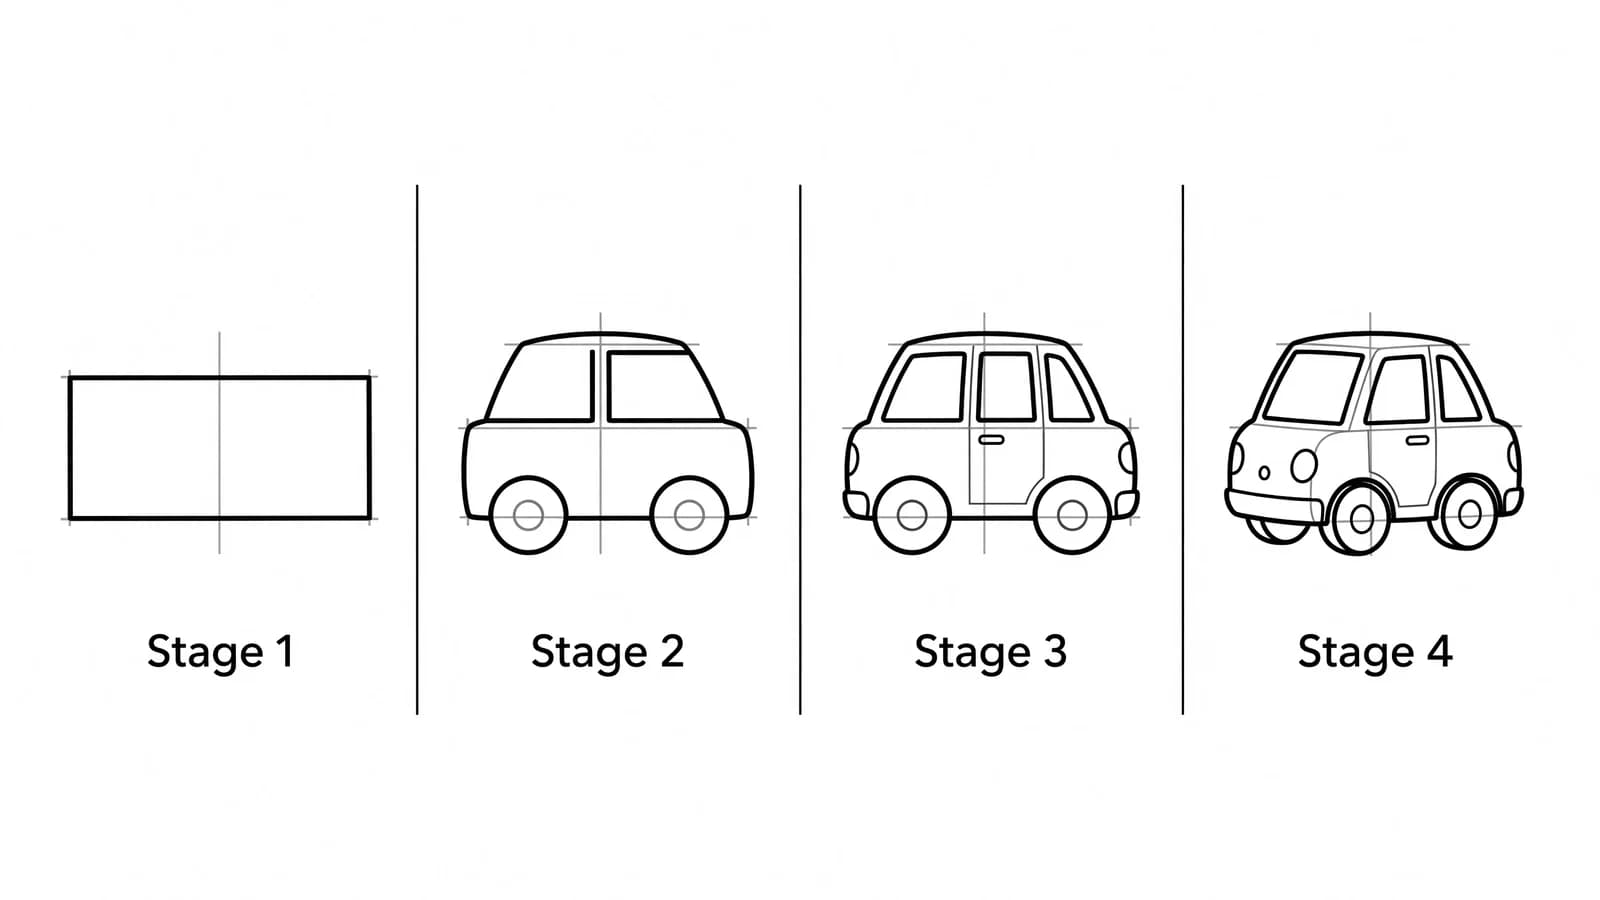
Step 1: Block in a box
Lightly draw a long rectangle for the main body. Beginner car tutorials suggest you imagine the vehicle inside a box and draw that box first, then build the real shape inside it (How to Draw a Realistic Car). For a car make the box low and long, for a truck add a tall front, and for a bus make it long and tall like a loaf of bread. Press lightly so you can erase the guide later.
Step 2: Shape the body
Round the corners of your box and add the parts that make your vehicle special. A car gets a curved roof set back a little. A truck gets a boxy cab in front and a flat bed or trailer behind. A bus stays one long tall box with rounded corners. Art teacher Kathy Barbro builds vehicles from these basic shapes in order, starting with the cab and front end before the wheels and details, which keeps the whole thing well proportioned (Art Projects for Kids). Keep your construction lines soft so you can still nudge the shape.
Step 3: Add the wheels
Draw two circles along the bottom, one near the front and one near the back, with a little of each wheel poking below the body. A big truck or bus can have extra wheels. Add a smaller circle inside each wheel for the hubcap. Wheels that sit on the same level keep your vehicle from looking tipped over.
Step 4: Add the windows
Draw the windshield at the front and the side windows along the body. A car has a few windows under its curved roof. A bus has a long row of evenly spaced windows. A truck has a tall windshield and a side window in the cab. Leave a thin frame around each window so they read clearly.
Step 5: Add the details
Now add the smaller parts: doors with handles, headlights, taillights, a bumper, and side mirrors. A school bus gets a stop sign and a flashing light. A truck gets big side mirrors and maybe a smokestack. Adding these details only after the main shape is set keeps everything in proportion (How to Draw a Realistic Car).
Step 6: Outline and erase guide lines
Trace the lines you want to keep with a firmer stroke or a black pen, then erase your box and any leftover guide marks (How to Draw a Realistic Car). Clean up where the wheels meet the body, and add a short ground line under the wheels so the vehicle sits flat on the road.
Step 7: Color your vehicle
Pick any color you like: red for a car, yellow for a school bus, green or blue for a truck. Color the windows light blue, the tires black with gray hubcaps, and the lights yellow and red. Add stripes, numbers, or a logo to make each vehicle its own.
What artists recommend (and common mistakes)
- Start with a box. Blocking the vehicle in as a simple box first helps you keep the proportions right before you add any curves (How to Draw a Realistic Car).
- Use light guide lines, then erase. Soft construction lines are easy to fix and clean up once the main shape is set (How to Draw a Realistic Car).
- Don't add details too early. A common beginner mistake is drawing windows, lights, and badges before the body shape is right. Get the box and wheels first, then the small parts (How to Draw a Realistic Car).
- Keep the wheels level. Both wheels should rest on the same line so the vehicle looks like it is standing on the road, not leaning.
- Build shapes in order. Working from the big body shapes down to the small parts, the way step-by-step lessons sequence a vehicle, helps the whole drawing stay well proportioned and fill the page (Art Projects for Kids).
Fun variations to try
- A race car: Stretch the box low and long, add a rear spoiler, and paint on a big number.
- A dump truck: Add a tall tilting bed at the back and chunky wheels.
- A double-decker bus: Make the box extra tall and draw two rows of windows.
- A camper van: Make a tall boxy body with a little window, a door, and a roof rack.
Frequently asked questions
How do you draw a vehicle for beginners? Start with a simple box for the body, then add a curved or boxy top, two wheels, and windows. Finish with doors, lights, and a bumper. The box method works for almost any vehicle.
How do you draw a car, truck, and bus the same way? Use one box as your base. Make it low and long for a car, add a tall cab and bed for a truck, and stretch it long and tall for a bus. Same wheels, windows, and details, just different proportions.
How do you draw an easy vehicle step by step? Build it in layers: box, body shape, wheels, windows, then small details. Drawing the big shapes first and the little parts last keeps everything in proportion.
Keep drawing and coloring
Ready for more? Zoom into how to draw a car for a single vehicle, or take to the sky with how to draw an airplane. Browse a list of cool things to draw for your next idea, then print free coloring pages to color cars, trucks, buses, and more.