Learn how to draw an airplane the easy way, from a simple tube body to wings, a tail, and windows. A friendly, step-by-step plane drawing for beginners.
An airplane looks like it is full of tricky angles, but a simple plane is really just a long tube with two wings, a tail, and a row of little windows. In this guide you'll learn how to draw an airplane step by step from the side, which is the friendliest angle for beginners. No experience needed, and you can turn it into a passenger jet, a paper-plane shape, or a tiny prop plane at the end.
Keep your lines light to start so you can nudge the shape around, then darken the lines you love. Let's take off.
What you'll need
- A pencil and an eraser
- Plain paper
- Optional: a ruler for straight lines, a black pen, plus crayons or markers
How to draw an airplane step by step
Step 1: Draw a light guideline
Draw one long, gentle horizontal line across your paper. This center guide helps you keep the body straight and place the wings and windows evenly later. Art teacher Kathy Barbro breaks her plane lesson into simple steps that build from basic shapes so beginners can line everything up (Art Projects for Kids). Press lightly so you can erase this line at the end.
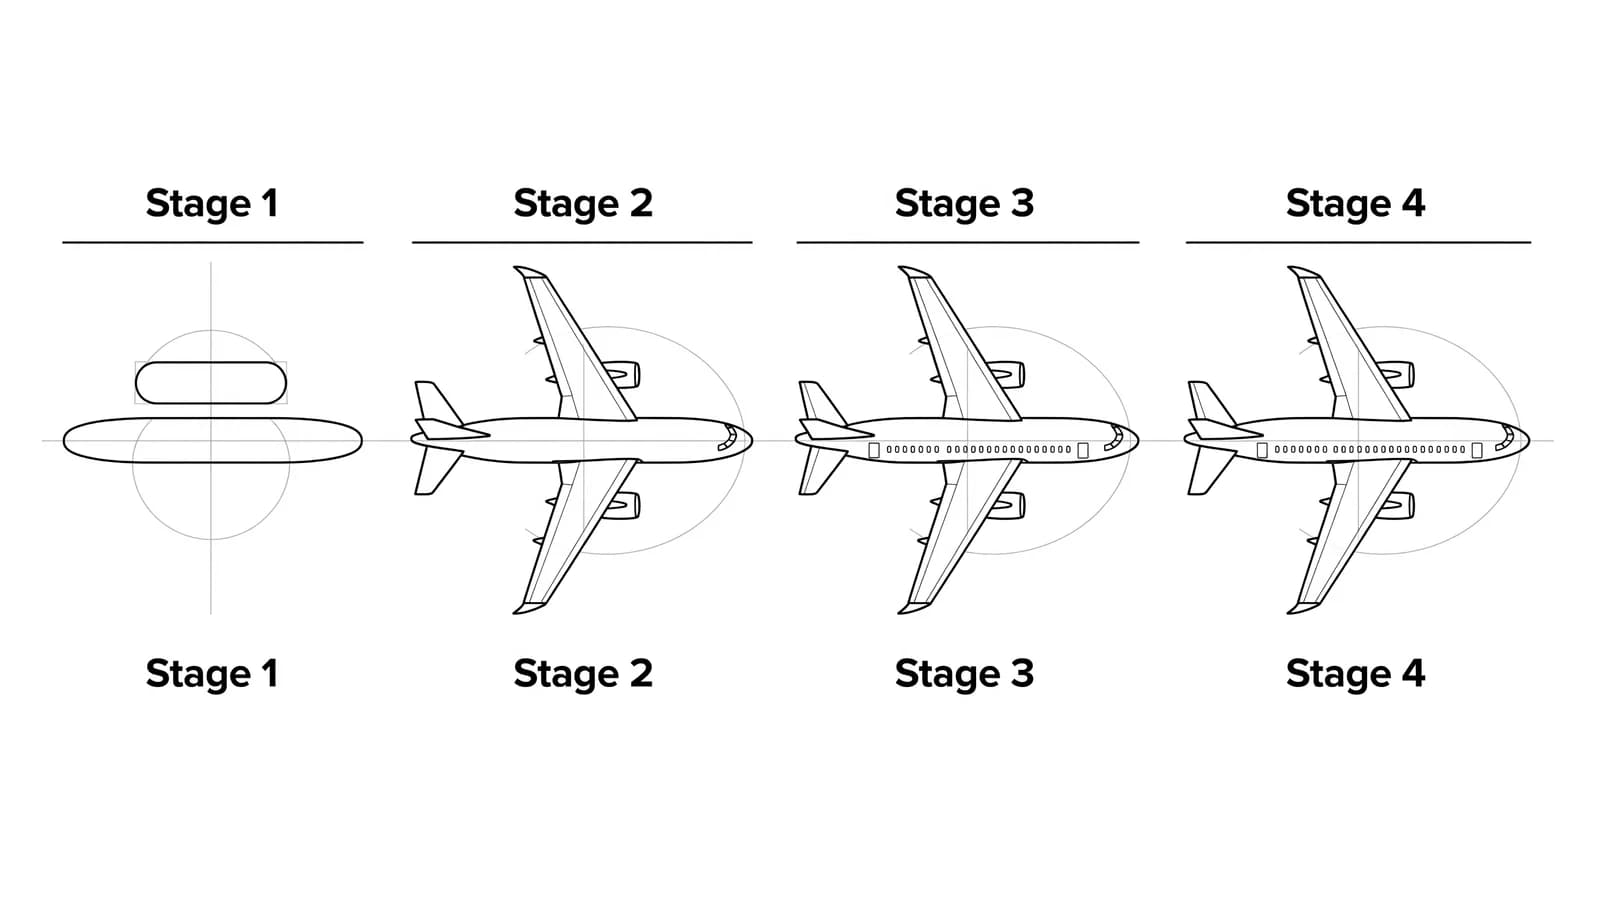
Step 2: Block in the body
Along your guideline, draw a long stretched oval or rounded tube for the fuselage, which is the body of the plane. Make it much wider than it is tall, like a giant hot dog. Beginner guides suggest blocking the body in as a simple shape first, then adding the nose and tail curves later, which keeps your proportions steady (Infinite Flight Community). A ruler can help if you want crisp edges.
Step 3: Shape the nose and tail
Round off the front into a smooth nose, then pinch the back end so the body narrows toward the tail. The nose is fatter and the tail is slimmer. This gentle tapering is what turns a plain tube into something that looks like it can fly.
Step 4: Add the wings
Draw one wing reaching out and down from the middle of the body, like a long flat triangle. Add the far wing at the same angle on the other side, and connect each wing to the body with a soft curve so the plane looks round and not flat. Matching the wing angles and using a curved join keeps the plane from looking flat. Evenly placed wings keep your jet balanced.
Step 5: Add the tail
At the back, add the tail fin standing up like a small shark fin, plus two little wings sticking out near the bottom of the tail. These small back wings are called stabilizers, and they help the plane look complete from the side.
Step 6: Draw the windows and door
Along the top half of the body, draw a long row of small round or oval windows, evenly spaced. Add a bigger window for the cockpit near the nose, and a thin door line near the front. Keeping the windows the same size and spacing makes the plane look neat.
Step 7: Outline and erase guide lines
Trace the lines you want to keep with a firmer stroke or a black pen, then erase your center guideline and any stray marks. Working light first and darkening later gives you a clean final outline (Art Projects for Kids). Clean up where the wings meet the body so they look attached.
Step 8: Color your airplane
Color the body white, silver, or a bright shade, and give it a colored stripe down the side. Make the windows light blue, the tail a bold color, and add little clouds or a sun behind it. Two short curved lines near the engines can read as a tiny vapor trail.
What artists recommend (and common mistakes)
- Block the body first, details last. A common beginner mistake is starting with the windows or wings. Get the long tube and the nose and tail curves right, then everything else fits onto it (Infinite Flight Community).
- Match your wing angles. If one wing tilts a different way than the other, the plane looks flat or broken. Keep both wings at the same angle and join them with a curve.
- Use a reference if you want a real jet. Looking at a photo of a plane while you draw helps you place the windows, wings, and engines in believable spots, even if you change the design (Infinite Flight Community).
- Draw lightly, darken last. Soft guide lines are easy to erase, so save your firm strokes for the shapes you are sure about.
Fun variations to try
- A passenger jet: Make the body long, add lots of windows, and put two engines under the wings.
- A little prop plane: Make the body short and round, add a propeller circle on the nose, and a single small wing.
- A paper-plane shape: Build it from sharp triangles for a folded, origami look.
- A jet at full speed: Tilt the whole plane upward and add long vapor trails streaming behind it.
Frequently asked questions
How do you draw an airplane for beginners? Start with a long tube for the body, round the nose, and pinch the tail. Then add two matching wings, a tail fin, and a row of windows. The side view is the easiest angle to begin with.
How do you draw a simple plane step by step? Build it in layers: light guideline, body tube, nose and tail, wings, tail fin, then windows and details. Drawing the big shapes first and the small parts last keeps the proportions right.
How do you draw a jet? Use the same side-view method, but make the body sleek and pointed, sweep the wings backward, and add two engines. The sharp nose and swept-back wings are what say "fast jet."
Keep drawing and coloring
Ready for more? Try how to draw a car for a side-view vehicle, or roll into how to draw a vehicle to draw a few at once. Browse a big list of cool things to draw for your next idea, then print free coloring pages to color planes, cars, and more.