Learn how to draw a tiger the easy way, from a circle and guide lines to bold stripes and a fierce face. A beginner step-by-step guide, no experience needed.
A tiger looks tricky with all those stripes, but underneath them it is just a big round cat. In this guide you will learn how to draw a tiger step by step, starting with a light circle and a cross of guide lines, then adding the eyes, muzzle, and the bold stripes that make a tiger a tiger. This works for an easy tiger drawing or a close-up tiger face drawing, and you need no experience at all.
We will draw a front-facing tiger head because the face is where all the personality lives. Keep your lines light at first so you can fix the shapes, then darken your favorites at the end. Let's begin.
What you'll need
- A pencil and an eraser
- Plain paper
- Optional: a black pen for outlining, plus orange, black, and white crayons or markers
How to draw a tiger step by step
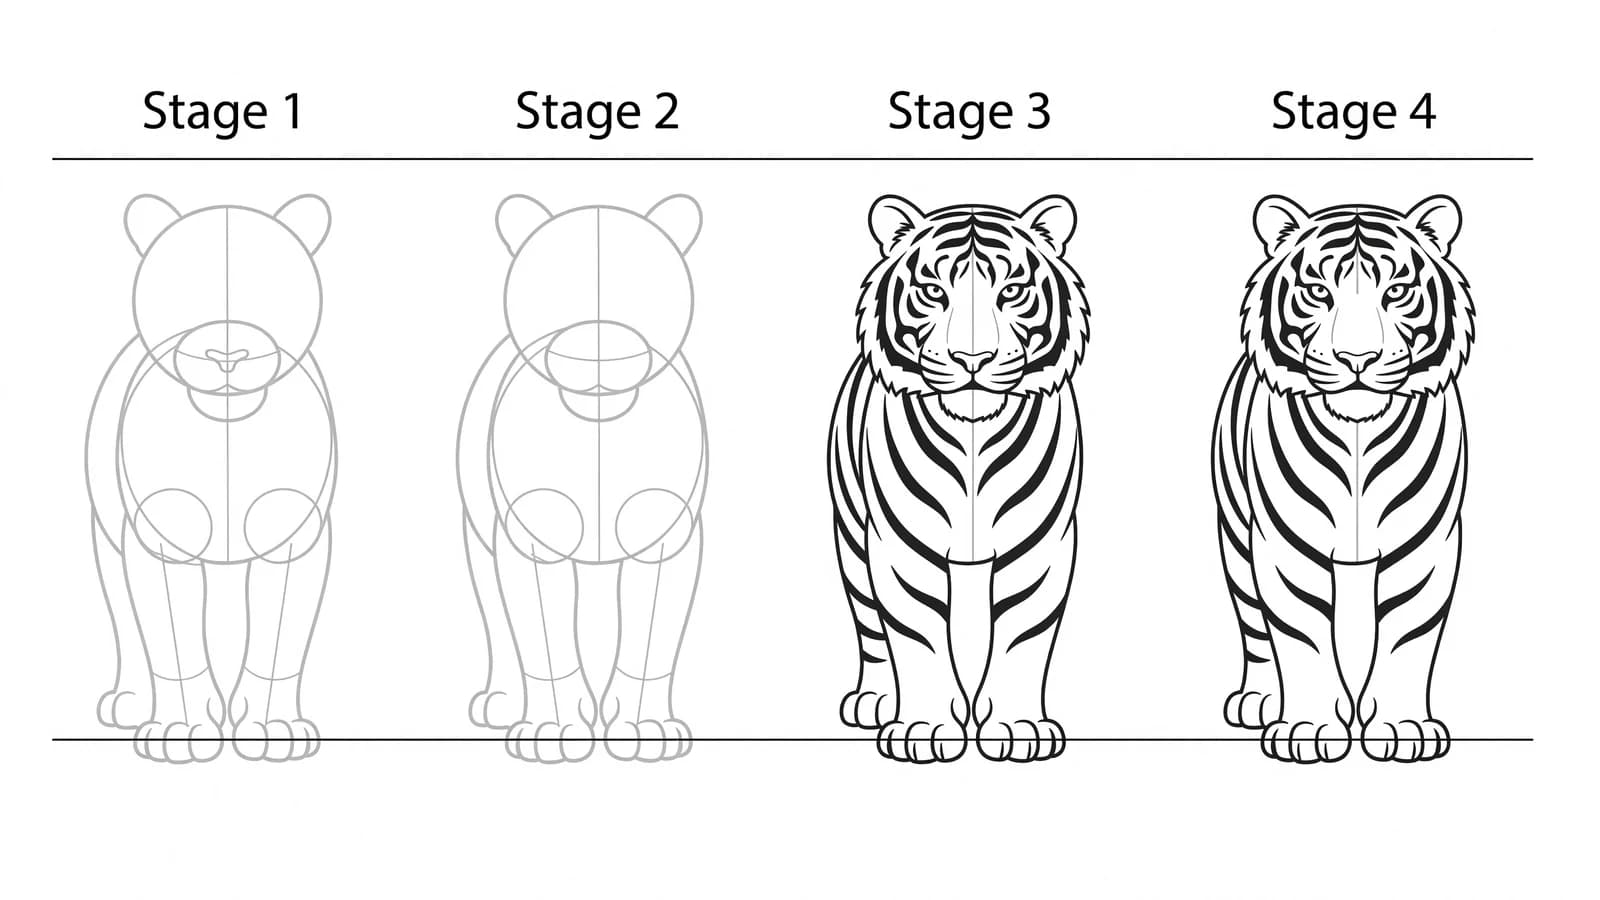
Step 1: Draw the head circle and guide lines
Draw a light circle for the head. Add a vertical line down the center and a horizontal line across the middle. These guides help with the balance and symmetry of your drawing, which is exactly how step-by-step tiger lessons begin, such as this Circle Line Art School tutorial and this Cartooning Club sketch lesson. Keep everything light so the guides erase easily later.
Step 2: Shape the cheeks and chin
A tiger's face is wider than a circle at the bottom. Add two soft, fluffy cheeks that puff out below the middle of the circle, then a rounded chin between them. This gives your tiger that strong, broad face. Little points of fur along the cheeks add to the look.
Step 3: Add the muzzle and nose
In the lower middle of the face, draw a wide upside-down triangle or a soft "M" shape for the muzzle, sitting on your center line. Put a rounded nose at the top of it. The muzzle sits right where your guide lines cross, which is why the cross is so useful.
Step 4: Draw the eyes and brows
Place two eyes on the horizontal guide line, one on each side of the center line. Add small angled brows above them. Tilting the brows down toward the nose gives your tiger a fierce, focused stare. For a friendlier tiger, keep the eyes round and the brows soft.
Step 5: Add the ears and mouth
Draw two rounded ears near the top of the head, with smaller curves inside them. From the bottom of the nose, draw a short line down, then two curves out for the mouth, like the dog and lion smiles. A couple of whisker dots on the muzzle finish the face.
Step 6: Draw the stripes
Now for the stripes. Add bold dark marks across the forehead, cheeks, and around the muzzle. The key is to let the stripes follow the natural direction of the fur as it grows over the form, curving with the round shape of the face rather than sitting flat, the way artist Gordon Mackenzie teaches in his tiger art lesson. Make them thicker in the middle and pointed at the ends.
Step 7: Outline and erase guide lines
Trace the lines you want to keep with a firmer stroke or a black pen, then erase the center and horizontal guides and any stray marks. Check that the stripes still curve with the face after you clean up.
Step 8: Color your tiger
Color the face bright orange, leave the muzzle, chin, and the area around the eyes white, and fill the stripes solid black. Build the orange up in light layers rather than pressing hard all at once, so the fur stays soft and even.
What artists recommend (and common mistakes)
- Start with the circle and guide lines. Beginners often draw the whole tiger outline first and end up with a lopsided face. The light circle and center cross keep both eyes level and the nose centered (Circle Line Art School).
- Let stripes follow the fur. A common mistake is drawing stripes as flat, straight bars. Real stripes curve over the round form of the face and body, following the direction the fur grows (Gordon Mackenzie).
- Sketch light, commit late. Use the center line for symmetry, then only darken your lines once the proportions look right (Cartooning Club).
- Leave the white. The white muzzle and the patches above the eyes are what make it read as a tiger, so plan to leave that paper uncolored.
Fun variations to try
- A cute tiger cub: Make the head extra round, the eyes huge, and the stripes few and soft.
- A roaring tiger: Open the mouth, show the fangs, and tilt the brows down hard.
- A white tiger: Color the face white with black stripes and pale blue eyes.
- A full-body tiger: Add a long body and tail from the side, carrying the stripes all the way down the back.
Frequently asked questions
How do you draw a tiger for beginners? Start with a circle for the head and a light cross of guide lines, then add cheeks, a muzzle, eyes, ears, and the stripes last. The guide lines keep the face balanced, which is why beginner lessons start with them.
How do you draw a tiger face? Build the face front-on: a circle with a center cross, fluffy cheeks below the middle, a muzzle where the guides meet, eyes on the horizontal line, and bold stripes that curve over the forehead and cheeks.
How do you draw tiger stripes? Draw them as bold marks that are thick in the middle and pointed at the ends, and let them curve with the round shape of the face instead of lying flat. Stripes that follow the fur's direction look far more real.
Keep drawing and coloring
Once your tiger has its stripes, draw the rest of the big cats. Try how to draw a lion for a mane, or how to draw a bear for another large, furry animal. For more inspiration, browse our easy animals to draw list, then print our free animal coloring pages to color a whole jungle.