Learn how to draw a hand the easy way, blocking the palm as a shape and fingers as guided segments. A beginner-friendly, step-by-step guide with no experience needed.
Hands feel scary to draw, but they follow a friendly plan. The trick is to stop seeing five wiggly fingers and start seeing one simple shape with a few guided parts. In this guide you'll learn how to draw a hand step by step, blocking the palm as a flat shape first, then building each finger from short segments. This is the easy way in, and it works whether you want a simple hand drawing or a hand drawing reference you can pose again and again.
We'll draw a relaxed, open hand seen from the back, since that's the clearest view to learn on. Keep your lines light so you can fix the guides later. Let's begin.
What you'll need
- A pencil and an eraser
- Plain paper
- Optional: a black pen for outlining, plus markers or colored pencils
- Optional: your own free hand as a reference, resting flat on the table
How to draw a hand step by step
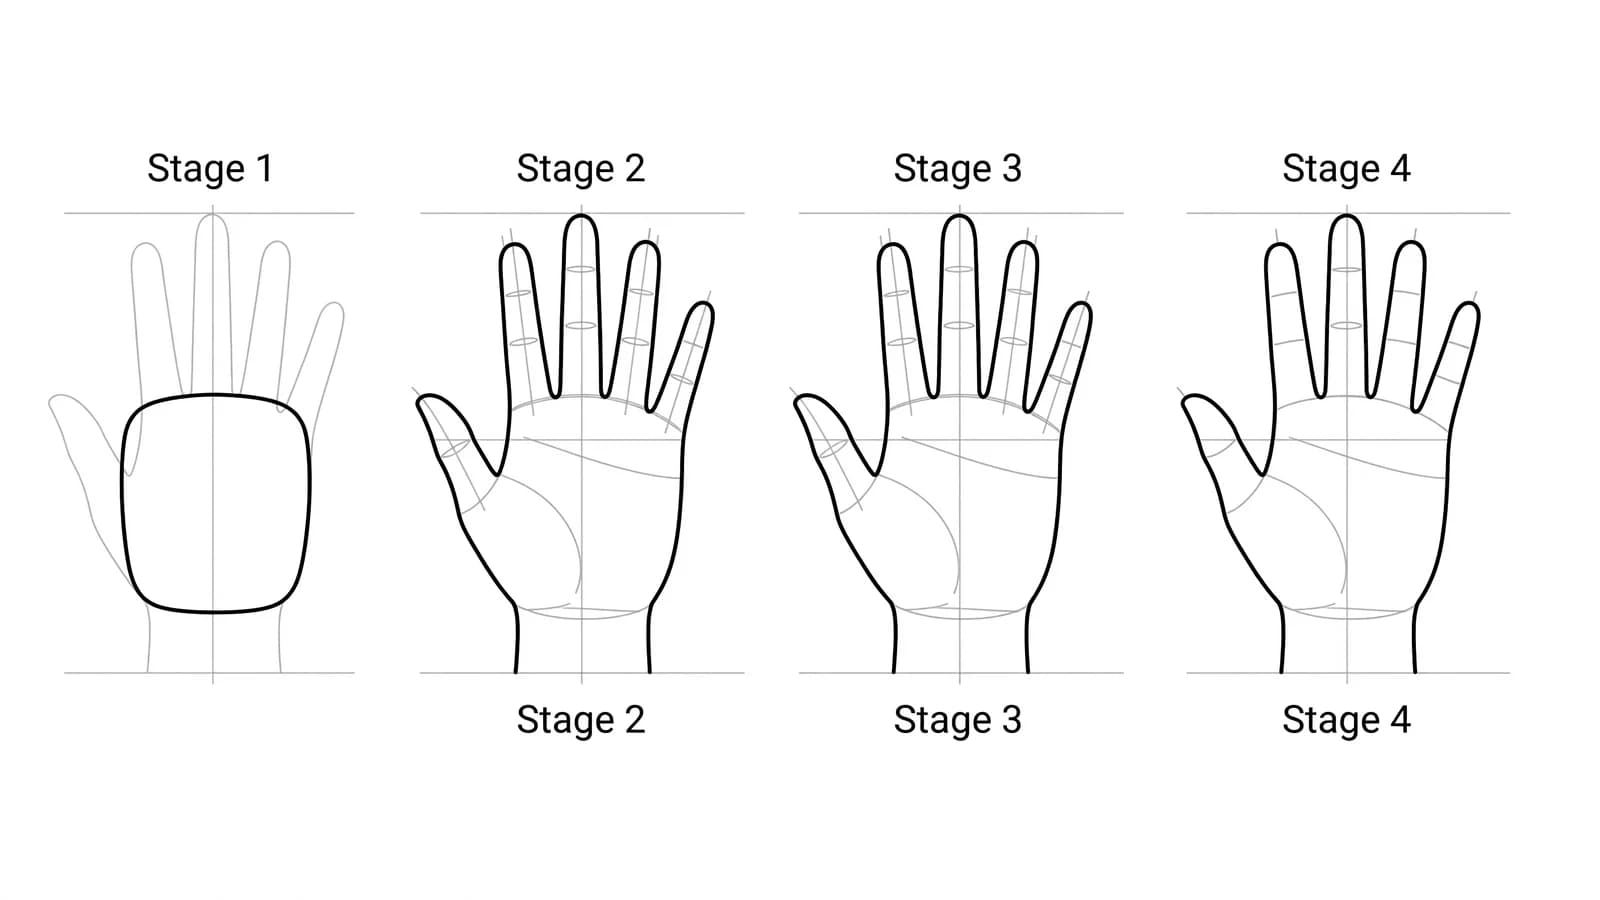
Step 1: Block the palm as a simple shape
Start with the palm, not the fingers. Draw a soft square or rounded rectangle for the back of the hand. Many hand teachers recommend blocking in the palm and fingers with basic forms before adding any details, so this block is your foundation. Keep it light and a little loose, the way The Virtual Instructor suggests, so you can nudge the shape as you go.
Step 2: Mark the wrist and the knuckle arc
Add a short wrist below the palm shape, just a slightly narrower band. Then, across the top of the palm, draw a gentle curved line for the knuckles. The middle finger sits highest, so this line arcs up in the center. According to School Specialty's Drawing Hands 101, the middle finger forms the top of an arc that the other fingers fall away from, which keeps your hand from looking flat across the top.
Step 3: Box in the four fingers
From the knuckle arc, draw four light boxes pointing outward, one for each finger. Here's the handy proportion check: the length of the fingers is roughly equal to the length of the palm. The middle finger is the longest, the index and ring fingers are a touch shorter, and the pinky is shortest. Remember that fingers are more rectangular than round, so keep these as soft boxes, not tubes.
Step 4: Add the thumb shape
The thumb is different. Place it lower on the side of the palm, near the wrist, and angle it away from the fingers. Block it with a short box for the base and a smaller box for the tip. Because the thumb points in its own direction, it gives the hand its natural, relaxed spread.
Step 5: Split each finger into segments
This is the step that makes hands look real. Divide every finger into three short segments with two light crease lines (the thumb gets two segments). Drawing each finger as one straight tube is the most common beginner mistake, and it makes hands look stiff. Build them from segments instead and the fingers can bend and curl naturally.
Step 6: Round off the contour
Now trace around all your boxes and segments with one flowing outline. Round the fingertips, soften the knuckles into small bumps, and let the line dip slightly between each finger. The boxes were only a guide. Your real hand has no straight edges, so smooth them all into gentle curves.
Step 7: Add the small details
Bring the hand to life with a few light marks: a crease line where each finger meets the palm, soft knuckle wrinkles, and a curved nail on the end of each finger and the thumb. Keep these light. A hand needs only a hint of detail to read clearly.
Step 8: Outline, erase, and color
Trace the lines you want to keep with a firmer stroke or a black pen, then erase all the boxes and guide lines underneath. Color the hand with a skin tone you like, leaving a soft highlight along the knuckles and fingertips so the hand looks rounded instead of flat.
What artists recommend (and common mistakes)
- Build from shapes, not details. Teachers like Matt Fussell at The Virtual Instructor start every hand from simple forms, then refine. Skipping the block-in is what makes hands hard.
- Keep the early stages loose. The Virtual Instructor advises keeping your first shapes light so you can adjust them. Press hard too soon and your mistakes get locked in.
- Never draw a finger as one stiff tube. Split it into three segments. This single habit fixes most awkward-looking hands.
- Use the proportion checks. Fingers about as long as the palm, middle finger highest, thumb set low on the side. These quick checks from School Specialty keep your hand believable.
Fun variations to try
- A waving hand: Curl a couple of fingers in and bend the segments so the hand looks like it's mid-wave.
- A holding hand: Wrap the finger segments around a pencil, a cup, or a flower to practice how fingers bend.
- A peace sign: Raise the index and middle fingers and fold the others down to practice contrast between straight and curled fingers.
- The palm view: Flip the hand over and add the palm lines and the soft pad at the base of the thumb.
Frequently asked questions
How do you draw a hand for beginners? Block the palm as a simple square first, add a curved knuckle line, then box in four fingers and a thumb. Split each finger into three segments, round off the outline, and add light creases and nails. Starting from one big shape is far easier than starting from five fingers.
Why do my hands look stiff? Usually because each finger is drawn as one straight tube. Divide every finger into three short segments with light crease lines, and let those segments bend. That alone makes a hand look relaxed and natural.
What is the easiest way to draw a hand? Trace your own hand once to learn the shape, then practice the block-in method: palm shape, knuckle arc, finger boxes, segments, contour. Keeping your real hand nearby as a reference makes every attempt easier.
Keep drawing and coloring
A hand is the perfect warm-up for drawing people. Once it feels steady, try how to draw a lady to put that hand on a full figure, or practice expressions with how to draw anime. Looking for fresh inspiration? Browse our drawing ideas for beginners, then fill a page with our free coloring pages.