Learn how to draw a cat the easy way, from light guide shapes to a cute cartoon kitty. A beginner-friendly, step-by-step guide with no experience needed.
A cat is one of the friendliest first animals to draw, because almost every part of it is a soft, rounded shape. In this guide you'll learn how to draw a cat step by step, starting with a round head and a couple of pointy ears, then building up to a cute sitting kitty you can color. No experience needed, and this same method works whether you want an easy cat drawing or a fluffier, more detailed one.
Keep your pencil lines light at the start so you can move things around. Let's begin.
What you'll need
- A pencil and an eraser
- Plain paper
- Optional: a black pen or marker for outlining, plus crayons or markers to color
How to draw a cat step by step
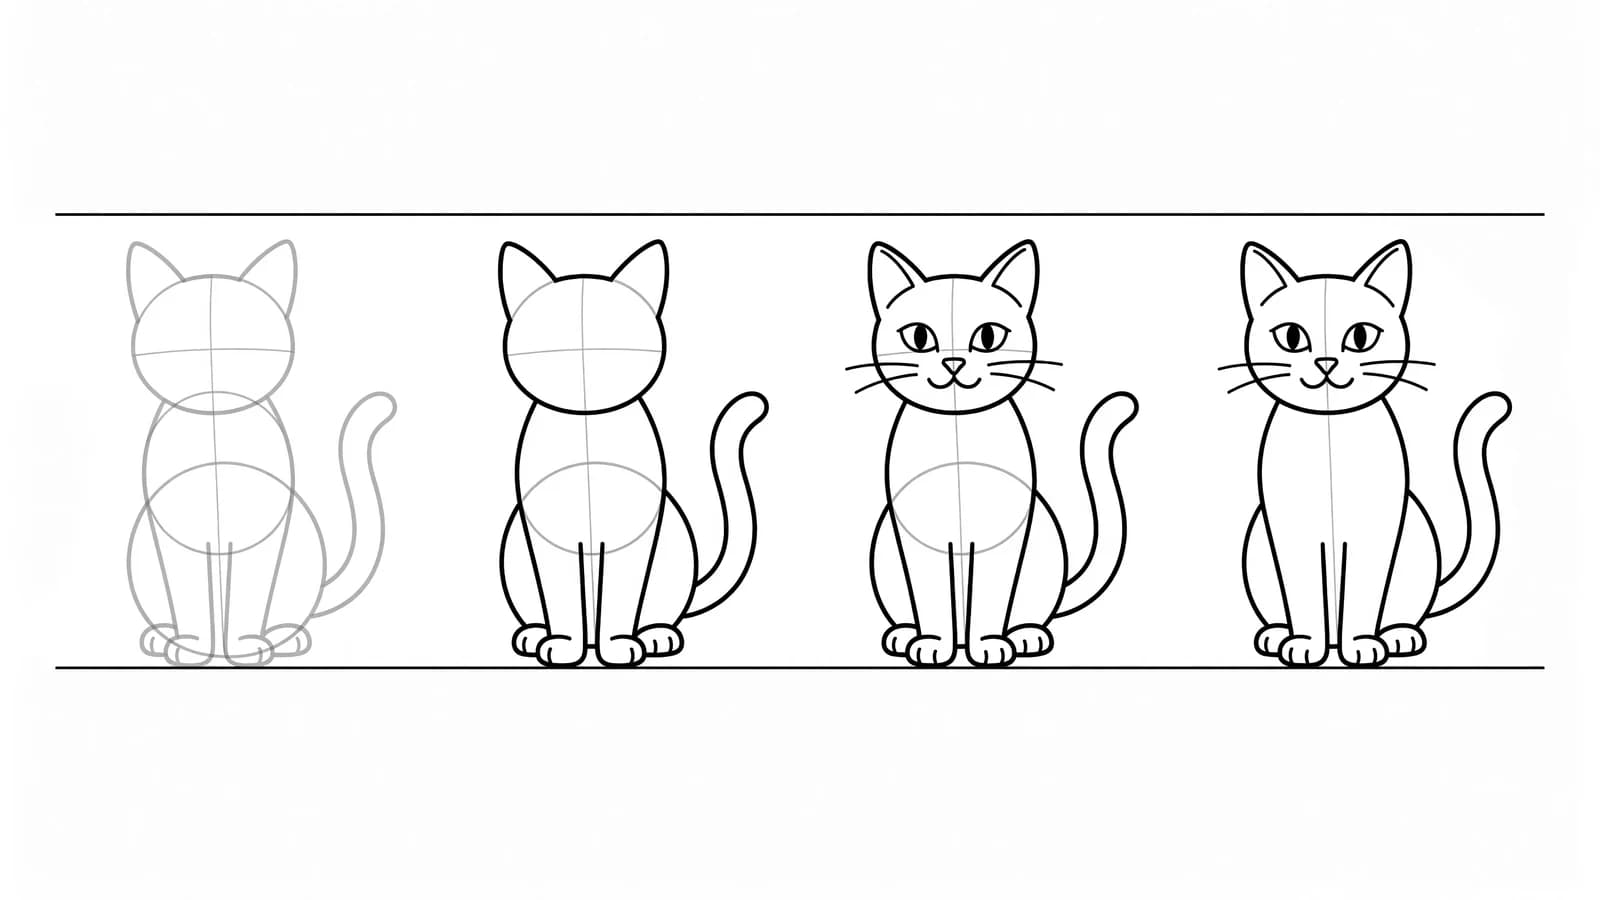
Step 1: Draw a light circle for the head
Start with a simple circle near the top of your page for the cat's head. Press lightly so this is just a guide. Leaving room below the head matters, because that's where the body and tail will go. Planning your space first is a habit good teachers build in early. The folks at Art For Kids Hub place the head high on the page on purpose, so there's room for the rest of the cat underneath.
Step 2: Add the ears
On top of the head circle, draw two triangle ears, one on the left and one on the right. Keep them about the same size and tip them slightly outward. Inside each ear, draw a smaller triangle for the pink inner ear. These simple letter-like shapes are all you need.
Step 3: Place the face
Add two eyes near the middle of the head. Big round eyes make a cute kitten; thin almond eyes make a sleepier cat. Below and between the eyes, draw a small upside-down triangle for the nose, then a curved line down from the nose that splits into a little "W" shape for the mouth. Using easy curves like a "W" or an upside-down "U" to block in features is a beginner-friendly trick taught in the Art For Kids Hub kitten lessons.
Step 4: Draw the whiskers
From each cheek, draw three thin whiskers fanning outward. Keep them light and spaced apart. A few dots where the whiskers start adds a nice touch. Whiskers instantly read as "cat," so don't skip them.
Step 5: Draw the body
Below the head, draw a rounded shape for the body, a little like a fat teardrop or an egg sitting upright. For a sitting cat, let the body widen at the bottom where the cat rests. Connect it smoothly to the bottom of the head so there's no gap.
Step 6: Add the legs and paws
At the front of the body, draw two short front legs coming straight down, with small rounded paws at the bottom. For a sitting pose, the front paws sit close together. Add a soft curve on each side near the base for the back legs tucked underneath.
Step 7: Curl the tail
From one side of the body, draw a long tail that curves around toward the front, like a question mark resting on the ground. A curled tail makes your cat look cozy and complete.
Step 8: Outline and color
Once you're happy with the shape, trace the lines you want to keep with a firmer stroke or a pen, then gently erase your light guide marks. Color your cat orange and white for a tabby, gray for a shorthair, or any fun storybook color. Add stripes or a few patches of spots for extra personality.
What artists recommend (and common mistakes)
- Use your pencil first, not your marker. Light guide shapes let you fix proportions before you commit. The educators at Art For Kids Hub sketch the whole cat in pencil first and only switch to marker for the final lines.
- Build from simple shapes. Their lessons block in the whole cat from easy shapes like circles, triangles, and "U" curves before adding any details. Start big and round, then refine.
- Turn your paper if it helps. A small tip from the Art For Kids Hub kitten lesson: rotating the page so the eyes line up straight across can make them easier to draw evenly.
- Common mistake: jumping straight to the final outline. If you ink every line right away, you can't nudge the ears or eyes when something looks off. Sketch lightly first, then commit only the lines you like.
Fun variations to try
- Sleepy cat: Draw the eyes as two simple curved lines and a tiny smile for a napping kitty.
- Loaf cat: Tuck all the legs under the body so it looks like a soft little bread loaf.
- Standing cat: Stretch the body out sideways and add four legs for a walking pose.
- Fluffy cat: Use short, jagged strokes around the edges of the body and tail to show long fur.
Frequently asked questions
How do you draw a cat easy? Start with a circle for the head and two triangle ears, add eyes, a nose, and whiskers, then draw a rounded body with short legs and a curled tail. Keeping every part a simple shape is what makes it easy.
How do you draw a cute cat? Make the eyes big and round, the head large compared to the body, and the paws small and tucked in. Oversized features and a chubby body read as cute and cuddly.
What shapes make up a cat drawing? A circle for the head, triangles for the ears, a rounded teardrop or egg shape for the body, and simple curves for the legs and tail. Almost the whole cat is built from circles and triangles.
Keep drawing and coloring
Once your cat feels right, try how to draw a dog so you have a pair of pets, then practice a wild cousin with how to draw a lion. For more inspiration browse our cute things to draw list, and when you're ready to color, print our free animal coloring pages.